-
龙迹之城散人玩家攻略
已经不是第一次玩传奇类氪金游戏了,基本上都是前期氪金买的东西, 后期一文不值,并且有可能可以白嫖。意味着,前期氪金很多, 后期跟不上氪的话,会很容易被追上。
这里记录一下散人(微氪)玩家的玩法。
定期活动
这游戏根据天数,会定期出活动,这里根据我自己的目前所在区服来更新。有可能与老区或者新区有不一样的。
第一天:开区
新建角色选法师、或者道士,战士不适合微氪玩。 赞助拿前三个赞助就够了,在吃 10 元红包,凑满 100,领取 98 连冲奖励。
主线任务、红包任务做完。任务做完,灵符一分不用, 只买第一天两个赞助对应的称号跟衣服,第八天这些灵符会返回来。
第二到第五天 每天吃100红包,灵符传奇币全攒着, 武魂只升级到10, 神器2。
异兽、符文、英雄之心,不要合成,材料全留着。
第八天:狂暴降临
以前第八天是灵符抽技能活动,现在改版了,变成了狂暴直氪, 前四个任务是额度到了就可以领取,第五个是需要抽奖抽到一个才能领取。 微氪抽奖就算了,这次我只开通了第四个赞助,拿了一个狂暴装备, 同时天赋里面可以用98万灵符购买紫电神雷技能。
第十五天:末日降临
末日是直氪卷轴开岛上箱子。500 元可以拿三件末日、 一个狐狸、四个特权。可以五天每天 100 元直氪末日卷轴, 顺便拿 98 元连冲奖励及 5 天连冲装扮。
- 第一岛选“元宝专享”
- 第二岛选“遗迹特权”
- 第三岛选末日
- 第四岛选“灵石专享”
- 第五岛选末日
- 第六岛选狐狸战灵
- 第七岛选“魔石专享”
- 第八岛选末日
第二十二天:秒杀直购
秒杀活动有点类似与狂暴,前四个任务也是五百额度, 包括:兽神装备、妖狱特权、三件秒杀、三个技能觉醒。
第二十九天:神罚套装
神罚套装的活动跟第十五天的末日活动几乎是一样的,因此也是 500 元拿三件神罚、 三个特权、一个精灵幻化、一件兽神装备任选,也是五天每天 100 元直氪末日卷轴, 顺便拿 98 元连冲奖励及 5 天连冲装扮。
- 第一岛选“灵符加成”
- 第二岛选“禁地双倍”
- 第三岛选神罚
- 第四岛选“传奇专享”
- 第五岛选神罚
- 第六岛选圣光精灵
- 第七岛选“兽神装备任选”
- 第八岛选神罚
第三十六天:炎阳套装
炎阳套装和前面的秒杀类似,前四个任务是五百,包括:8阶军装刀、“传奇回收”、“经验专享”、“传奇回收Ⅱ”、超级幸运、三件炎阳。
周年庆活动
完成每日任务,周年庆商店里面的东西可以全部兑换出来,包括六个英雄、一个狐狸、苍血真龙皓月各一件,升星石等等。
装备合成技巧
每个部位三个属性,锻造时,两个单字锻造成双字,双字+单字锻造成终极。
锻造时左边为主装备、右边为附装备,锻造失败附装备损毁。
因此稀有属性单字,或者包含稀有属性的双字应该放在左边,与稀有属性匹配的双字要直接熔炼掉。
这样才能最大化装备收益。
下面列出装备各部位属性,三个字自上而下稀有程度递减:
武器 属性 匹配 血 吸血 爆裂 (爆 + 攻),全熔炼 爆 暴击几率 怒血 (血 + 攻) 攻 攻击增伤 破天 (血 + 爆) 衣服 属性 匹配 防 物伤减免、魔伤减免 不灭(抗 + 反) 抗 暴击抵抗 金刚 反 反伤 神体 头盔 属性 匹配 防 物伤减免、魔伤减免 天命(护 + 闪) 护 破甲抵抗 玄体 闪 吸血抵抗 龙体 项链 属性 匹配 血 吸血 斩神(破 + 攻),全熔炼 破 无视双防 怒血(血 + 攻) 攻 攻击增伤 弑天(血 + 破) 手镯 属性 匹配 固 暴伤减免 天怒(破 + 闪) 破 无视双防 无双 闪 吸血抵抗 爆破 戒指 属性 匹配 攻 攻击增伤 戮魔(爆 + 狂) 爆 暴击几率 灭神 狂 暴击增伤 破天 鞋子 属性 匹配 防 物伤减免、魔伤减免 破军 御 暴击抵抗 真魂(防 + 护) 护 破甲抵抗 神体 腰带 属性 匹配 防 物伤减免、魔伤减免 天命(御 + 护) 御 暴击抵抗 不灭 护 破甲抵抗 混元 符文提升技巧
符文一共有八个,按照最低级别提供套装属性,符文主要来自于试炼之地的boss、禁地。
- 试炼之地:乾,坤,离,坎,兑,
- 禁地:震,艮,巽
龙子提升技巧
龙子主要来自于龙眠神殿 Boss、禁地,
- 禁地:睚眦、蒲牢、霸下
- 龙眠神殿:其他 6 个
异兽提升
异兽主要来自于灵犀 Boss 爆落,活动里面七天登录送、60 连重送任选:
- 七天登录送:圣兽白虎、雪域狂狮、荆棘地龙、圣兽青龙, 地龙比白虎和狂狮高一阶,青龙比地龙高一阶
- 任选开:暗殿麒麟
兽神出战
妖狱进地图的条件依赖于出战的兽神级别,优先让最高级出战,点击兽神,会显示兽神装扮是否齐全,提示是否被其他兽神装备了。
出战最高级别兽神后,进入地图,只打最高级别的boss。
-
使用 GitHub 进行身份验证时要小心
起因
很早以前,我注册过一个叫做“黑客派”的论坛,后来这个论坛改名为“链滴”。
当时论坛提供了使用 Github 账号授权登录,由于早期并未注意过 GitHub 登录授权的权限问题。 被站长直接控制 Github 账号去执行 star 和 follow 操作,相关帖子可以看:https://v2ex.com/t/534800
谷歌搜索已无主站入口:

直接搜索最新网址,发现一篇道歉信排名靠前,可想此事当时影响挺大的。

但是非注册用户点击却无法阅读,啥意思?只给注册用户道歉?

使用 web achive 服务拉取到道歉信内容:

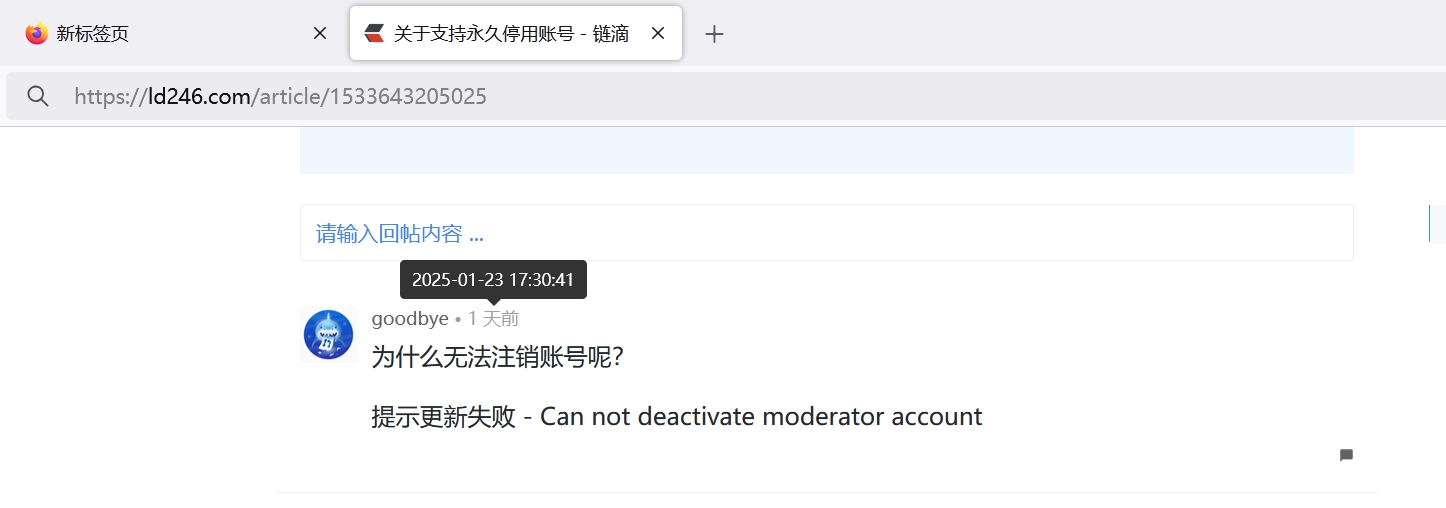
最近我尝试登录这个账号并提交账号注销申请,按照他的网站说明:来去自由·关于支持永久停用账号。

但是似乎并不是那么回事。
申请注销时提示更新失败 - Can not deactivate moderator account。于是只能手动将自己以往再次网站发的帖子全部改成:

在体用账号帖子留言后,账号被封禁,而不是被停用。

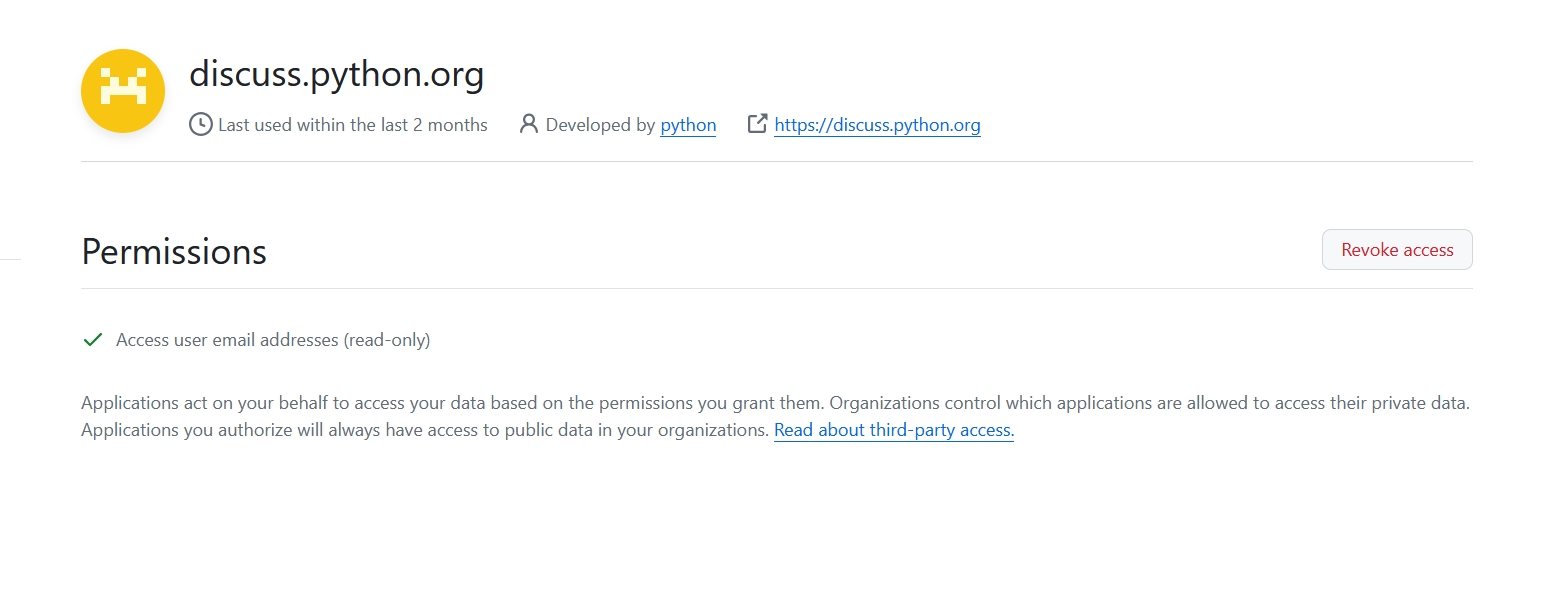
最后,我们再看下链滴作者 D 的博客 https://88250.b3log.org 评论系统,使用 Github 登录时所需要的权限:
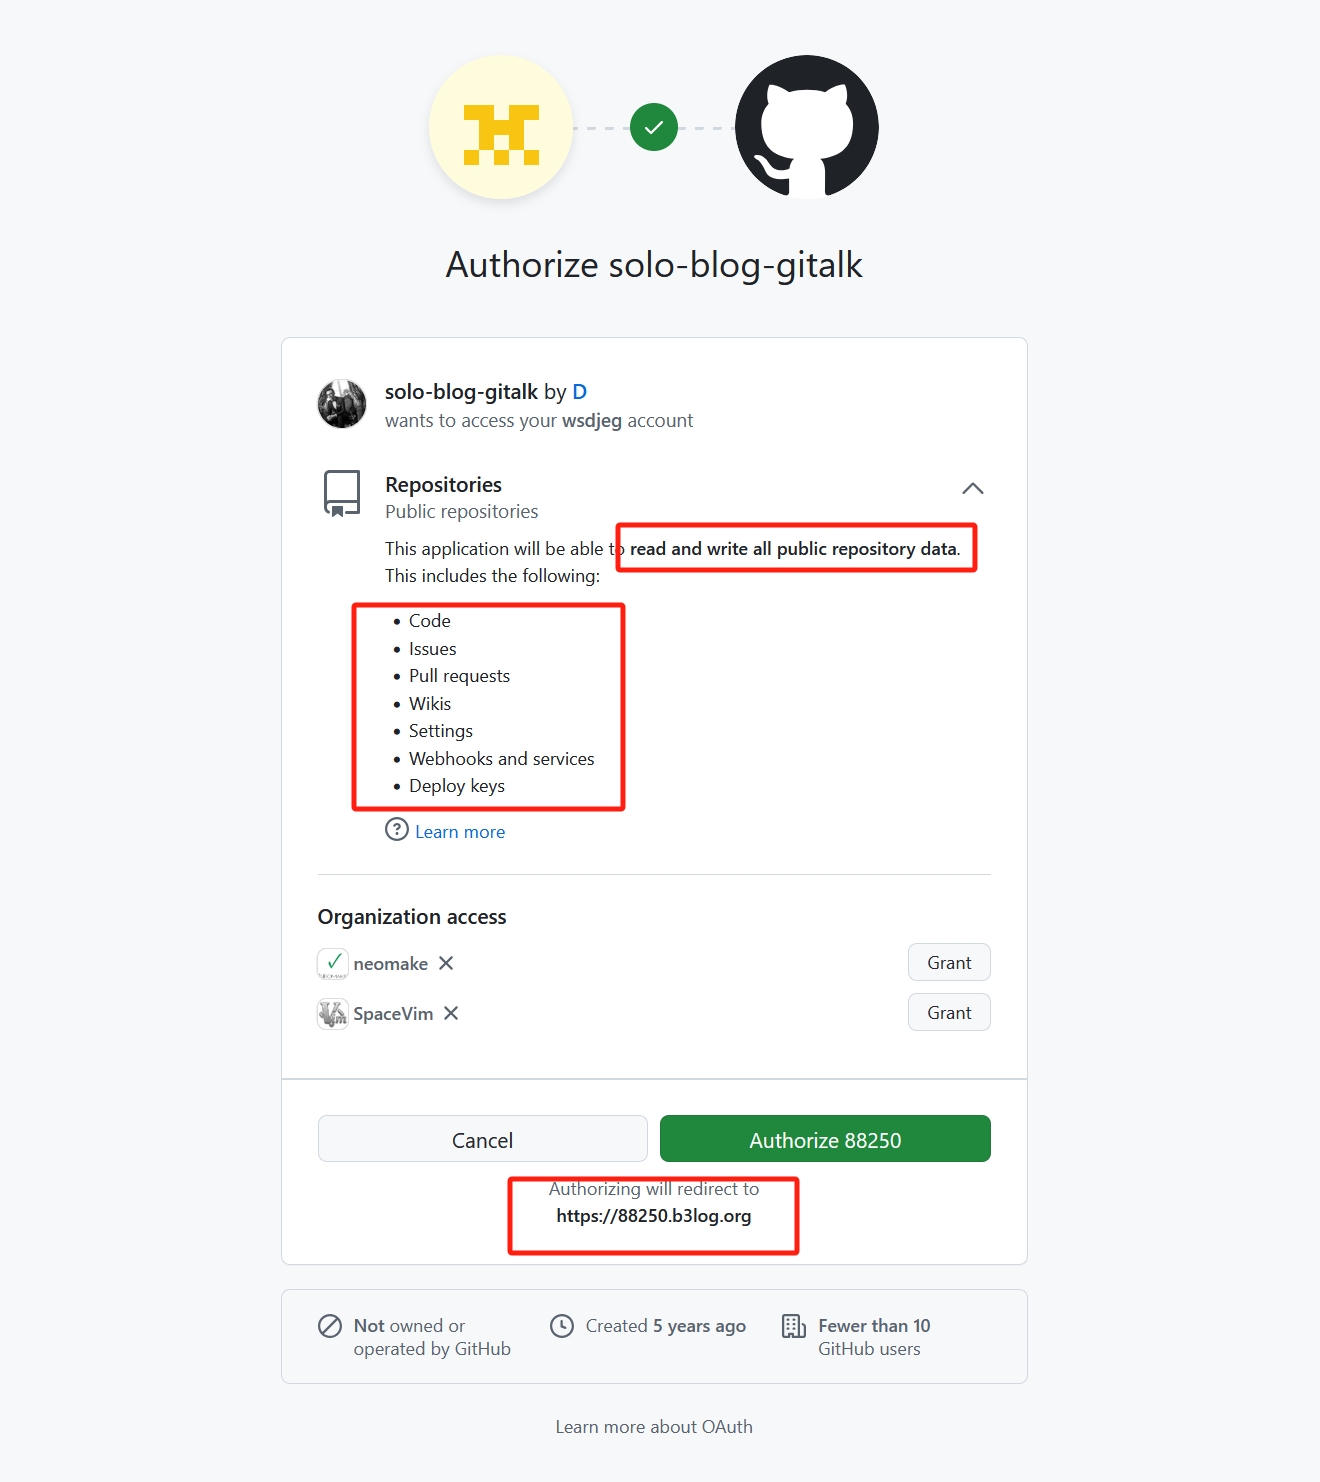
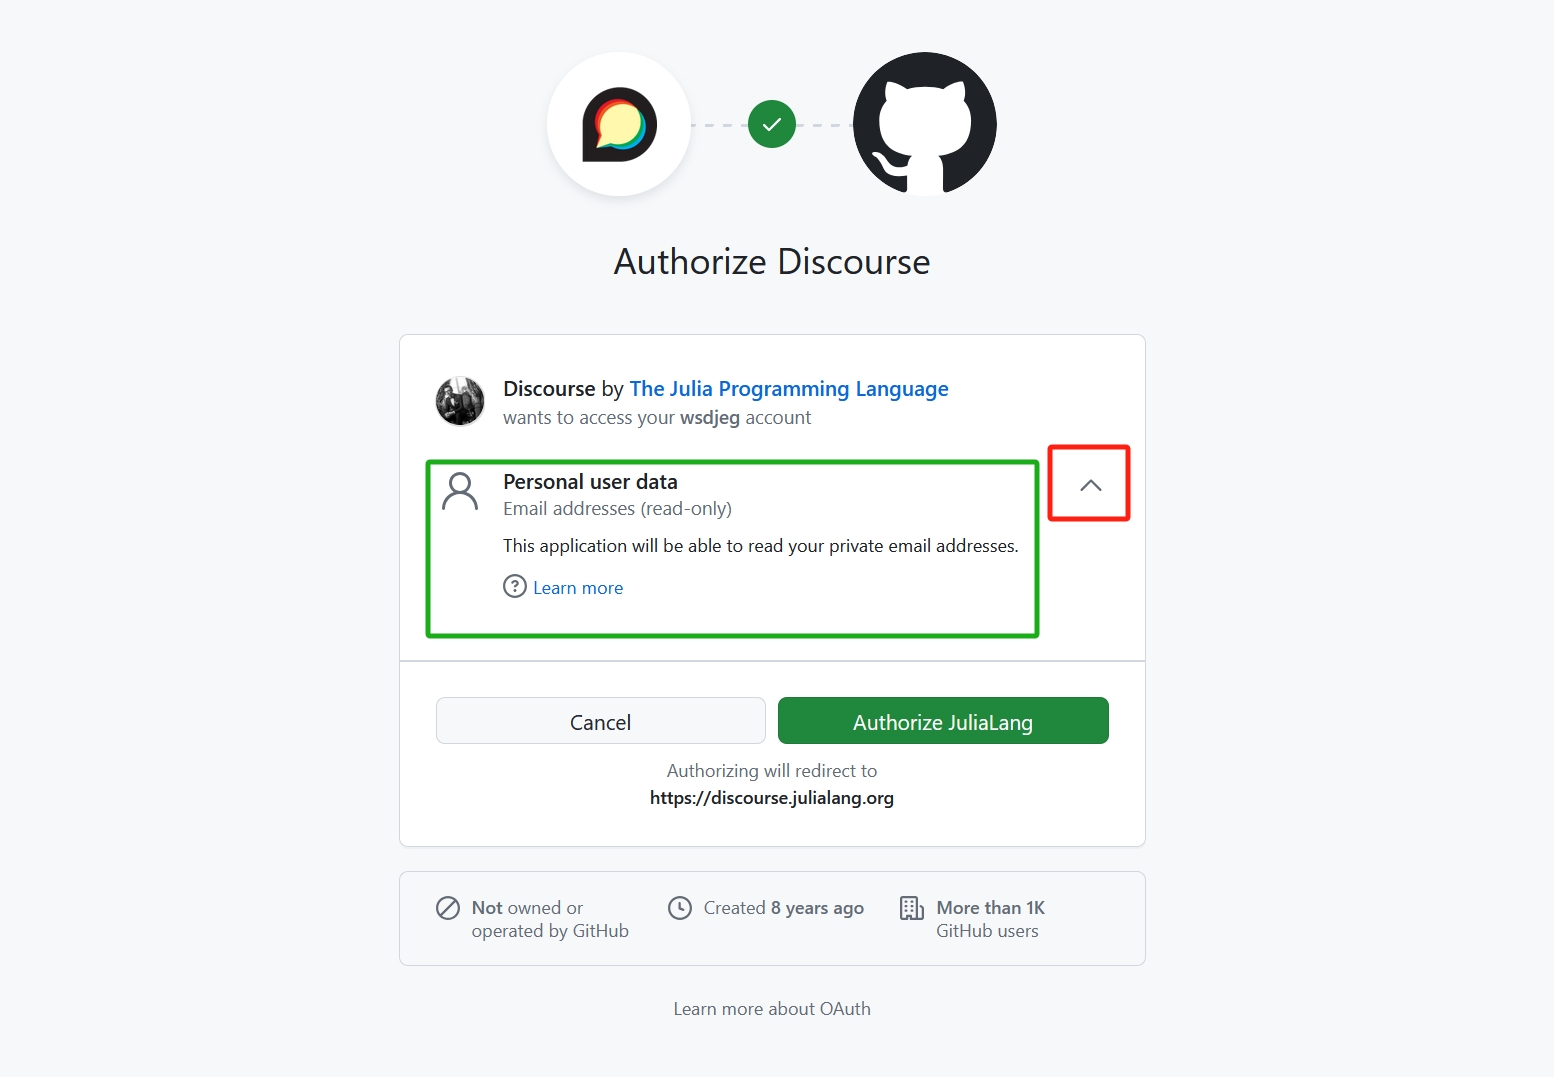
授权登录时需要的权限
在初次注册登录时,都会出现以下界面,可以点击右侧红框下拉按钮,展开所有的权限。实际上,如果仅用于注册网站,需要一个唯一的注册ID的话,获取邮箱地址的权限就足够了。 图片中显示了 julia 语言论坛授权登录权限信息:
查看 Github 账户已授权网站
在 Github 账户设置界面依次点击:
Integrations->Applications->Authorized OAuth Apps: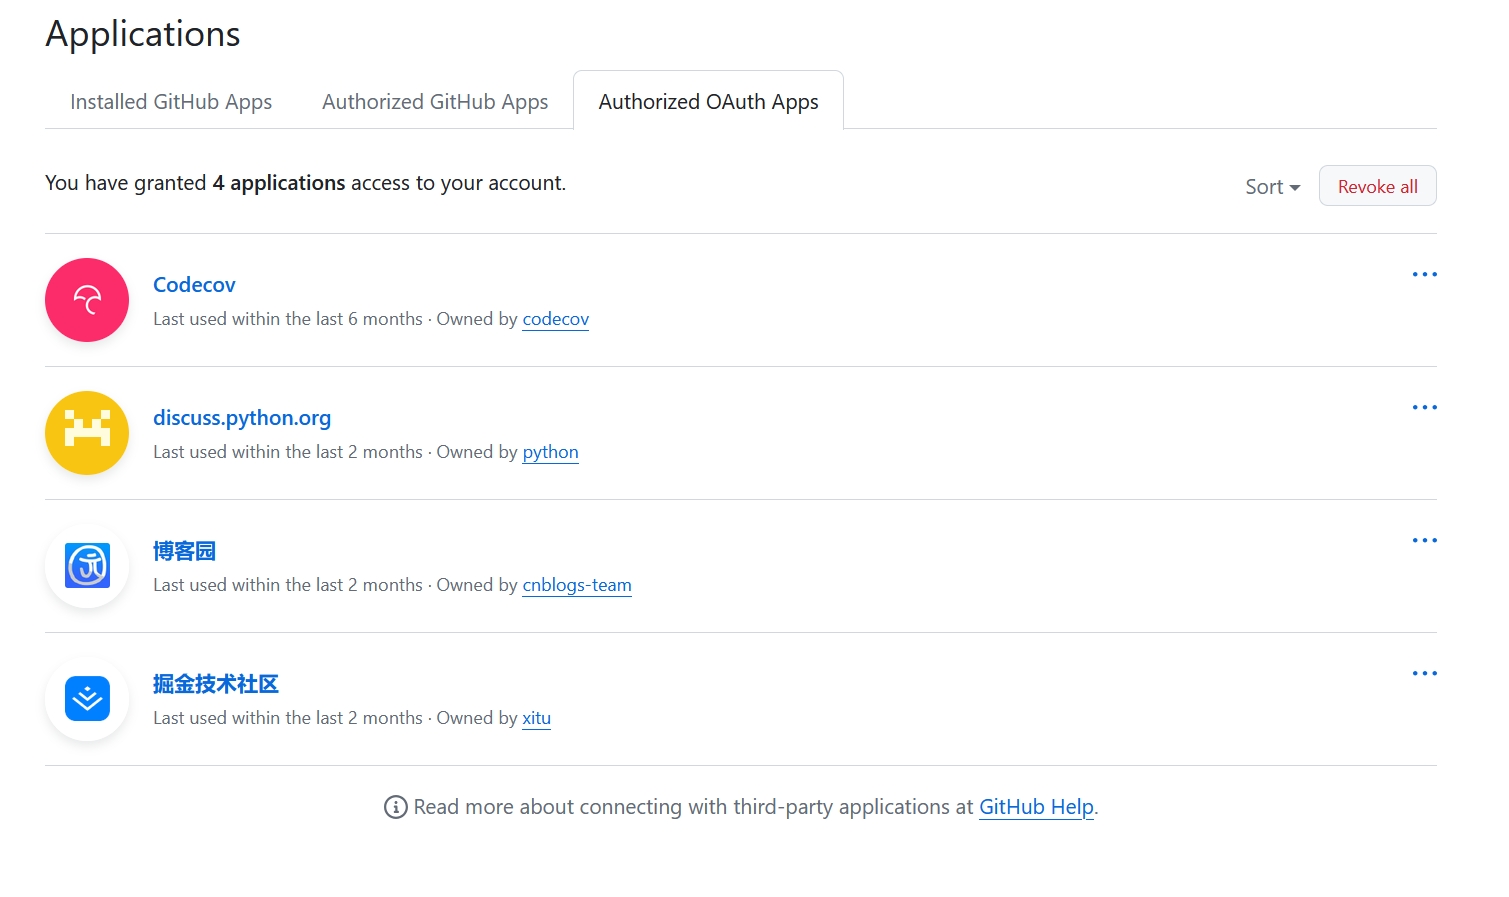
如果需要看各自的授权权限点开即可查看:
如果认为该权限太高,可以点击右侧的
Revoke access。国内版 Github?
最后,我们来看看号称国内版 Github 的码云使用 Github 授权时需要的权限:
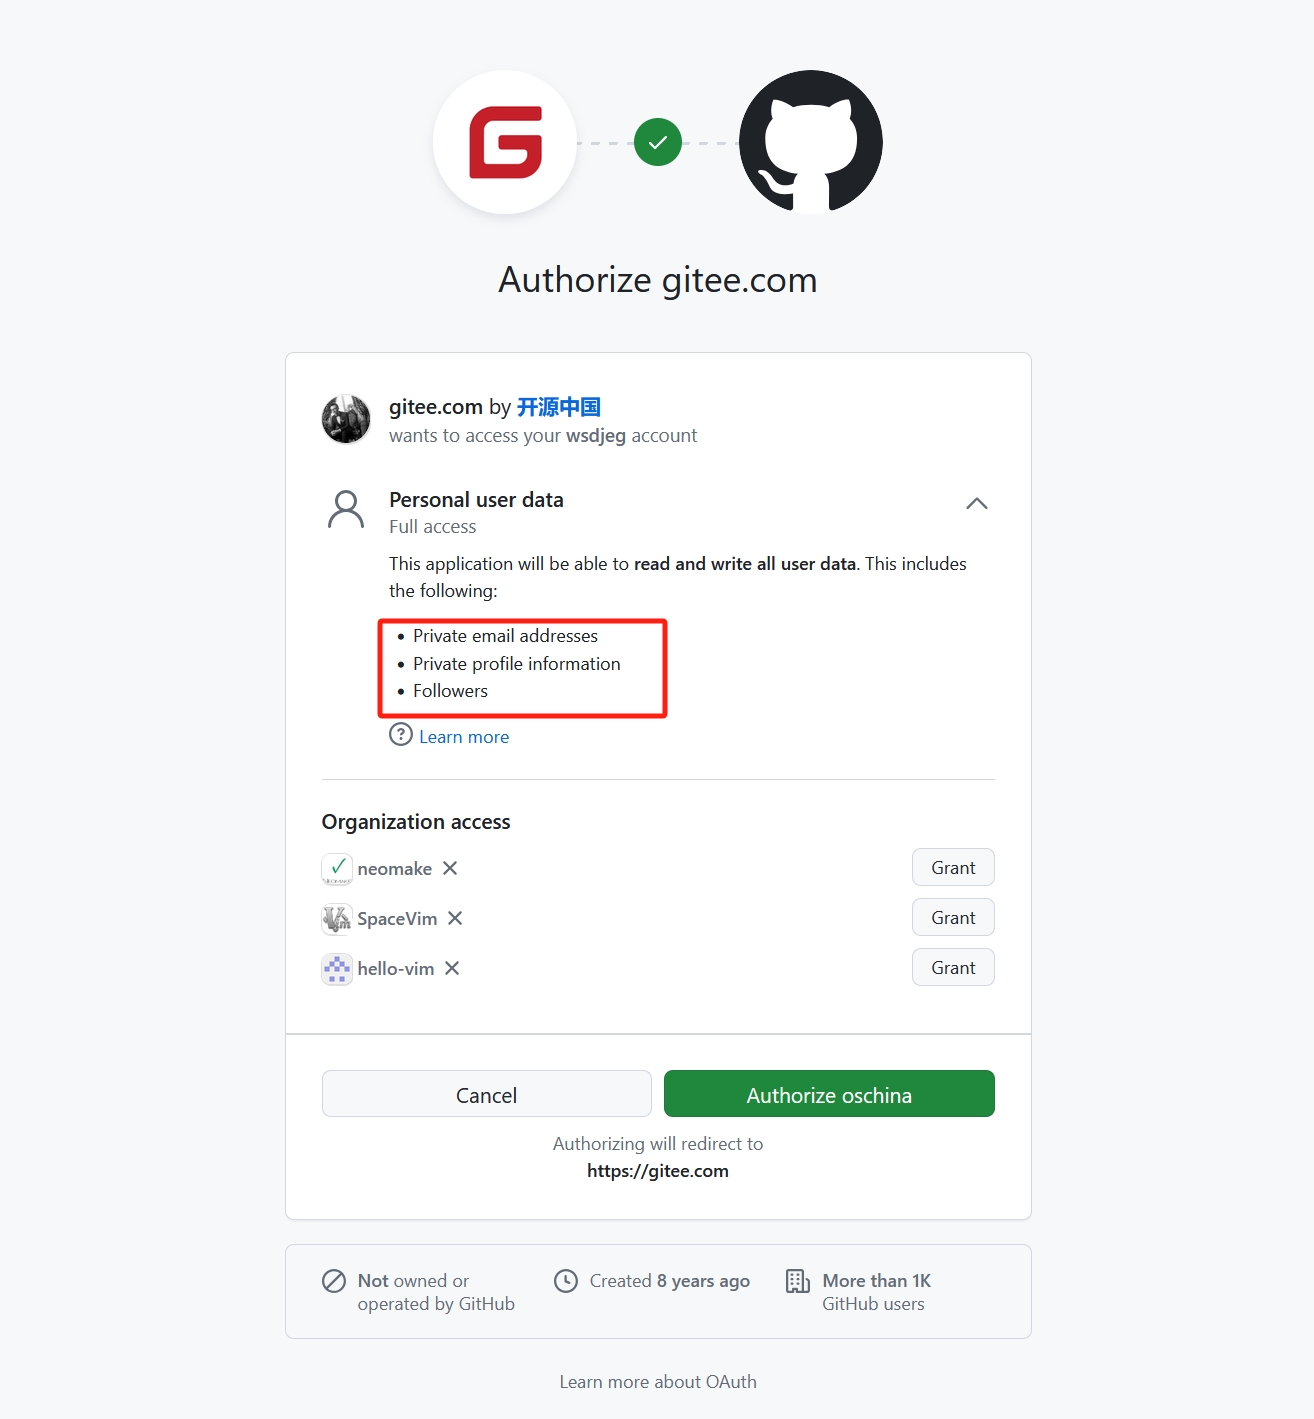
请问要读写用户的 Followers 做什么?
-
请停止复制我的个人网站
今天使用 Google 搜索自己之前发过的一篇文章“停用 v2ex 账号”, 发现搜索结果如下。奇怪的是, 有一个域名为
jbwqfy.com的网站居然是全站复制了我的个人博客。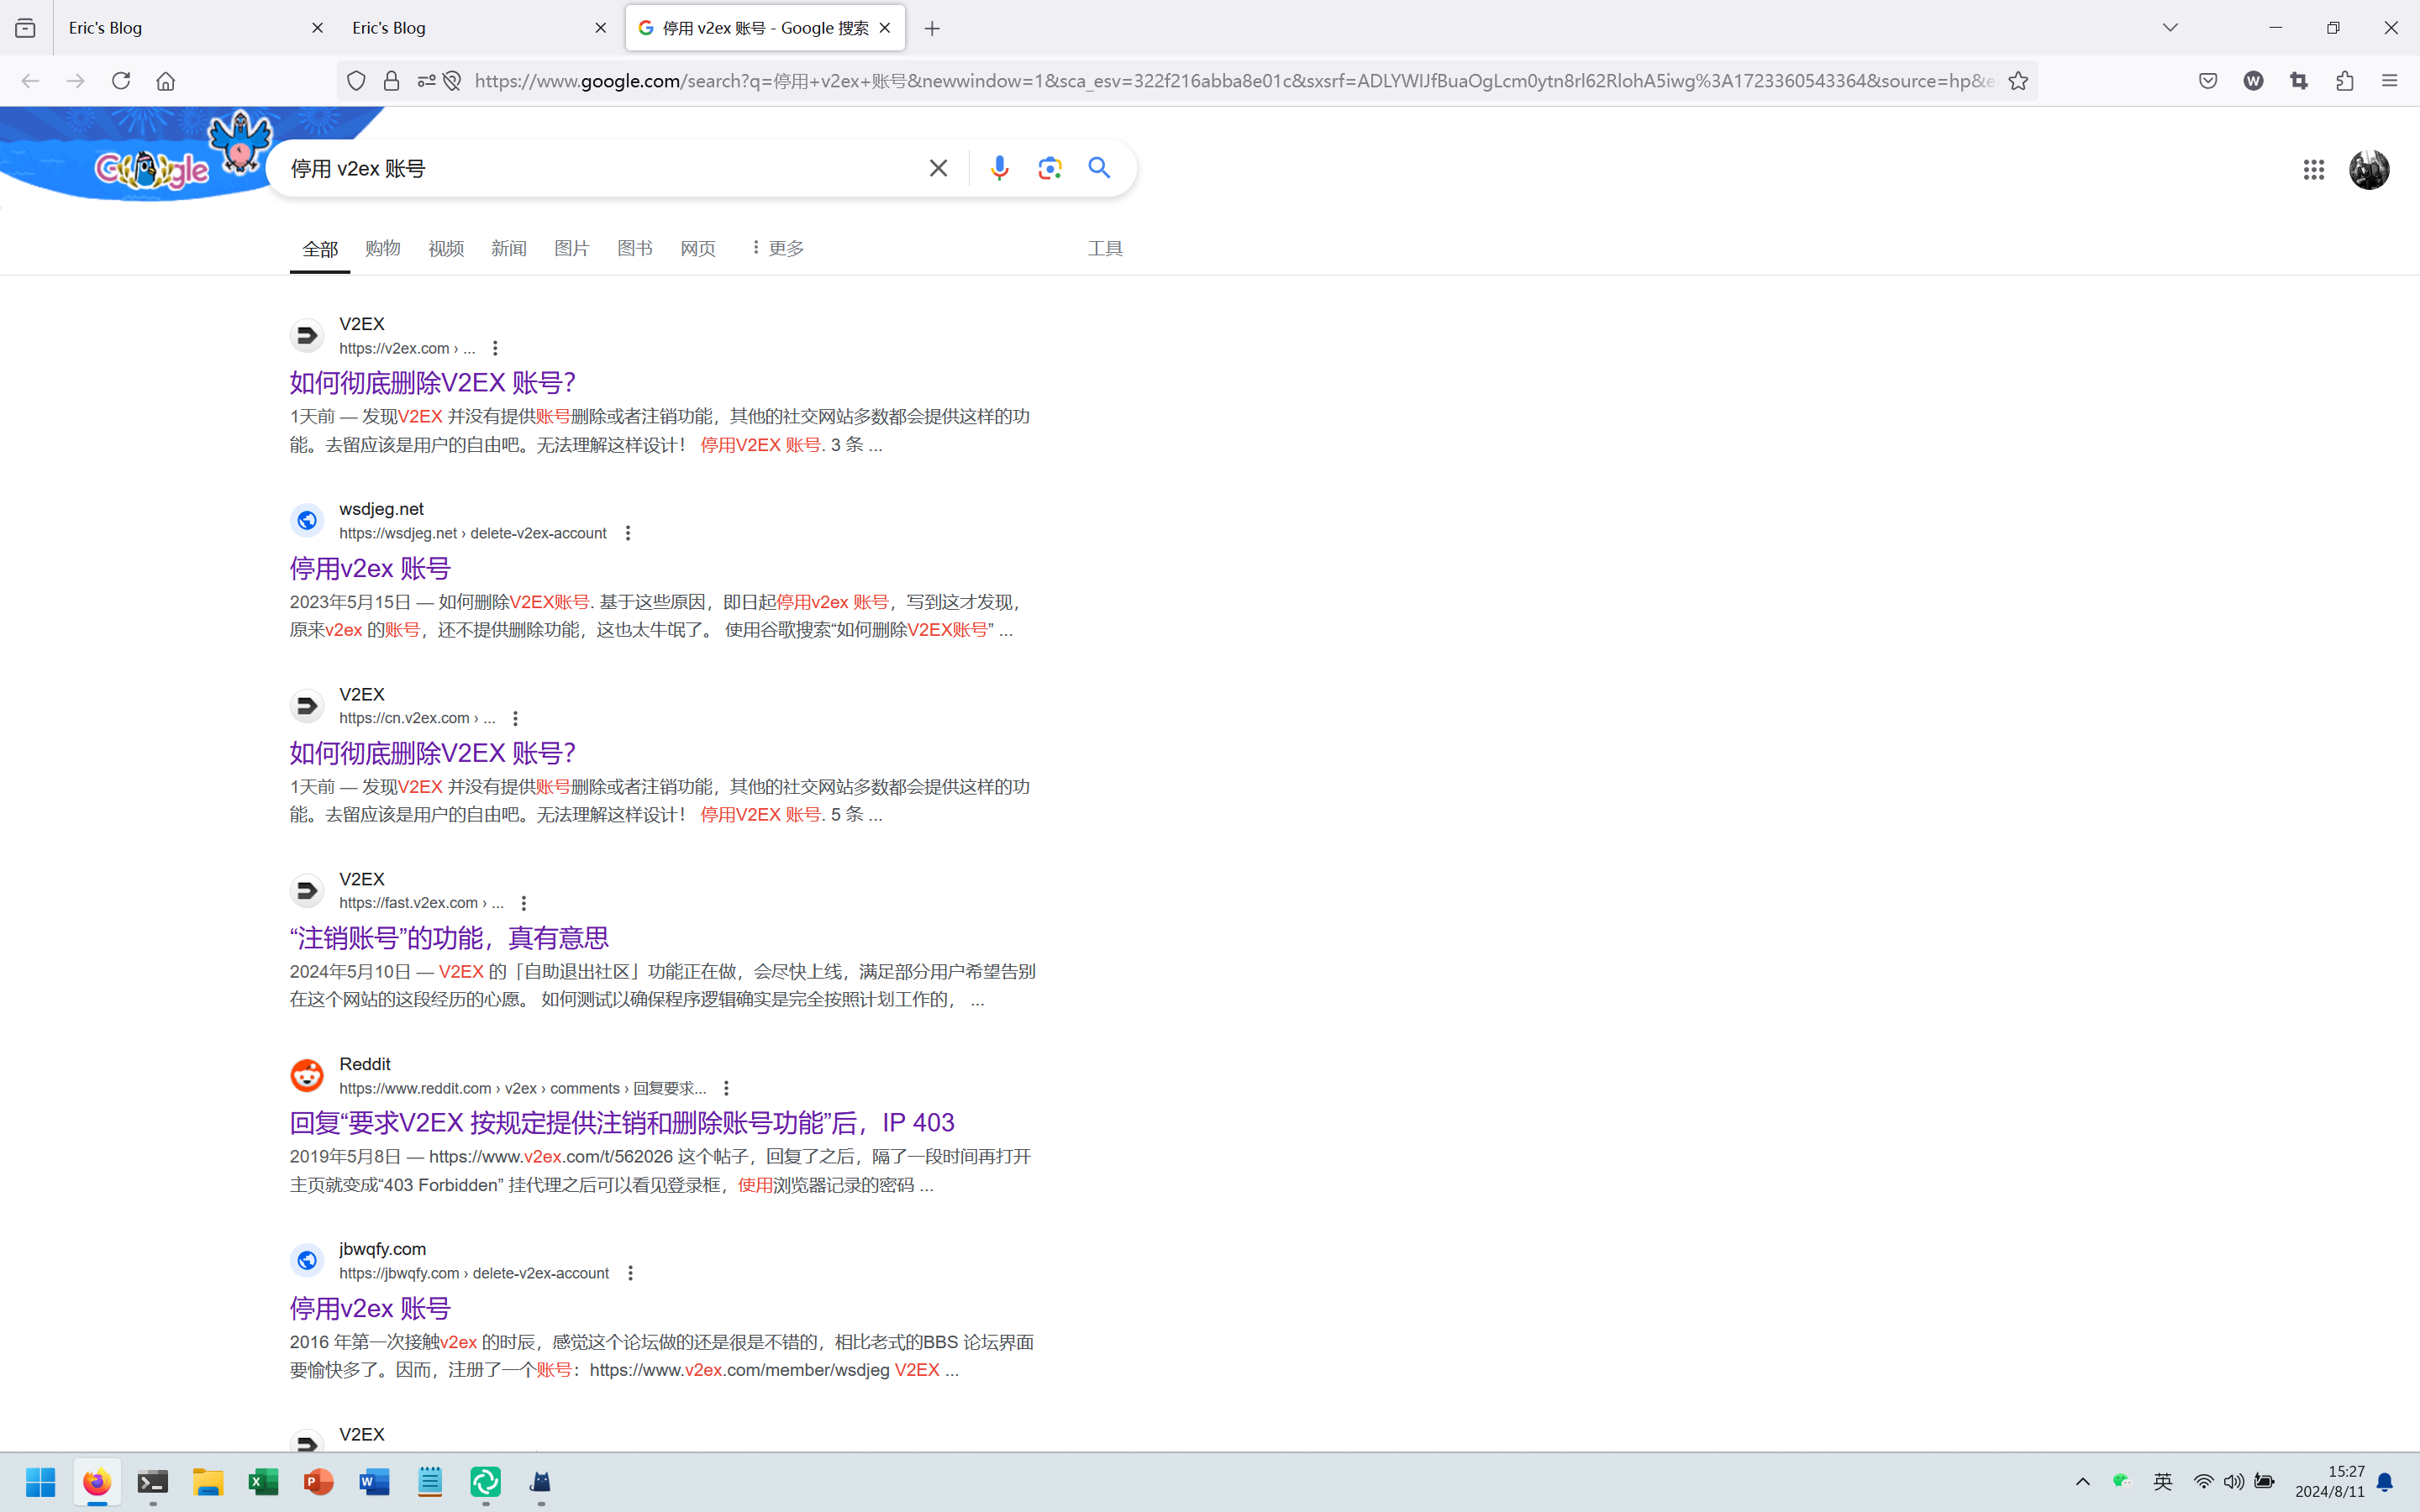
打开其首页,我今日刚发的文章他都有,基本上是实时同步了,目前无法查明原因。
whois 查询结果显示如下,并没有什么有效信息。

-
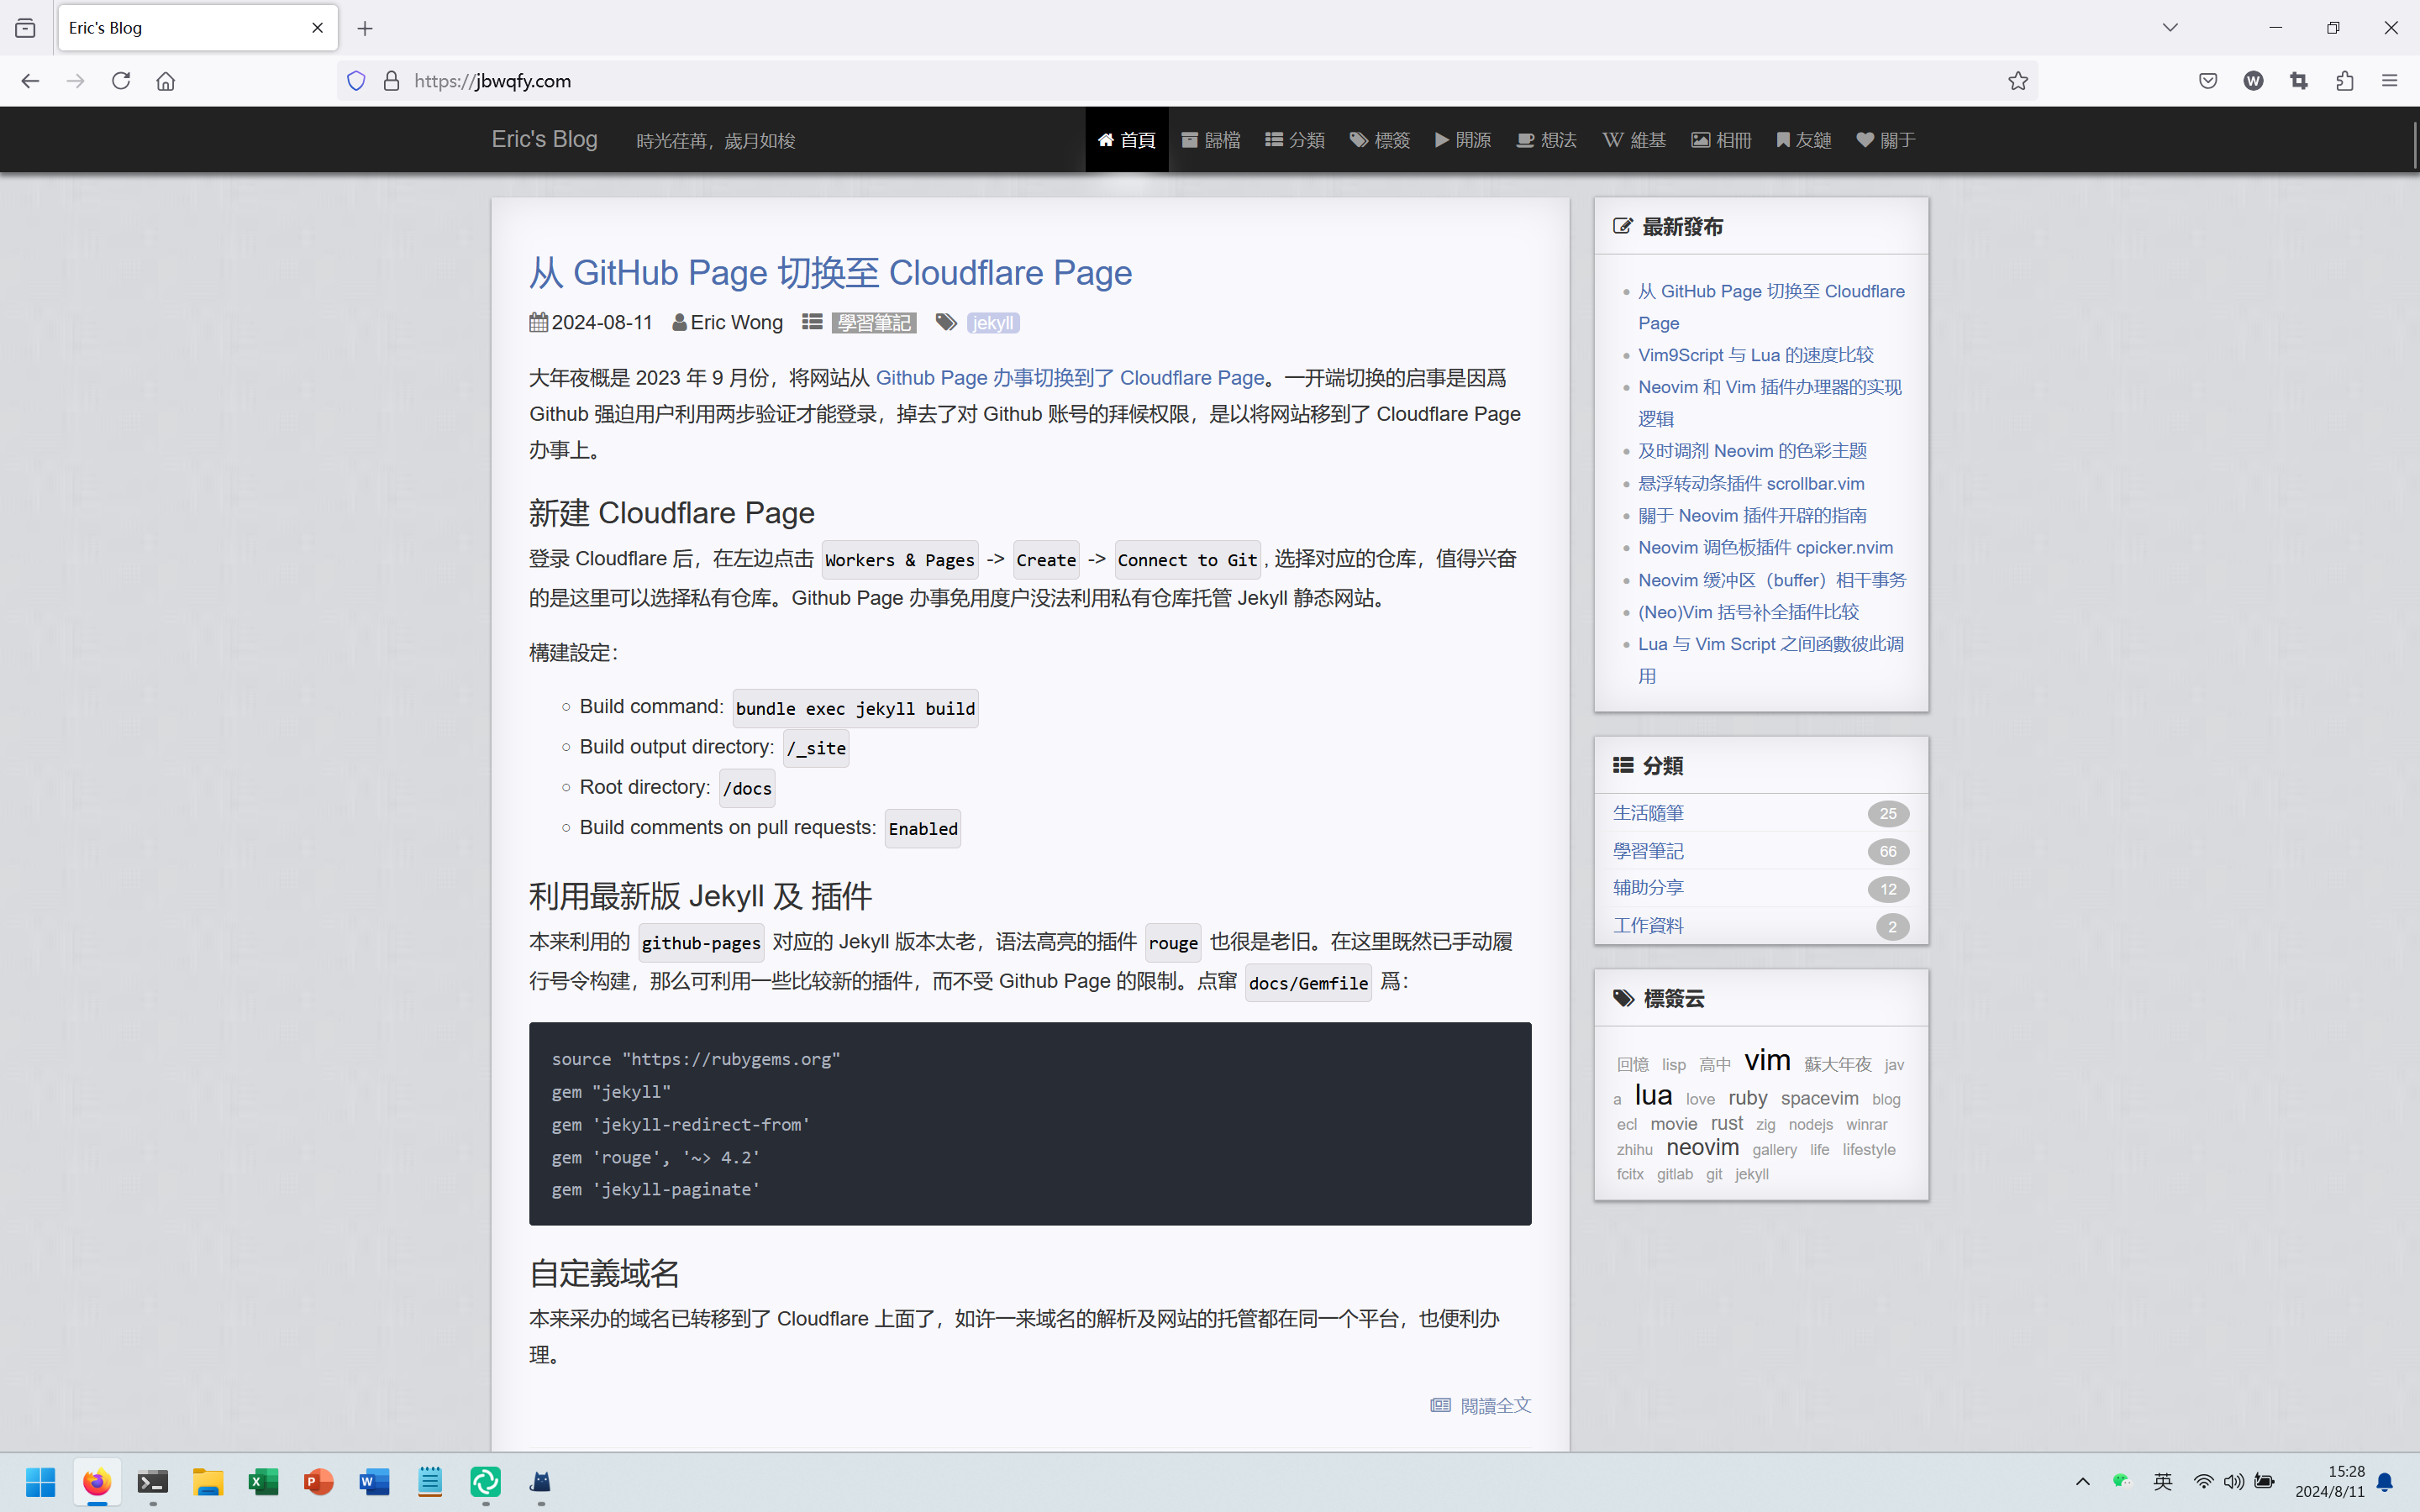
从 GitHub Page 切换至 Cloudflare Page
大概是 2023 年 9 月份,将网站从 Github Page 服务切换到了 Cloudflare Page。 一开始切换的原因是因为 Github 强制用户使用两步验证才能登录,失去了对 Github 账号的访问权限, 因此将网站移到了 Cloudflare Page 服务上。
新建 Cloudflare Page
登录 Cloudflare 后,在左侧点击
Workers & Pages->Create->Connect to Git, 选择对应的仓库, 值得开心的是这里可以选择私有仓库。Github Page 服务免费用户无法使用私有仓库托管 Jekyll 静态网站。构建设定:
- Build command:
bundle exec jekyll build - Build output directory:
/_site - Root directory:
/docs - Build comments on pull requests:
Enabled
使用最新版 Jekyll 及 插件
原先使用的
github-pages对应的 Jekyll 版本太老,语法高亮的插件rouge也非常老旧。 在这里既然已经手动执行命令构建,那么可以使用一些比较新的插件,而不受 Github Page 的限制。 修改docs/Gemfile为:source "https://rubygems.org" gem "jekyll" gem 'jekyll-redirect-from' gem 'rouge', '~> 4.2' gem 'jekyll-paginate'自定义域名
原先购买的域名已经转移到了 Cloudflare 上面了,这样一来域名的解析及网站的托管都在同一个平台,也方便管理。
- Build command:
-
Vim9Script 与 Lua 的速度比较
前面写过一篇Lua 与 VimL 速度比较的文章, 里面对 Lua 与 VimL 脚本计算速度做了比较。随着 Vim 的更新并且推出了新的脚本语言 Vim9Script, 也想看一下这个新的脚本语言写法及执行效率到底如何。
任然参考上一篇文章中的比较方式,Vim9Script 实现的函数如下:
vim9script
def V9Fibo(N: string)
  var start = reltime()
  var t = str2nr(N)
  var b = 0
  while t > 0
    t = t - 1
    var a = 1
    b = 1
    var c = 73
    while c > 0
      c = c - 1
      var tmp = a + b
      a = b
      b = tmp
    endwhile
  endwhile
  var sec = reltimefloat(reltime(start))
  echo b
  echom printf('Vim9Fibo(%s): %.6g sec', N, sec)
enddef

defcompile

command! -nargs=+ TestV9Func V9Fibo(<f-args>)
新建一个 vim 文件,写入上述内容。使用
:so %载入脚本,分别执行如下测试命令::TestV9Func 1000 :TestV9Func 10000000本地测试结果:
Vim9Fibo(1000): 0.007455 sec
Vim9Fibo(10000000): 69.937198 sec
在前一篇文章中比较的是 Vim Script 和 Lua 的速度,其结果是:
Fibo(1000): 0.410364 sec
Fibo(10000000): 1470.280914 sec
LuaFibo(1000): 9.052000e-4 sec
LuaFibo(10000000): 1.235385 sec
测试结果不难看出,Vim9Script 相较于老版本的 Vim script 确实有很大的速度提升。 计算参数1000时,从
0.41s提升到了0.0074s; 计算参数一千万时,从1470s提升到了69s。 但是相较于 Lua 的9.0e-4s和1.23s的测试结果,还是相差太多。
-
Neovim 和 Vim 插件管理器的实现逻辑
Neovim 或者 Vim 的插件管理器有很多,最开始的时候我使用的是 Vundle.vim, 后来尝试过 vim-plug 和 neobundle.vim, 目前使用的是 dein.vim。当然了,网上搜一下,其实还有很多其他的插件管理器, 然而并没有发现什么特别吸引我的功能,所以也就没有什么动力切换了。
相较于切换插件管理器,其实我更想好好研究一下插件管理器的实现逻辑,于是看了一些文档及插件管理器的源码,整理这篇文章。
插件的本质
我所理解的 Vim 或者 Neovim 的插件本质是一系列的 Vim 文件按照一定的目录结构组织起来的集合。 Neovim 中增加了
plugin/、color/等目录下 lua 文件的识别。不管是 Vim 还是 Neovim,插件管理器添加一个插件的本质就是将插件所在的目录加入到
runtimepath选项, 所谓的懒加载(lazy load)实际上是在适当的时机下触发前面这一步骤。所以,很早以前,还没有插件管理器时,很多时候只是将插件下载到某一个目录,并在
vimrc中将目录添加到runtimepath中。set runtimepath+=/path/to/plugin_directory目录结构及载入时机
阅读
:h runtimepath可以看到标准的插件的目录结构包括:filetype.lua filetypes autoload/ automatically loaded scripts colors/ color scheme files compiler/ compiler files doc/ documentation ftplugin/ filetype plugins indent/ indent scripts keymap/ key mapping files lang/ menu translations lua/ lua modules menu.vim GUI menus pack/ packages parser/ treesitter syntax parsers plugin/ plugin scripts queries/ treesitter queries rplugin/ remote-plugin scripts spell/ spell checking files syntax/ syntax files tutor/ tutorial files在说明每一个目录的功能之前,我认为有必要了解一下 Vim 启动时的文件载入顺序。
假定,我们有一个 hello-vim 插件,其目录为
~/wsdjeg/bundle/hello-vim,示例 vimrc 文件:set nocompatible set rtp+=~/wsdjeg/bundle/hello-vim filetype plugin indent on syntax on当启动 Vim 时,它将逐行读取并执行
vimrc文件。其中set rtp这一行就是将插件 hello-vim 的目录加入到 runtimepath 内。下一行
filetype plugin indent on,这个命令包含了三层意思:- 启动文件类型自动识别,比如打开
*.md文件时,自动识别并设置filetype为markdown。 - 设置
filetype时,根据&filetype的值,自动读取并执行 runtimepath 中每一个目录下ftplugin/子目录里对应的 vim 文件 - 设置
filetype时,根据&filetype的值,自动读取并执行 runtimepath 中每一个目录下indent/子目录里对应的 vim 文件
关于
:filetype命令的使用,:h :filetype-overview显示如下帮助文档:Overview: *:filetype-overview* command detection plugin indent ~ :filetype on on unchanged unchanged :filetype off off unchanged unchanged :filetype plugin on on on unchanged :filetype plugin off unchanged off unchanged :filetype indent on on unchanged on :filetype indent off unchanged unchanged off :filetype plugin indent on on on on :filetype plugin indent off unchanged off off To see the current status, type: > :filetype The output looks something like this: > filetype detection:ON plugin:ON indent:OFF那么,使用以上的简单的 vimrc 启动 Vim 时,文件的载入顺序为:
- vimrc
- ~/wsdjeg/bundle/hello-vim/plugin/*.vim
如果
hello-vim/目录下有filetype.vim文件,或者存在ftdetect/子目录,其内*.vim文件也会被执行。autoload/目录关于
autoload/内的 Vim 文件载入机制,我们来做这样一个测试:文件名:
~/.SpaceVim.d/autoload/test_autoload.vim,假定~/.SpaceVim.d/已经加入 runtimepath。echom "hi one" function! test_autoload#hi() echom "hi two" endfunction echom "hi three"启动 Vim 后,发现上述三句
echom语句都没有执行,这也说明了autoload内的文件默认是不会自动执行的。 此时如果执行函数call test_autoload#hi()。就会发现如下输出:hi one hi three hi two注意下输出的顺序,
hi three在hi two前面。 这是因为当调用test_autoload#hi()函数时,Vim 是根据函数的名称,确认下函数是否已定义,如果未定义, 则去找到对应的 Vim 文件读取并逐行执行,执行完了后才会调用函数。前面执行过了
call test_autoload#hi()函数后,如果再次调用。此时输出只会有一行:hi two那么问题来了,如果我再次调用一个不存在的函数
call test_autoload#no()函数,会发生什么呢?hi one hi three E117: Unknown function: test_autoload#no也很好理解,这个
test_autoload#no()函数未定义, Vim 根据函数名称会再次去读取并逐行执行 Vim 文件,也就导致了 Vim 文件中的脚本被重复执行了。不受控的重复执行肯定不行的,那么如何规避呢? 可以像下面这样修改:if exists('s:loaded') finish endif " 有很多插件喜欢用 g:plugin_xxx_loaded, 个人感觉,非必要不使用暴露给脚本外部的变量跟函数。 let s:loaded = 1 echom "hi one" function! test_autoload#hi() echom "hi two" endfunction echom "hi three"plugin/目录在 Vim 启动时默认的配置文件
vimrc读取完成后, 此时会对runtimepath下每一个目录下的plugin/子目录进行遍历。其内所有的 Vim 文件会被逐一读取并执行。 Neovim 增加了plugin/目录下 lua 文件的支持。ftplugin/目录这个目录就是 Vim 自带的
on_ft加载机制,当filetype被设定时会自动载入ftplugin/<filetype>.vim,Neovim 还支持 Lua 格式文件ftplugin/<filetype>.lua。懒加载的实现逻辑
很多插件管理器都实现了一个叫做
Lazy load(懒加载)的功能,那么这个功能到底是如何实现,其本质逻辑是什么呢?通过命令加载
on_cmd当执行某个命令时加载,这种实现逻辑实际上新建一个新的命令,在命令中载入插件,并根据其参数再次调用命令。
比如
call dein#add('wsdjeg/FlyGrep.vim', {'on_cmd' : 'FlyGrep'})此时会定义如下命令:
dein.vim/autoload/dein/parse.vim#L342
function! s:generate_dummy_commands(plugin) abort
  let a:plugin.dummy_commands = []
  for name in a:plugin.on_cmd
    " Define dummy commands.
    let raw_cmd = 'command '
          \ . '-complete=customlist,dein#autoload#_dummy_complete'
          \ . ' -bang -bar -range -nargs=* '. name
          \ . printf(" call dein#autoload#_on_cmd(%s, %s, <q-args>,
          \  expand('<bang>'), expand('<line1>'), expand('<line2>'))",
          \   string(name), string(a:plugin.name))

    call add(a:plugin.dummy_commands, [name, raw_cmd])
    silent! execute raw_cmd
  endfor
endfunction
在上述例子中,FlyGrep.vim 插件载入之前,执行的命令
:FlyGrep实际上时调用dein#autoload#_on_cmd函数根据函数加载
on_func当调用插件的函数时动态载入插件,其实我感觉这个功能有点多余。因为
autoload/目录下的 Vim 脚本文件在 Vim 启动时是不会自动执行的。 只有在调用对应的函数时才会载入并执行。可能是为了更加极致的
Lazy load, 让非载入的插件完全隐藏吧。那么on_func这个功能到底是如何实现的呢?(Neo)Vim 有一个事件叫做
FuncUndefined,是在调用不存在的函数时触发. 下面是一段简单的on_func实现。let s:lazy_plugins = [] function! Plug(path, opt) if !empty(a:opt) " 直接 添加 rtp return endif call add(s:lazy_plugins, [a:path, a:opt]) endfunction function! s:on_func(f) for [path, opt] in s:lazy_plugins if opt.on_func =~# a:f " 载入路径 path 的插件 endif endfor endfunction augroup test_on_func autocmd! autocmd FuncUndefined * call s:on_func(expand('<afile>')) augroup END call Plug('~/.SpaceVim.d/hello-vim', { \ 'on_func' : 'hello#' \ })根据事件加载
on_event(Neo)Vim 有很多事件(event),这些事件在特定的时机会被触发。根据事件加载指的是设置某些插件在特定的事件触发时再载入系统。 相较于前面的
on_cmd和on_func的实现,on_event的实现相对简单一些, 仅仅是监控事件的发生与否,对于发生时的<amatch>及<afile>不做判断。以下为简单的实现逻辑:
let s:lazy_plugins = []
augroup test_on_event
autocmd!
augroup END
function! s:load(path)
  " 载入路径为 path 的插件
endfuntion
function! Plug(path, opt)
  if !empty(a:opt)
    call s:load(a:path)
    return
  endif
  if has_key(a:opt, 'on_event')
    for event in a:opt.on_event
      exe printf('autocmd test_on_event %s call s:load("%s")', event, a:path)
    endfor
  endif
endfunction

call Plug('~/.SpaceVim.d/hello-vim', {
    \ 'on_event' : ['InsertEnter', 'WinEnter']
    \ })
根据文件类型加载
on_ft根据文件类型加载插件,实际上可以理解为一种特殊的
on_event懒加载模式。前面也说到on_event懒加载不判断触发事件时的<amatch>和<afile>值。 而on_ft模式的懒加载底层逻辑是只监听FileType这一种事件,并且在事件触发时判断<amatch>值。on_ft懒加载的简单实现代码如下:let s:lazy_plugins = [] augroup test_on_ft autocmd! augroup END function! s:load(path) " 载入路径为 path 的插件 endfuntion function! Plug(path, opt) if !empty(a:opt) call s:load(a:path) return endif if has_key(a:opt, 'on_ft) for ft in a:opt.on_ft exe printf('autocmd test_on_ft FileType %s call s:load("%s")', ft, a:path) endfor endif endfunction call Plug('~/.SpaceVim.d/hello-vim', { \ 'on_ft' : ['java', 'python'] \ })根据按键加载
on_map以下这段摘自 dein.vim 的源码:
function! s:generate_dummy_mappings(plugin) abort
  let a:plugin.dummy_mappings = []
  let items = type(a:plugin.on_map) == v:t_dict ?
        \ map(items(a:plugin.on_map),
        \   { _, val -> [split(val[0], '\zs'),
        \                dein#util#_convert2list(val[1])]}) :
        \ map(copy(a:plugin.on_map),
        \  { _, val -> type(val) == v:t_list ?
        \     [split(val[0], '\zs'), val[1:]] : [['n', 'x'], [val]] })
  for [modes, mappings] in items
    if mappings ==# ['<Plug>']
      " Use plugin name.
      let mappings = ['<Plug>(' . a:plugin.normalized_name]
      if stridx(a:plugin.normalized_name, '-') >= 0
        " The plugin mappings may use "_" instead of "-".
        call add(mappings, '<Plug>(' .
              \ substitute(a:plugin.normalized_name, '-', '_', 'g'))
      endif
    endif

    for mapping in mappings
      " Define dummy mappings.
      let prefix = printf('dein#autoload#_on_map(%s, %s,',
            \ string(substitute(mapping, '<', '<lt>', 'g')),
            \ string(a:plugin.name))
      for mode in modes
        let raw_map = mode.'noremap <unique><silent> '.mapping
              \ . (mode ==# 'c' ? " \<C-r>=" :
              \    mode ==# 'i' ? " \<C-o>:call " : " :\<C-u>call ")
              \ . prefix . string(mode) . ')<CR>'
        call add(a:plugin.dummy_mappings, [mode, mapping, raw_map])
        silent! execute raw_map
      endfor
    endfor
  endfor
endfunction
不难看出,
on_map的实现机制跟on_cmd有点类似,实际上时定义了新的快捷键映射,触发时去调用dein#autoload#on_map函数。 再在这个函数内载入对应的插件,载入完成后使用feedkey()函数去模拟按下触发的快捷键映射。总结
本文主要介绍了 (neo)vim 插件的基本目录结构以及各个目录下文件的载入机制。 充分利用好这些机制后,即便是没有使用懒加载机制的情况下也可以大大的提高插件的初始化体验。 除此之外,本文还简单介绍了目前常见的几种赖加载机制的实现底层原理。
最后,说明一下,文中示例代码仅限于体现功能实现的基本逻辑,并未做额外的条件判断及错误捕获,并不适用于直接使用。
- 启动文件类型自动识别,比如打开