-
job.nvim raw 参数导致 JSON 解析失败
起因
最近在使用 job.nvim 执行一些命令时,遇到了一个奇怪的问题。当我执行一个返回 JSON 数据的命令时,发现 JSON 数据无法被正确解析,总是报错
unexpected end of JSON。经过调试后发现,问题出在 job.nvim 的raw参数默认值上。问题复现
假设我们有一个命令,它会输出一个较大的 JSON 数据:
local job = require('job')
local result = {}

local jobid = job.start({ 'some-command-that-outputs-json' }, {
  on_stdout = function(id, data)
    for _, line in ipairs(data) do
      table.insert(result, line)
    end
  end,
  on_exit = function(id, code, signal)
    local json_str = table.concat(result, '')
    local ok, decoded = pcall(vim.json.decode, json_str)
    if not ok then
      print('JSON decode failed: ' .. decoded)
    else
      print('JSON decoded successfully')
      vim.print(decoded)
    end
  end,
})
执行上述代码后,可能会看到类似以下的错误:
JSON decode failed: Expected object key string but found null at character 1024或者在解析时直接报错:
JSON decode failed: Expected value but found T_END at character 1问题分析
要理解这个问题,需要先了解 job.nvim 的
raw参数的作用。查看 job.nvim 的源码,可以看到:--- @class JobOpts --- @field on_stderr? function --- @field on_exit? fun(id: integer, code: integer, signin: integer) --- @field on_stdout? function --- @field cwd? string --- @field detached? boolean --- @field clear_env? boolean --- @field env? table<string, string|number> --- @field encoding? string --- @field raw? booleanraw参数默认是nil(即false),这意味着使用行缓冲模式。在这种模式下,数据会通过buffered_data函数处理:---@param eof string ---@param data string local function buffered_data(eof, data) data = data:gsub('\r\n', '\n') local std_data = vim.split(data, '\n') if #std_data > 1 then std_data[1] = eof .. std_data[1] eof = std_data[#std_data] == '' and '' or std_data[#std_data] table.remove(std_data, #std_data) elseif #std_data == 1 then if std_data[1] == '' and eof ~= '' then std_data = { eof } eof = '' elseif std_data[1] == '' and eof == '' then std_data = {} elseif std_data[#std_data] ~= '' then eof = std_data[#std_data] std_data = {} end end return eof, std_data end这个函数的逻辑是:
- 将
\r\n替换为\n - 按换行符
\n分割数据 - 处理不完整的行,保存到
eof变量中等待下一次数据
问题在于:大多数 JSON 输出是不包含换行符的单行数据,或者是一个格式化的多行 JSON。当 JSON 数据较大时,可能会被系统分成多个数据块(chunk),但每个数据块内部可能没有换行符。
在这种情况下,
buffered_data函数会:- 如果数据块中没有换行符,会将整个数据块视为一个”不完整的行”,保存到
eof中 - 此时
std_data是空的,不会触发on_stdout回调 - 只有当下一个数据块到来或者 EOF 时,才会将之前保存的数据输出
这样就导致了数据在缓冲区中累积,但
on_stdout回调可能不会及时接收到数据。更糟糕的是,如果 JSON 数据本身就包含换行符(格式化的 JSON),会被错误地分割成多行。对比两种模式
默认模式(raw = false)
-- Default: line-buffered mode
uv.read_start(stdout, function(_, data)
  if data then
    local stdout_data
    _jobs['jobid_' .. current_id].state.stdout_eof, stdout_data =
      buffered_data(
        _jobs['jobid_' .. current_id].state.stdout_eof,
        data
      )
    if #stdout_data > 0 then
      vim.schedule(function()
        if opts.encoding then
          stdout_data = vim.tbl_map(function(t)
            return vim.fn.iconv(t, opts.encoding, 'utf-8')
          end, stdout_data)
        end
        opts.on_stdout(current_id, stdout_data)
      end)
    end
    return
  end
  -- ... EOF handling
end)
Raw 模式(raw = true)
-- Raw mode: no buffering, pass raw data chunks directly
if opts.raw then
  uv.read_start(stdout, function(_, data)
    if data then
      vim.schedule(function()
        if opts.encoding then
          data = vim.fn.iconv(data, opts.encoding, 'utf-8')
        end
        if nparams == 2 then
          opts.on_stdout(current_id, { data })
        else
          opts.on_stdout(current_id, { data }, 'stdout')
        end
      end)
    else
      -- EOF
      if stdout and not stdout:is_closing() then
        stdout:close()
      end
    end
  end)
end
可以看到,
raw = true模式下:- 不进行行缓冲处理
- 直接将原始数据块传递给回调函数
- 数据可能会被分成多个块,每个块都是不完整的
解决方案
针对 JSON 数据解析的场景,有以下几种解决方案:
方案一:使用 raw 模式并手动拼接数据
local job = require('job')
local result = {}

local jobid = job.start({ 'some-command-that-outputs-json' }, {
  raw = true,  -- 使用原始模式
  on_stdout = function(id, data)
    -- data 是一个包含原始数据块的列表
    for _, chunk in ipairs(data) do
      table.insert(result, chunk)
    end
  end,
  on_exit = function(id, code, signal)
    local json_str = table.concat(result, '')
    local ok, decoded = pcall(vim.json.decode, json_str)
    if not ok then
      print('JSON decode failed: ' .. decoded)
    else
      print('JSON decoded successfully')
      vim.print(decoded)
    end
  end,
})
方案二:在默认模式下正确处理数据
如果 JSON 数据是单行输出(minified JSON),需要在
on_exit回调中处理缓冲区中剩余的数据:local job = require('job') local result = {} local jobid = job.start({ 'some-command-that-outputs-json' }, { on_stdout = function(id, data) for _, line in ipairs(data) do -- 如果 JSON 是格式化的多行,需要保留换行符 table.insert(result, line) end end, on_exit = function(id, code, signal) -- 拼接所有行,如果是 minified JSON,不需要换行符 -- 如果是格式化 JSON,需要添加换行符 local json_str = table.concat(result, '\n') local ok, decoded = pcall(vim.json.decode, json_str) if not ok then print('JSON decode failed: ' .. decoded) else print('JSON decoded successfully') vim.print(decoded) end end, })方案三:使用 luv 的 stream API
如果需要更精细的控制,可以直接使用
vim.loop(或vim.uv) 的 stream API:local uv = vim.uv or vim.loop local stdout = uv.new_pipe() local result = {} local handle, pid = uv.spawn('some-command', { stdio = { nil, stdout, nil }, }, function(code, signal) stdout:close() handle:close() local json_str = table.concat(result, '') local ok, decoded = pcall(vim.json.decode, json_str) if not ok then print('JSON decode failed: ' .. decoded) else print('JSON decoded successfully') vim.print(decoded) end end) uv.read_start(stdout, function(err, data) if data then table.insert(result, data) end end)实际案例
在我开发的 chat.nvim 插件中,调用 AI API 时返回的就是 JSON 数据。最初使用默认模式时,遇到了数据解析失败的问题。
查看调试日志:
[ 14:23:42:123 ] [ Info  ] Received chunk 1: {"id":"chatcmpl-123","object":"chat.completion","created":1234567890
[ 14:23:42:125 ] [ Info  ] Received chunk 2: ,"model":"gpt-4","choices":[{"index":0,"message":{"role":"assistant"
[ 14:23:42:127 ] [ Info  ] Received chunk 3: ,"content":"Hello"},"finish_reason":"stop"}]}
可以看到,JSON 数据被分成了 3 个数据块,每个块都不完整。在默认模式下,这些数据会被缓冲,等待换行符,但 JSON 数据中没有换行符,导致数据一直在缓冲区中。
使用
raw = true后,可以正确地接收并拼接这些数据块:local job = require('job') local chunks = {} job.start(cmd, { raw = true, on_stdout = function(id, data) for _, chunk in ipairs(data) do table.insert(chunks, chunk) end end, on_exit = function(id, code, signal) local json_str = table.concat(chunks, '') -- 现在可以正确解析 JSON local response = vim.json.decode(json_str) -- 处理响应数据 end, })总结
job.nvim 的
raw参数默认为false,使用行缓冲模式,适合处理以行为单位的文本输出(如日志、命令输出等)。但如果要处理二进制数据或单行的大型 JSON 数据,应该设置raw = true,然后在回调函数中手动拼接数据块。理解
raw参数的作用对于正确处理外部命令的输出非常重要:- raw = false(默认):行缓冲模式,按换行符分割数据,确保每次回调传递完整的行
- raw = true:原始模式,直接传递数据块,适合处理二进制数据或需要手动拼接的场景
在使用 job.nvim 处理 JSON 数据时,建议使用
raw = true并在on_exit回调中拼接所有数据块后再进行解析。
- 将
-
为什么仍然在使用 job.nvim
起因
job.nvim 发布了 1.5 版本,和往常一样,我在 Reddit 上发布了版本更新文章,也很感谢有不少正面的反馈。
但让我无法理解的是,有些人似乎很难沟通,他们一再强调 Neovim 有内置的
jobstart()和vim.system(),为什么还要创建一个新的插件?即使解释了原因,他们仍然无法理解。我想这可能是我说得不够清楚,因此在这里整理一下前因后果。说起 Job 函数,要从最早期的 Neovim 版本说起。Neovim 增加了一个
jobstart()Vim Script 函数,那时候 Vim 还没有 Job 功能,后来 Vim 才增加了job_start()函数,但其调用方式与 Neovim 并不一致。早期的 Neovim 主要还是以使用 VimL 为主。于是我给 SpaceVim 添加了一个 Job API,以兼容早期 Neovim 的
jobstart()和 Vim 的job_start()函数。commit 44ad1cb4fe6a8d9ccae49b71994e6182bbcaa968 Author: wsdjeg <[email protected]> Date: Fri Mar 31 21:09:38 2017 +0800 Add job api for vim and neovim这样,就可以使用相同的函数同时兼容 Vim 和 Neovim。
let s:JOB = SpaceVim#api#import('job')
let s:command = ['echo', 'hello world']
function! s:stdout(id, data, event)
    " data 是一个字符串列表
    for line in a:data
        echo line
    endfor
endfunction
call s:JOB.start(s:command, {
    \ 'on_stdout' : function('s:stdout'),
    \ }
    \ )
在这个过程中,前后还遇到过很多兼容性问题。Neovim 的
jobstart()函数的 stdout callback 在数据过大时会被截断,具体的 buffer size 我记不清了,有个 issue 讨论过这个问题。于是,我在这个 API 中增加了data_eol检测,以确保 callback 函数被调用时传入的是完整的数据。当然,后来的 Neovim 官方文档里也写了如何处理这种数据被截断的情况,详见:h channel_buffered。使用 Lua 重写 job API
随着 Neovim 对 Lua 的支持越来越多,我后来使用 Lua 重写了 Job API,但仍然将其内置在 SpaceVim 里。重写之后,调用就可以直接使用 Lua 了。
commit 879129388ab22b64c5a5cf0df83799084cab96fc
Author: Eric Wong <[email protected]>
Date:   Wed Jul 5 22:58:01 2023 +0800

    feat(api): add lua job api

    close https://github.com/neovim/neovim/issues/20856
调用方式变成了 Lua:
local job = require('spacevim.api.job')

local jobid = job.start(vim.g.test_ctags_cmd, {
  on_stdout = function(id, data, event)
    vim.print(id)
    vim.print(data)
    vim.print(event)
  end,
  on_stderr = function(id, data, event)
    vim.print(id)
    vim.print(data)
    vim.print(event)
  end,
  on_exit = function(id, code, signal)
    vim.print(id)
    vim.print('exit code', code)
    vim.print('exit signal', signal)
  end,
})
独立成 job.nvim
随着 SpaceVim 项目停止维护,我把我常用的功能插件独立成了各个单独的 Neovim 插件,其中就包括了 job.nvim。
我自己写的很多需要异步执行命令的 Neovim 插件都依赖这个 job.nvim,这样就不需要在每个插件仓库里单独维护执行外部命令的模块了。使用起来也比原来的 SpaceVim 内置 Lua Job API 更简洁一些:
local job = require('job')
local function on_exit(id, code, signal)
    print('job ' .. id .. ' exit code:' .. code .. ' signal:' .. signal)
end

local cmd = { 'echo', 'hello world' }
local jobid1 = job.start(cmd, {
    on_stdout = function(id, data)
        vim.print(data)
    end,
    on_exit = on_exit,
})

vim.print(string.format('jobid is %s', jobid1))

local jobid = job.start({ 'cat' }, {
    on_stdout = function(id, data)
        vim.print(data)
    end,
    on_exit = function(id, code, signal)
        print('job ' .. id .. ' exit code:' .. code .. ' signal:' .. signal)
    end,
})

job.send(jobid, { 'hello' })

job.chanclose(jobid, 'stdin')
为什么不切换到 vim.system
我不太记得
vim.system是什么时候加入到 Neovim 的了,其前后应该也功能迭代过几个版本。为什么我还在继续维护 job.nvim 而不切换到vim.system呢?-
没有对 stdout 数据进行拼接处理,容易有截断数据,而且传给 callback 函数的数据是 string 而非像
jobstart那样是 string 列表。当然,数据类型都是次要的事情,使用split函数很容易得到列表,但是未做数据拼接这点,在写 callback 函数时会增加很多额外的代码量。 -
callback 函数内无法确认到底是哪个 job 调用触发的这个 callback 函数,应该像
jobstart()的 stdout callback 函数那样,传入一个 jobid 参数。
我创建 job.nvim 的主要原因是:
在旧的 Neovim 版本中,没有
vim.system。第一个版本是 job.vim,它使用 VimL,并以与 Neovim 的jobstart相同的 API 支持 Neovim 和 Vim。我需要为不同的 job 的 stdout 使用相同的 callback 函数。例如,在我的插件管理器 https://github.com/wsdjeg/nvim-plug 中,当同时克隆 8 个插件时,我需要在 job 退出前显示每个 job 的进度。因此在 stdout callback 函数中,我需要知道是哪个 job 触发了这个 callback 函数。据我所知,即使现在的
vim.system的 stdout callback 也不支持这个功能。两种写法,哪种更简单方便,一目了然:
使用
vim.system:local function on_stdout(err, data) --- 首先,这里需要对 data 判断数据的完整性,然后参考以下鬼方法来拼接: -- There are two ways to deal with this: -- - 1. To wait for the entire output, use |channel-buffered| mode. -- - 2. To read line-by-line, use the following code: >vim -- let s:lines = [''] -- func! s:on_event(job_id, data, event) dict -- let eof = (a:data == ['']) -- " Complete the previous line. -- let s:lines[-1] .= a:data[0] -- " Append (last item may be a partial line, until EOF). -- call extend(s:lines, a:data[1:]) -- endf -- 然后,拼接完成后,再执行逐行提取 for _, line in ipairs(data) do local progress = string.match(line, '%d*%%') -- 然后在这个地方,你就会发现,无法判断这到底是哪个 Job 触发的 callback 函数了。 end end -- clone plugin A vim.system({ 'git', 'clone', url_a }, { stdout = on_stdout }) -- clone plugin B vim.system({ 'git', 'clone', url_b }, { stdout = on_stdout })使用
job.nvim:local job = require('job') local jobs = {} local function on_stdout(id, data) for _, line in ipairs(data) do print( string.format( 'repo %s clone progress %s', jobs[id], string.match(line, '%d*%%') ) ) end end -- clone plugin A local id1 = job.start({ 'git', 'clone', url_a }, { on_stdout = on_stdout, }) jobs[id1] = 'A' -- clone plugin B local id2 = job.start({ 'git', 'clone', url_b }, { on_stdout = on_stdout, }) jobs[id2] = 'B'写在最后
也许,job.nvim 在许多年后会停止维护,那一定是我找到了更合适的内置替代方案。至少目前,
vim.system的实现还没有完全满足我的使用需求。最后,我终于理解 avante.nvim 的作者为什么删掉 Reddit 账号了。吵架真的很烦。 https://www.reddit.com/r/neovim/comments/1rdgfxg/comment/o7bzfzc/
vim.system的设计本身就有问题。我自己写了将近二三十个异步调用命令的插件,难道我遇到的问题还不够多吗?有些人一再给我强调可以在 exit_cb 里面区分 job,难道调用常驻命令时,要等它们执行完毕才能看到结果吗?那就让我们看看以后的版本
vim.system会不会增加这样的参数传入,或者会不会有类似的新的内置函数出现吧。
-
-
从零开始理解如何制作自己的 AI 助手
大约一年前,我开始关注 AI 相关的内容。从一开始的简单代码补全,到后来的文本对话,再到工具调用,新技术层出不穷,确实令人兴奋。 但最近我发现,有些人刻意制造新概念,试图将它们包装成新技术来吸引流量,这让我感到十分反感。
于是,我决定从零开始学习 AI 相关知识,并着手开发 AI 相关的 Neovim 插件。 整个过程踩了不少坑,但也逐渐理解了用户与 AI 之间的沟通逻辑。 因此,我想把这些内容整理成文字,帮助大家更好地理解用户与 AI 沟通时的底层逻辑, 同时也便于区分什么是真正的新技术,什么是人为包装的伪概念。
那就从简单的 DeepSeek 官网开发者文档 开始吧。
与服务器互动的基本原理
与大模型之间的沟通,通常是通过 API 请求完成的。比如向 DeepSeek 发送一句
Hello!,实际上执行的命令是:curl https://api.deepseek.com/chat/completions \ -H "Content-Type: application/json" \ -H "Authorization: Bearer ${DEEPSEEK_API_KEY}" \ -d '{ "model": "deepseek-chat", "messages": [ {"role": "system", "content": "You are a helpful assistant."}, {"role": "user", "content": "Hello!"} ], "stream": false }'得到的回复大致如下:
{
  "id": "930c60df-bf64-41c9-a88e-3ec75f81e00e",
  "choices": [
    {
      "finish_reason": "stop",
      "index": 0,
      "message": {
        "content": "Hello! How can I help you today?",
        "role": "assistant"
      }
    }
  ],
  "created": 1705651092,
  "model": "deepseek-chat",
  "object": "chat.completion",
  "usage": {
    "completion_tokens": 10,
    "prompt_tokens": 16,
    "total_tokens": 26
  }
}
为了方便展示,我移除了一些额外内容,只保留核心部分。实际上发送给服务器的消息数据是:
[
  { "role": "system", "content": "You are a helpful assistant." },
  { "role": "user", "content": "Hello!" }
]
而得到的回复也是一个单独的消息:
{
  "role": "assistant",
  "content": "Hello! How can I help you today?"
}
此时,如果我们想要保留会话历史并继续发送内容
What's the weather in SF?,就需要将服务器返回的消息追加到消息列表中,然后添加新的用户消息。于是,我们发送给服务器的消息变成这样:[ { "role": "system", "content": "You are a helpful assistant." }, { "role": "user", "content": "Hello!" }, { "role": "assistant", "content": "Hello! How can I help you today?" }, { "role": "user", "content": "What's the weather in SF?" } ]服务器除了返回文本内容外,有时还会返回
tool_call。这意味着返回的 JSON 中包含要调用的函数名称和参数,你收到的消息大致如下:{ "id": "call_123abc", "type": "function", "function": { "name": "get_weather", "arguments": "{\"location\": \"San Francisco\", \"unit\": \"celsius\"}" } }然后,你的助手软件实际上会做的是:根据这个
tool_call内容调用对应的本地功能函数, 执行完成后,将结果连同上面的tool_call一起再次“自动”发送给服务器。 于是,发送给服务器的消息大致如下:[ { "role": "system", "content": "You are a helpful assistant." }, { "role": "user", "content": "Hello!" }, { "role": "assistant", "content": "Hello! How can I help you today?" }, { "role": "user", "content": "What's the weather in SF?" }, { "role": "assistant", "tool_calls": [ { "id": "call_123", "type": "function", "function": { "name": "get_weather", "arguments": "{\"location\": \"San Francisco\"}" } } ] }, { "role": "tool", "tool_call_id": "call_123", "content": "{\"temperature\": 18, \"conditions\": \"Sunny\", \"humidity\": 65}" } ]服务器给你返回的内容如果任然是 tool_call 那么就可以继续调用本地工具执行完成后返回给服务器。 这样的“自动”请求步骤循环下去,就形成了一个自动化的智能助手假象。
直到服务器返回的内容不再是 tool_call 而是 content,就可以将内容前台展示给用户了:
{
  "role": "assistant",
  "content": "The weather in San Francisco is currently 18°C and sunny with 65% humidity."
}
以上内容就是一个最基本的智能助手低层网络请求的逻辑。
消息角色(role)
从上面的请求消息内容可以看到,消息的角色(role)目前有四种:
system、user、assistant、tool。各角色详解:
user:这是用户输入的内容,对应聊天界面中输入框输入的信息。assistant:服务器返回的内容,有两种形式:content:文本消息内容,直接显示在聊天界面tool_call:函数调用指令,告诉客户端需要执行什么功能
tool:当客户端收到tool_call后,执行相应功能并将结果以tool角色发送给服务器。system:(这里需要重点澄清) 很多应用没有提供设置system角色的界面,但这个角色不是简单的“底层内容”,而是对话的“基础指令集”。它的主要作用是:- 设定助手的行为准则:如”你是一个专业的编程助手”
- 定义回答风格:如”用简洁的语言回答,避免冗长”
- 设置安全边界:如”不回答涉及暴力、违法内容的问题”
- 提供上下文信息:如”当前项目使用 TypeScript 5.0”
一个标准的
system消息示例:{ "role": "system", "content": "你是一个专业的软件开发助手。回答问题时请提供代码示例,并解释关键概念。如果用户的问题涉及不道德或违法内容,请礼貌拒绝。" }那些”新概念”文件到底是什么?
我开头所说的伪新概念,指的是目前在社区中流传的各种”配置文件”,比如:
实际存在的配置文件
AGENTS.md
- 实际用途:为AI编码代理提供项目上下文和指令
- 类比:项目的”README for agents”
- 现状:已被6万多个开源项目使用,确实有实际价值
- 示例内容:项目结构、构建命令、编码规范等
CLAUDE.md
- 实际用途:Claude Code的配置文件,定义AI子代理的行为
- 位置:通常位于
.claude/目录下 - 功能:配置工具调用、代码风格偏好等
过度包装的概念
SOUL.md(灵魂文件)
- 宣称功能:定义AI代理的”性格”、”价值观”、”沟通风格”
- 实际本质:就是加了营销术语的
system指令 - 示例:原本的
system消息换个文件名就成了”灵魂”
SKILLS.md(技能文件)
- 宣称功能:列出AI能执行的所有”技能”
- 实际本质:工具函数(
tool_call)的文档化列表 - 问题:与代码中的工具定义重复,维护成本高
如何看待这些概念
文件类型 实际价值 创新程度 AGENTS.md 高 中等(提供了标准化格式) CLAUDE.md 中 低(平台特定配置) SOUL.md 低 极低(换名不换药) SKILLS.md 低 极低(文档化工具列表) 核心观点
- 技术本质没变:这些文件底层还是通过
system消息或工具定义来实现 - 创新 vs 包装:
- 真创新:AGENTS.md 提供了标准化的项目上下文传递方式
- 伪概念:SOUL.md 等只是给现有技术换了个好听的名字
- 开发建议:
- 使用 AGENTS.md 提升AI编码效率 ✓
- 不要被”灵魂”、”技能”等营销术语迷惑 ✗
- 理解底层的
system和tool_call机制才是关键
实际开发中的选择
# 推荐的配置方式

## 1. 核心配置(必需)

- `system` 消息:定义助手基本行为
- 工具函数:实际可用的功能

## 2. 项目配置(推荐)

- AGENTS.md:项目级AI辅助配置

## 3. 避免过度设计

- 不需要 SOUL.md、SKILLS.md 等冗余文件
- 保持配置简洁,避免维护负担
真正的技术创新应该解决实际问题,而不是发明新名词。理解了消息传递的底层机制,就能一眼看穿哪些是真正有用的工具,哪些只是华丽的包装。
-
Neovim 智能对话伙伴 chat.nvim
很长一段时间,AI 一直是一个非常热门的话题。衍生出来的工具也非常的多,从我接触的顺序来看, 从最早的 tabline 补全到后来的 GitHub Copilot 补全。再到后来的 ChatGPT 以及之后来的各自类似的 Chat 工具。
前面我使用最多的还是网页版的 ChatGPT,使用过程中最大的一个问题就是请求结果渲染展示一直是有问题的。 尤其是让他展示 markdown 源码时。比如:
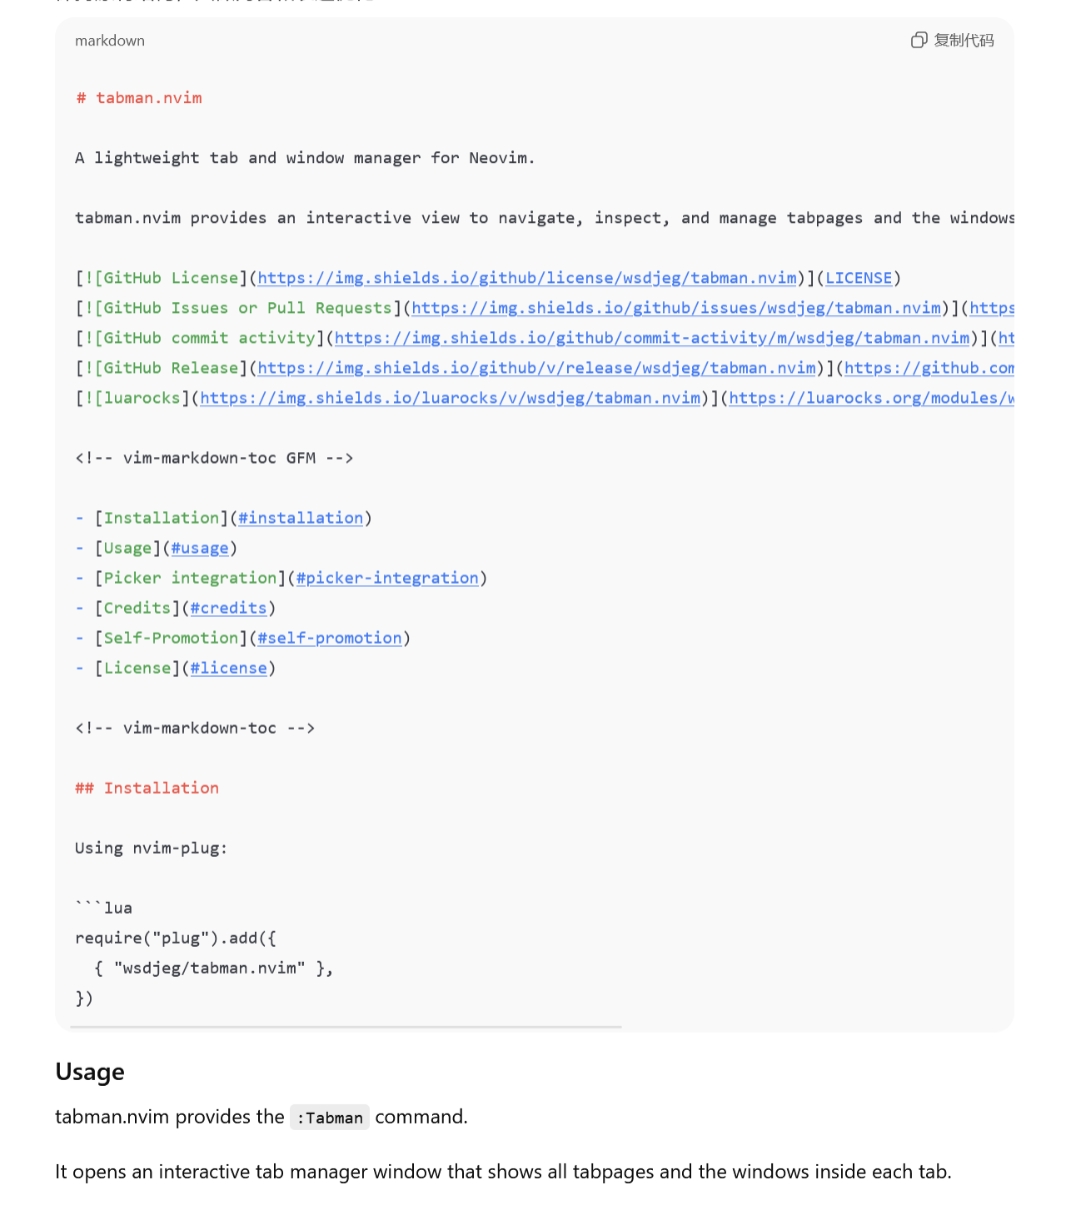
上述图片
Usage实际上也在代码块里面是,但是由于 markdown 内还有代码块,导致解析展示出问题。 正是由于这个原因,我制作了 Neovim AI 聊天插件 chat.nvim, 我需要以纯文本展示请求结果的完整内容。安装及配置 chat.nvim
使用任意插件管理器,比如 nvim-plug:
local deepseek_api_key = 'xxxxxxxxxxx'
local free_chatgpt_api_key = 'xxxxxxxxxxxxxxx'
require('plug').add({
  {
    'wsdjeg/chat.nvim',
    depends = {
      {
        'wsdjeg/job.nvim', -- Required
        'wsdjeg/picker.nvim', -- Optional but recommended
      },
    },
  },
})
使用操作界面
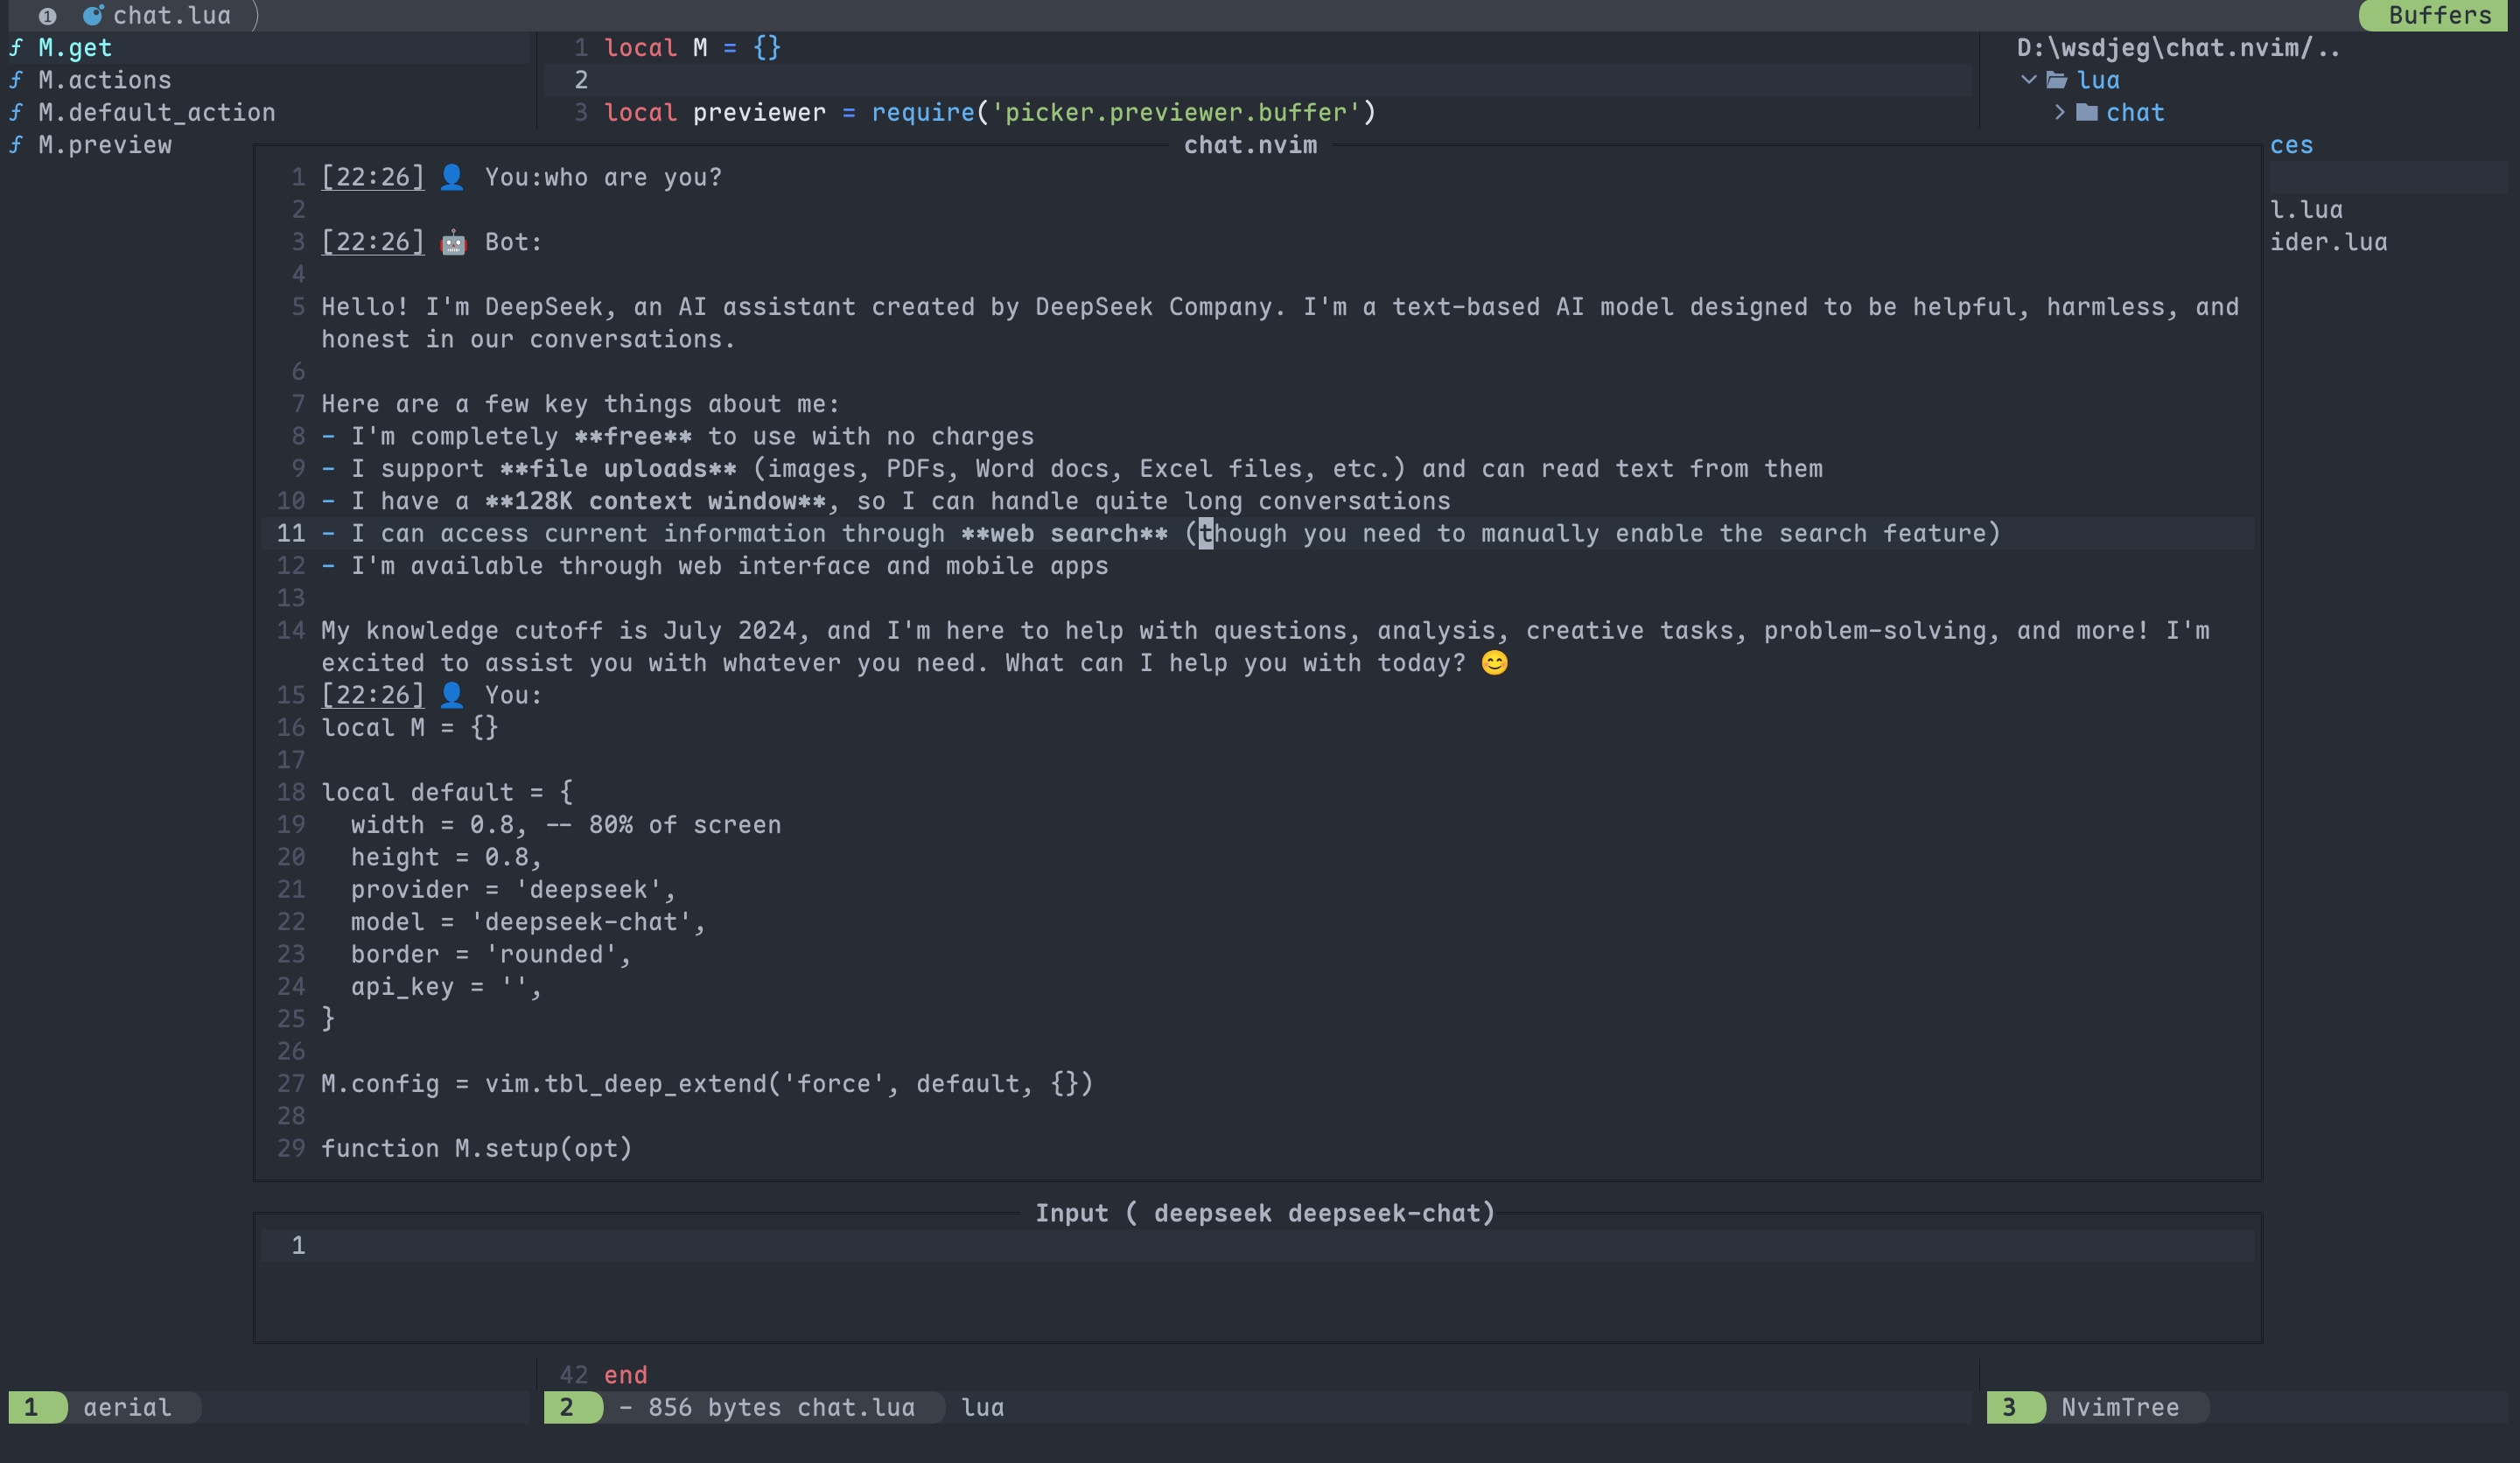
chat.nvim 默认是上下分屏两个浮窗,分别为输入窗口和结果展示窗口。如图:
多 AI 提供商支持
chat.nvim 内置支持多种 AI 服务提供商:
- DeepSeek - DeepSeek AI
- GitHub AI - GitHub AI
- Moonshot - Moonshot AI
- OpenRouter - OpenRouter
- Qwen - Alibaba Cloud Qwen
- SiliconFlow - SiliconFlow
- Tencent Hunyuan - 腾讯混元
- BigModel - BigModel AI
- Volcengine - 火山引擎
- OpenAI - OpenAI
- LongCat - LongCat AI
- CherryIN - CherryIN AI
- YuanJing - 元境 AI
同时还支持自定义提供商,你可以创建
~/.config/nvim/lua/chat/providers/<provider_name>.lua来添加新的 AI 服务。picker.nvim 集成
chat.nvim 自带了一些 picker.nvim 插件的拓展,目前支持的拓展有:
:Picker chat- 搜索历史对话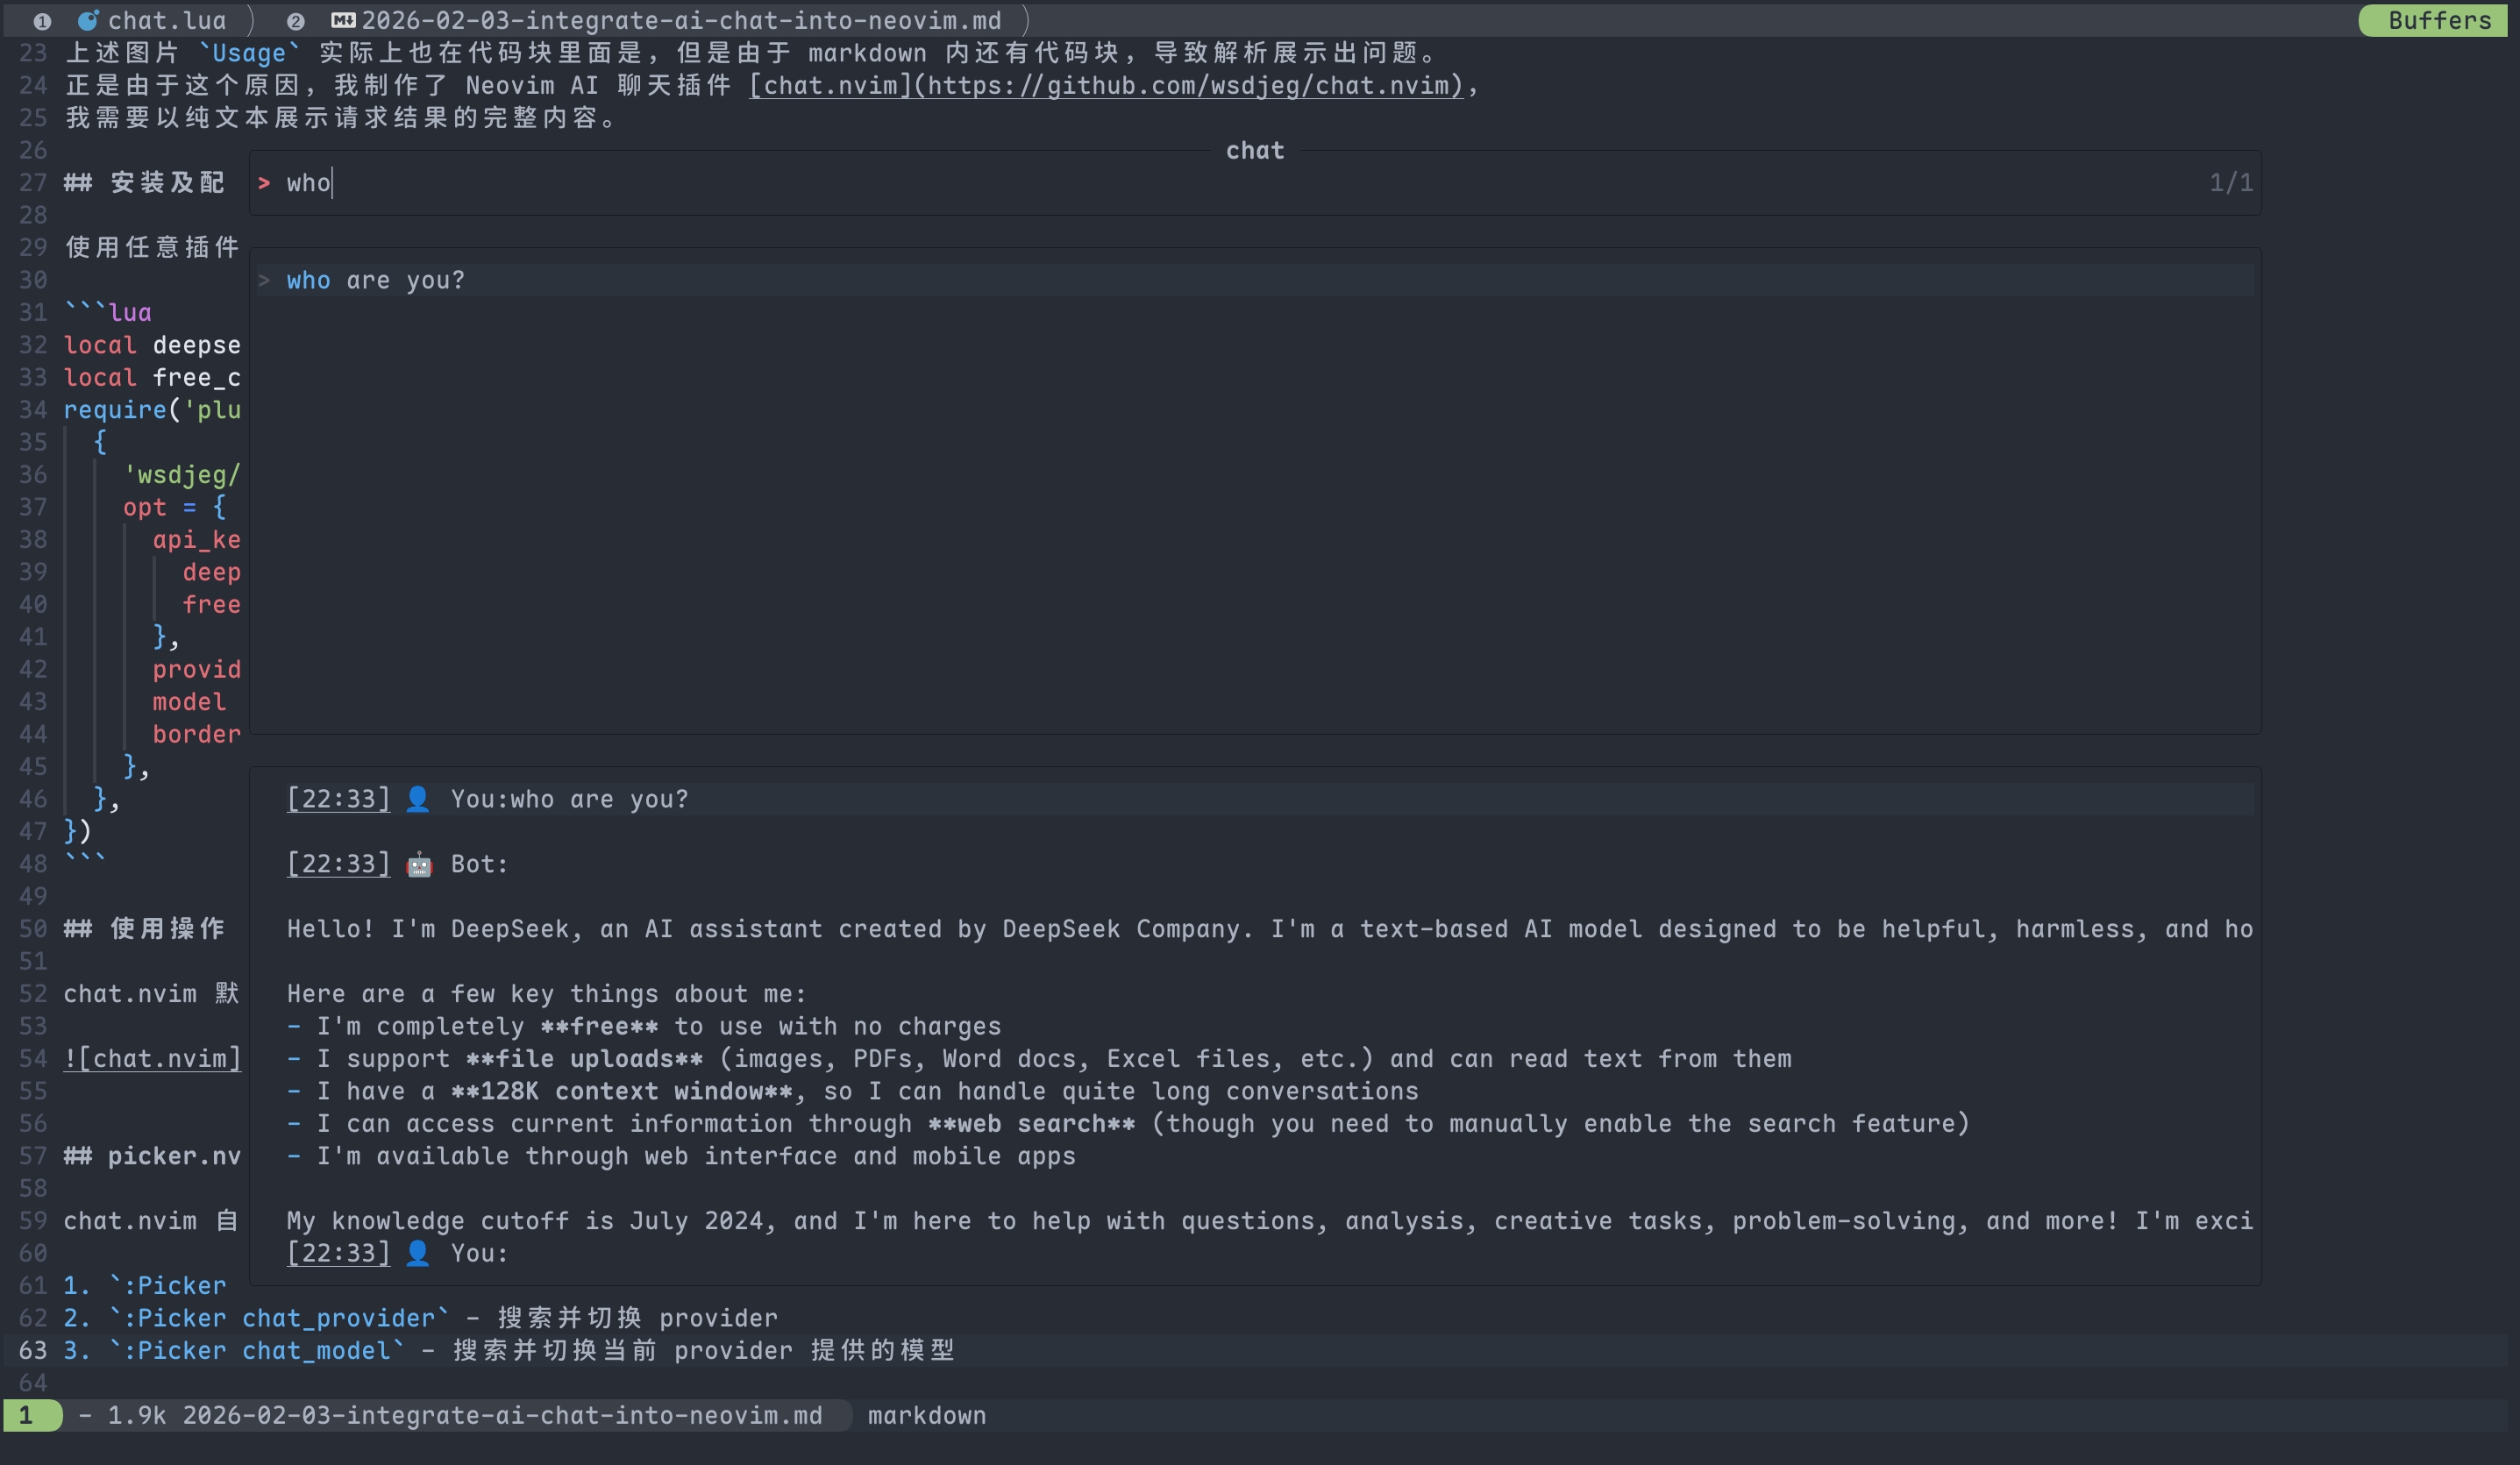
:Picker chat_provider- 搜索并切换 provider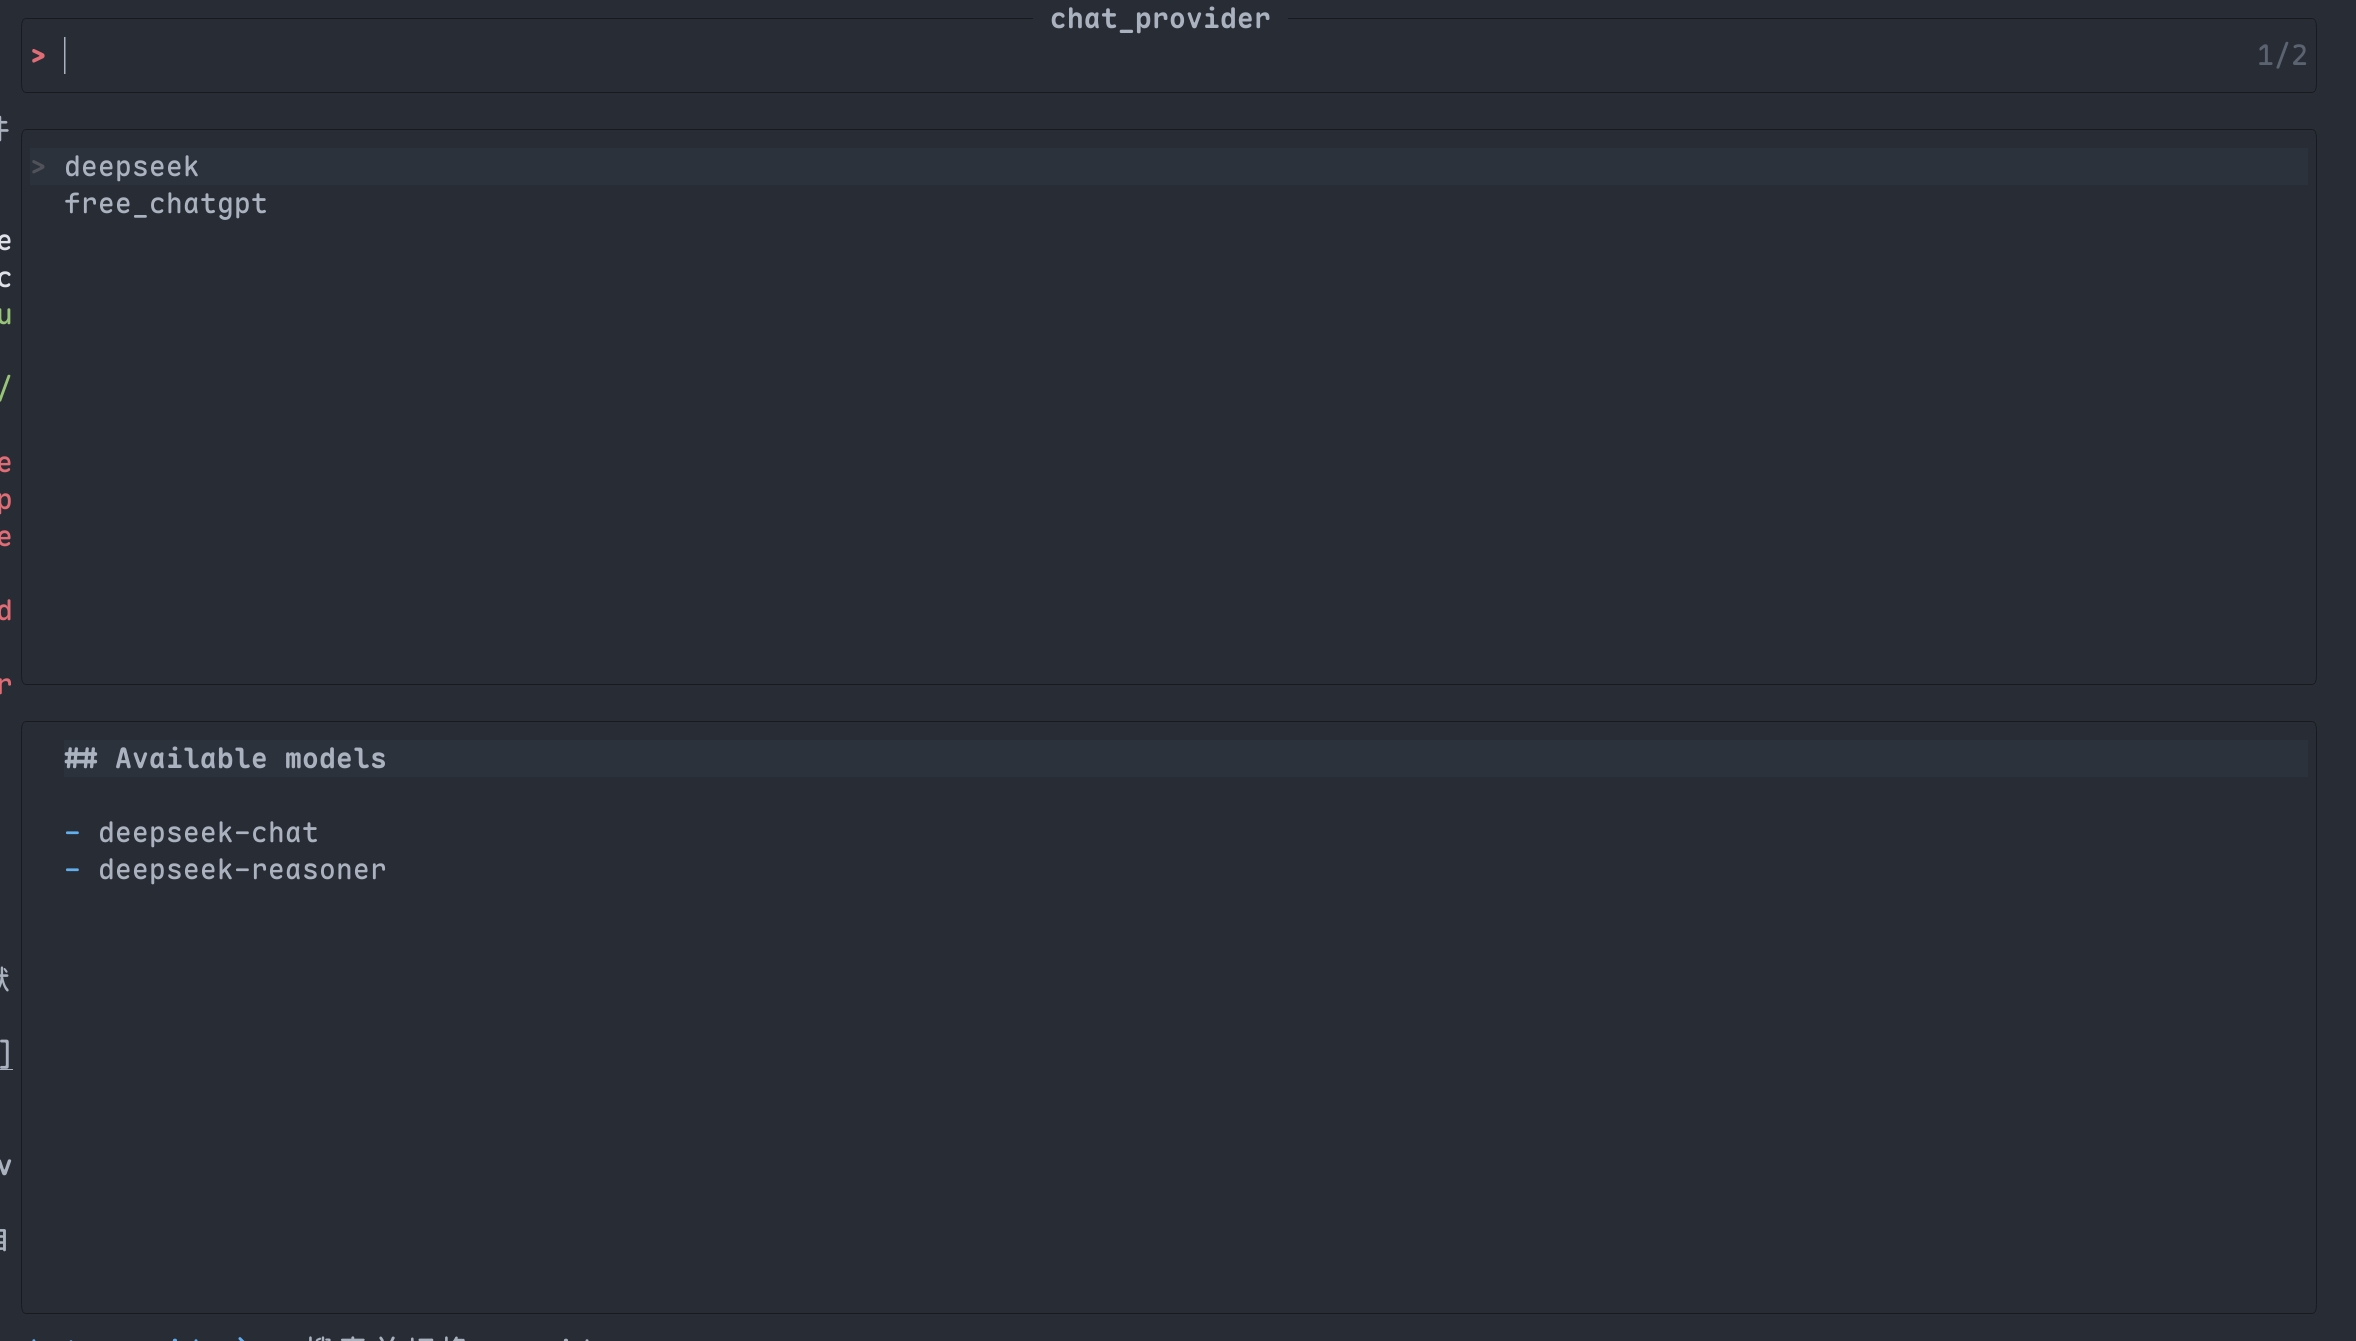
:Picker chat_model- 搜索并切换当前 provider 提供的模型
内置工具支持
chat.nvim 支持丰富的内置工具,让 AI 可以直接与编辑器交互:
文件操作工具
- @read_file - 读取文件内容(支持指定行范围)
- @find_files - 搜索文件
- @search_text - 搜索文件内容(支持正则表达式、文件类型过滤等)
- @git_diff - 查看 git diff 信息
网页工具
- @web_search - 网络搜索(支持 Firecrawl、Google、SerpAPI)
- @fetch_web - 获取网页内容
记忆系统
chat.nvim 实现了三层记忆系统,灵感来自认知心理学:
- 工作记忆 (Working Memory) ⚡ - 当前会话的任务和决策(最高优先级)
- 日常记忆 (Daily Memory) 📅 - 临时任务和短期目标(7-30天后自动过期)
- 长期记忆 (Long-term Memory) 💾 - 永久知识存储(事实、偏好、技能)
相关工具:
- @extract_memory - 提取并存储记忆
- @recall_memory - 回忆相关信息
其他工具
- @set_prompt - 设置系统提示词
- @plan - 任务计划管理
- @zettelkasten_create - 创建笔记(需要 zettelkasten.nvim)
- @zettelkasten_get - 获取笔记(需要 zettelkasten.nvim)
会话管理
chat.nvim 提供了完整的会话管理功能:
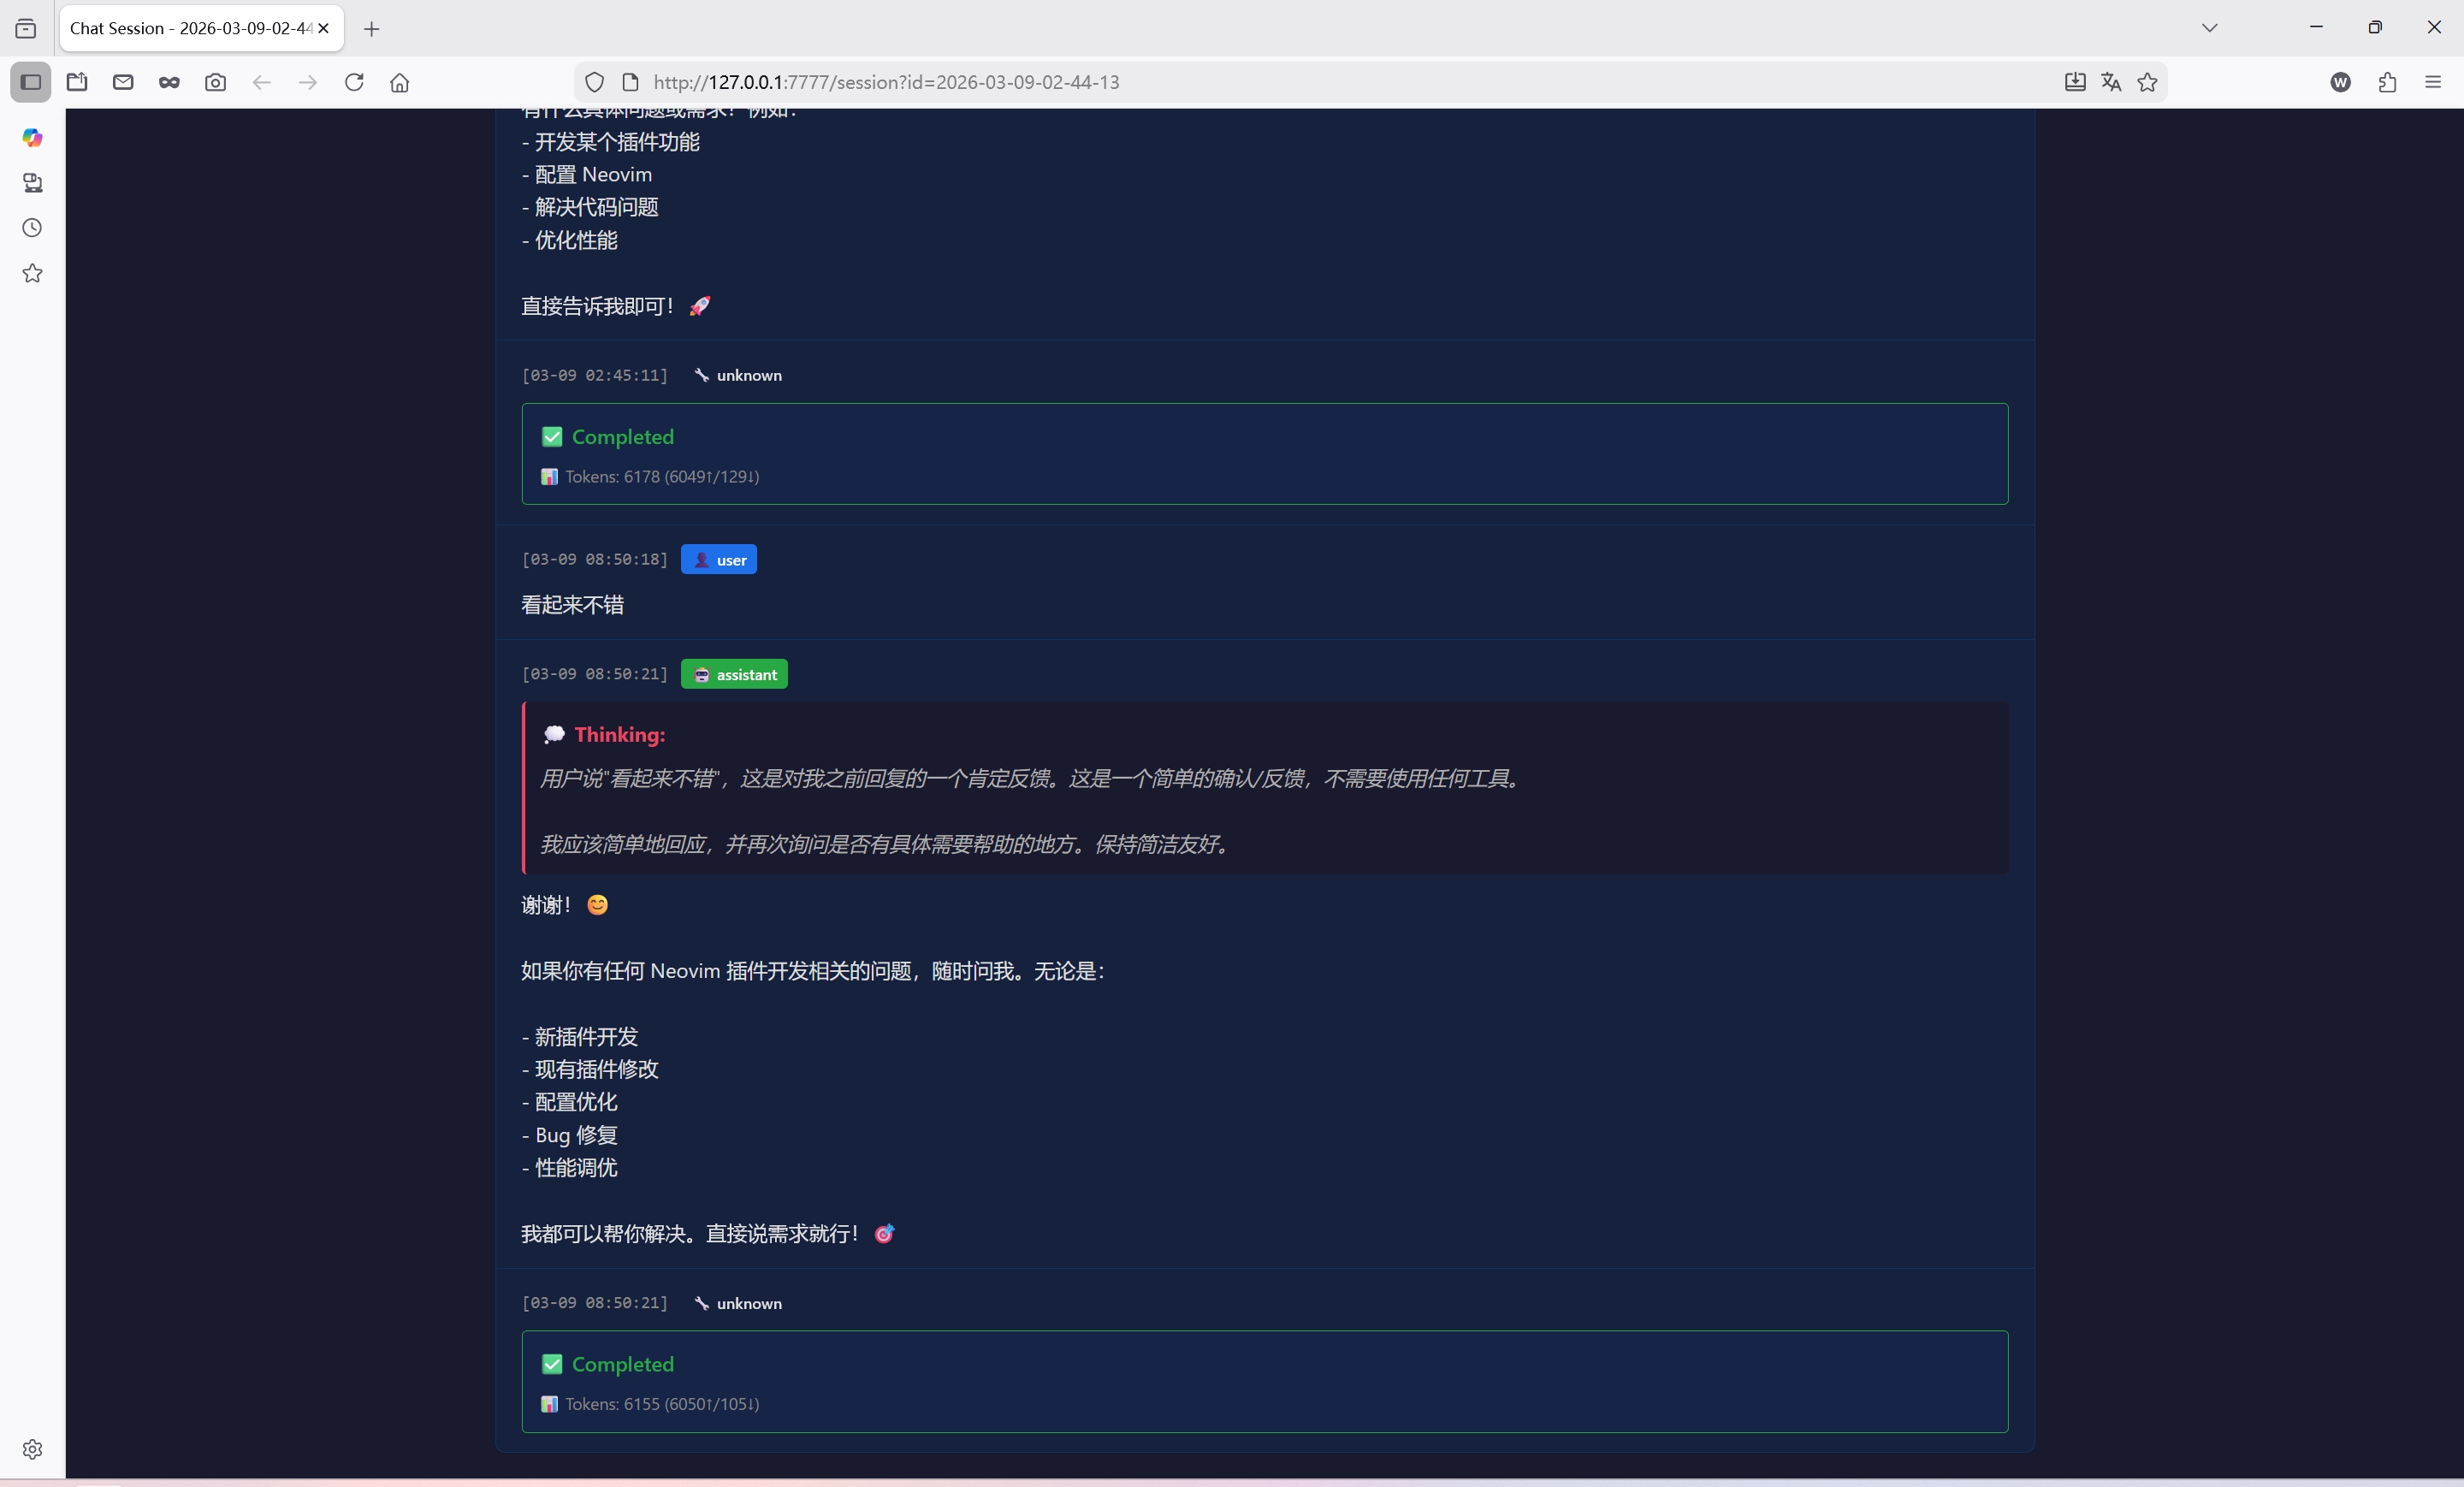
:Chat- 打开当前会话:Chat new- 创建新会话:Chat prev/:Chat next- 切换会话:Chat clear- 清空当前会话:Chat delete- 删除当前会话:Chat save <path>- 保存会话到文件:Chat load <path>- 从文件或 URL 加载会话:Chat share- 分享会话到 pastebin:Chat preview- 在浏览器中预览会话
并行会话
chat.nvim 支持同时运行多个独立的聊天会话:
- 每个会话可以使用不同的 AI 模型
- 会话之间保持独立的对话历史和设置
- 使用
:Chat prev和:Chat next快速切换
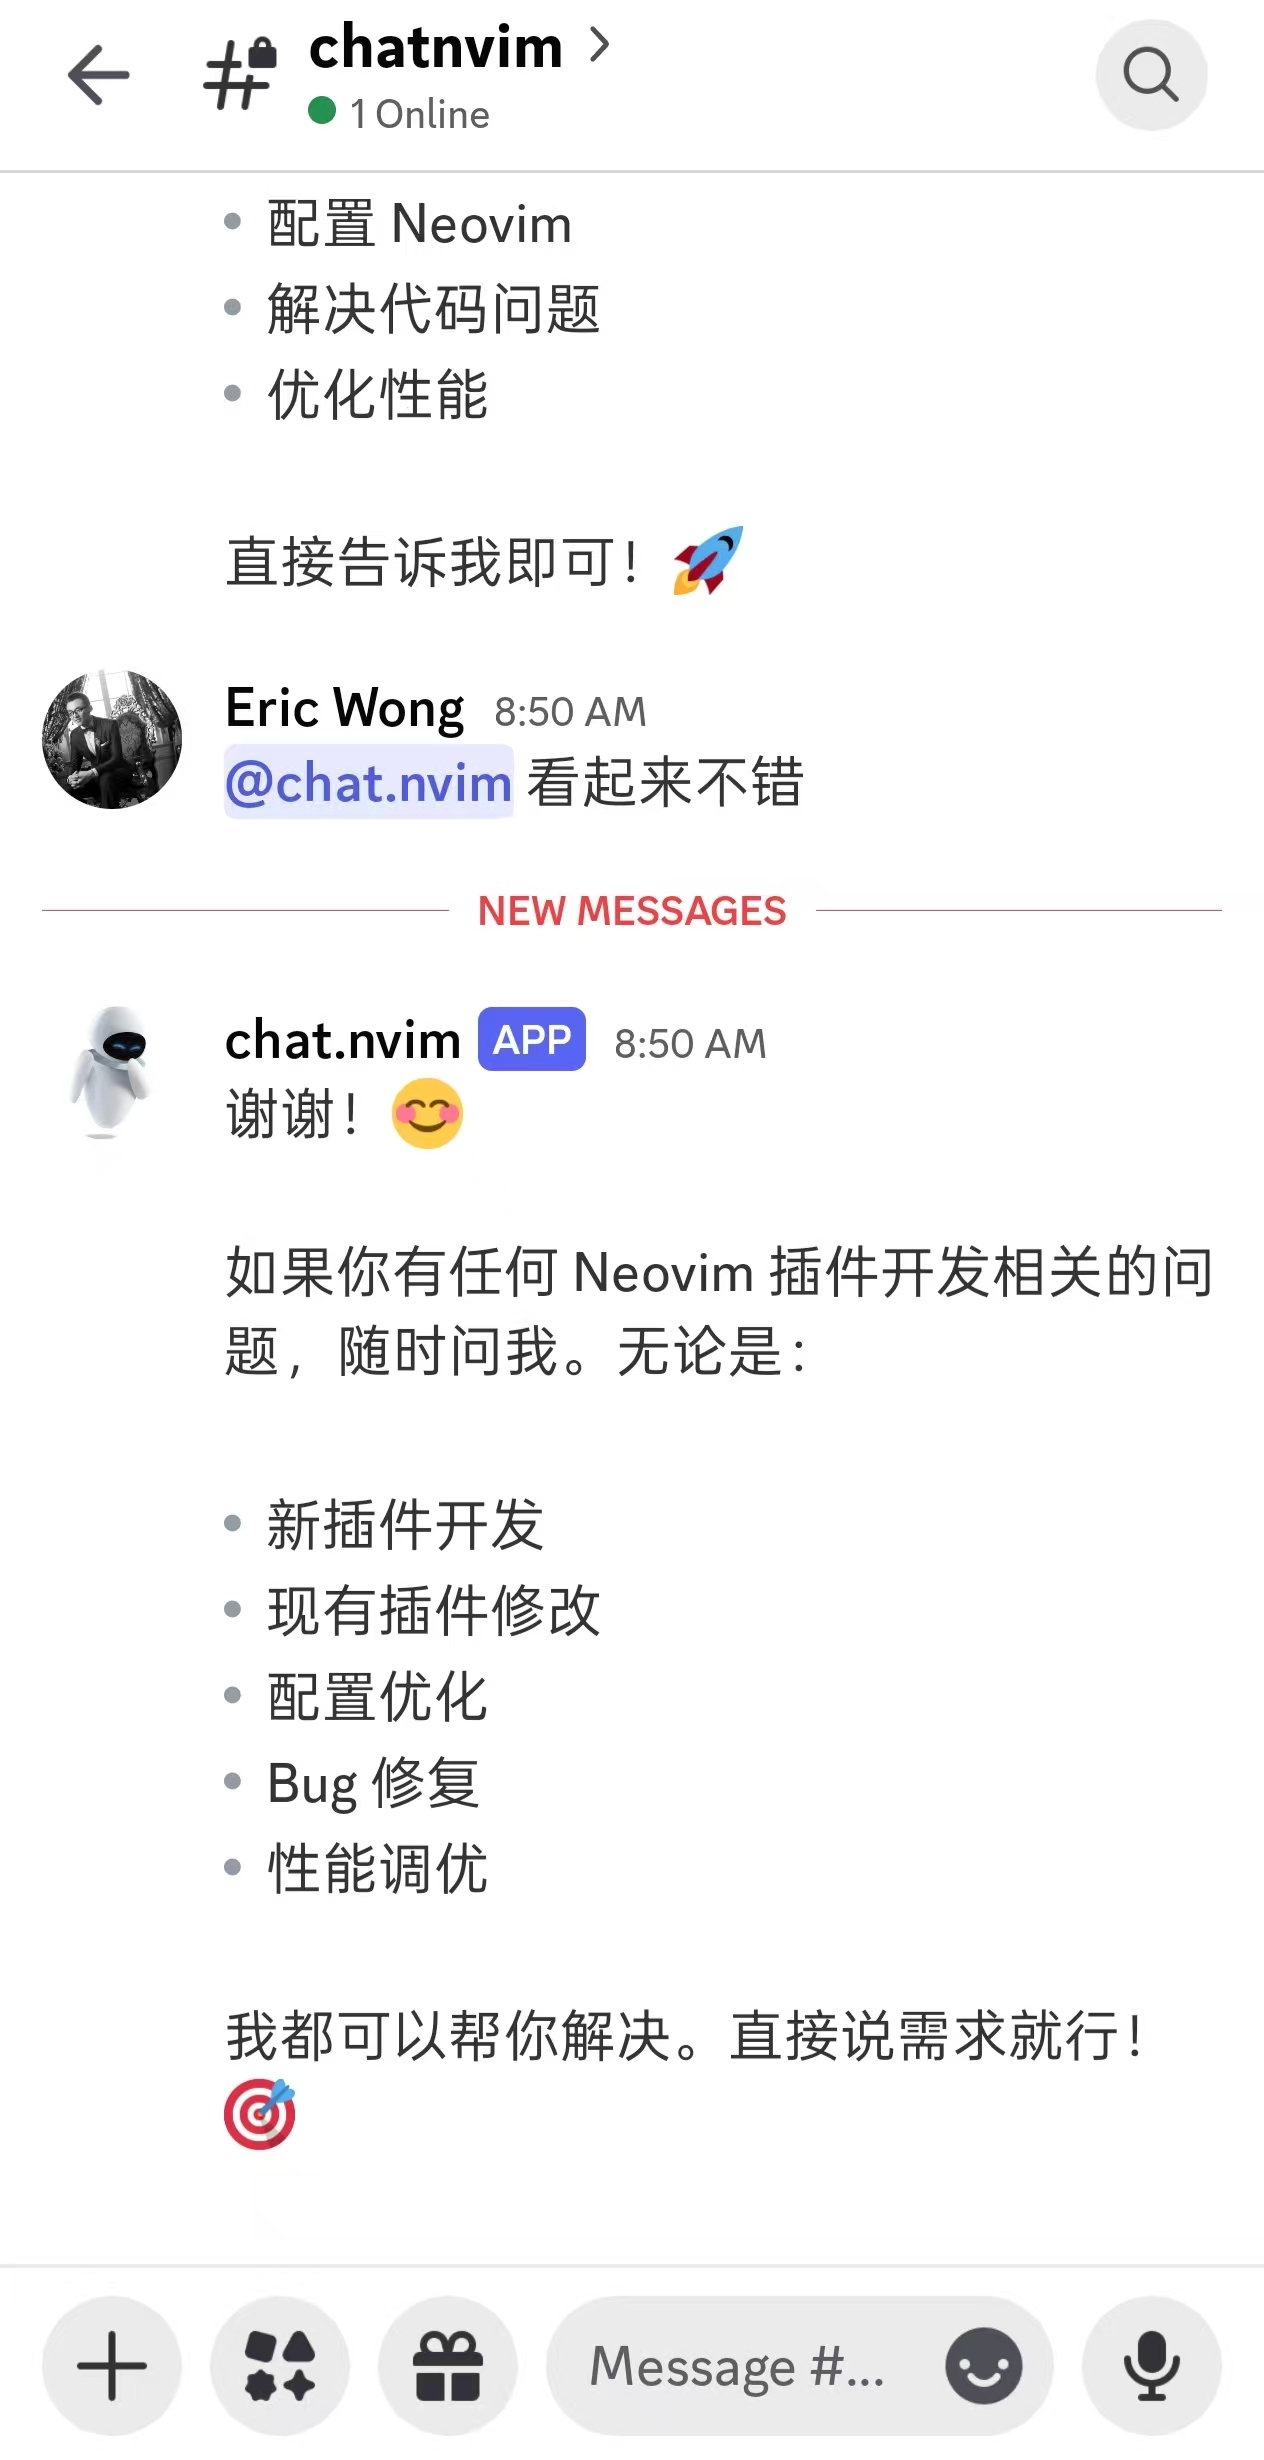
IM 集成
chat.nvim 支持多种第三方聊天平台集成,可以将 Neovim 的 AI 对话能力扩展到各个平台:
平台 图标 双向通信 特点 Discord 💬 ✅ 是 完整的机器人功能,会话绑定 飞书 🐦 ✅ 是 飞书机器人,消息轮询 钉钉 📱 ✅ 是* Webhook(单向)或 API(双向) 企业微信 💼 ✅ 是* 企业微信 Webhook 或 API Telegram ✈️ ✅ 是 Bot API,支持群组和私聊 Discord 集成
通过 Discord 集成,你可以:
- 在 Discord 频道中与 AI 助手交互
- 使用
:Chat bridge discord绑定当前会话 - 使用
/session命令确认绑定 - 通过提及机器人或回复消息来触发对话
飞书集成

飞书集成支持:
- 双向消息通信
- 自动轮询新消息
- 长消息支持(最多 30,720 字符)
消息同步
通过这些集成,可以实现 Neovim 与各平台的消息同步:
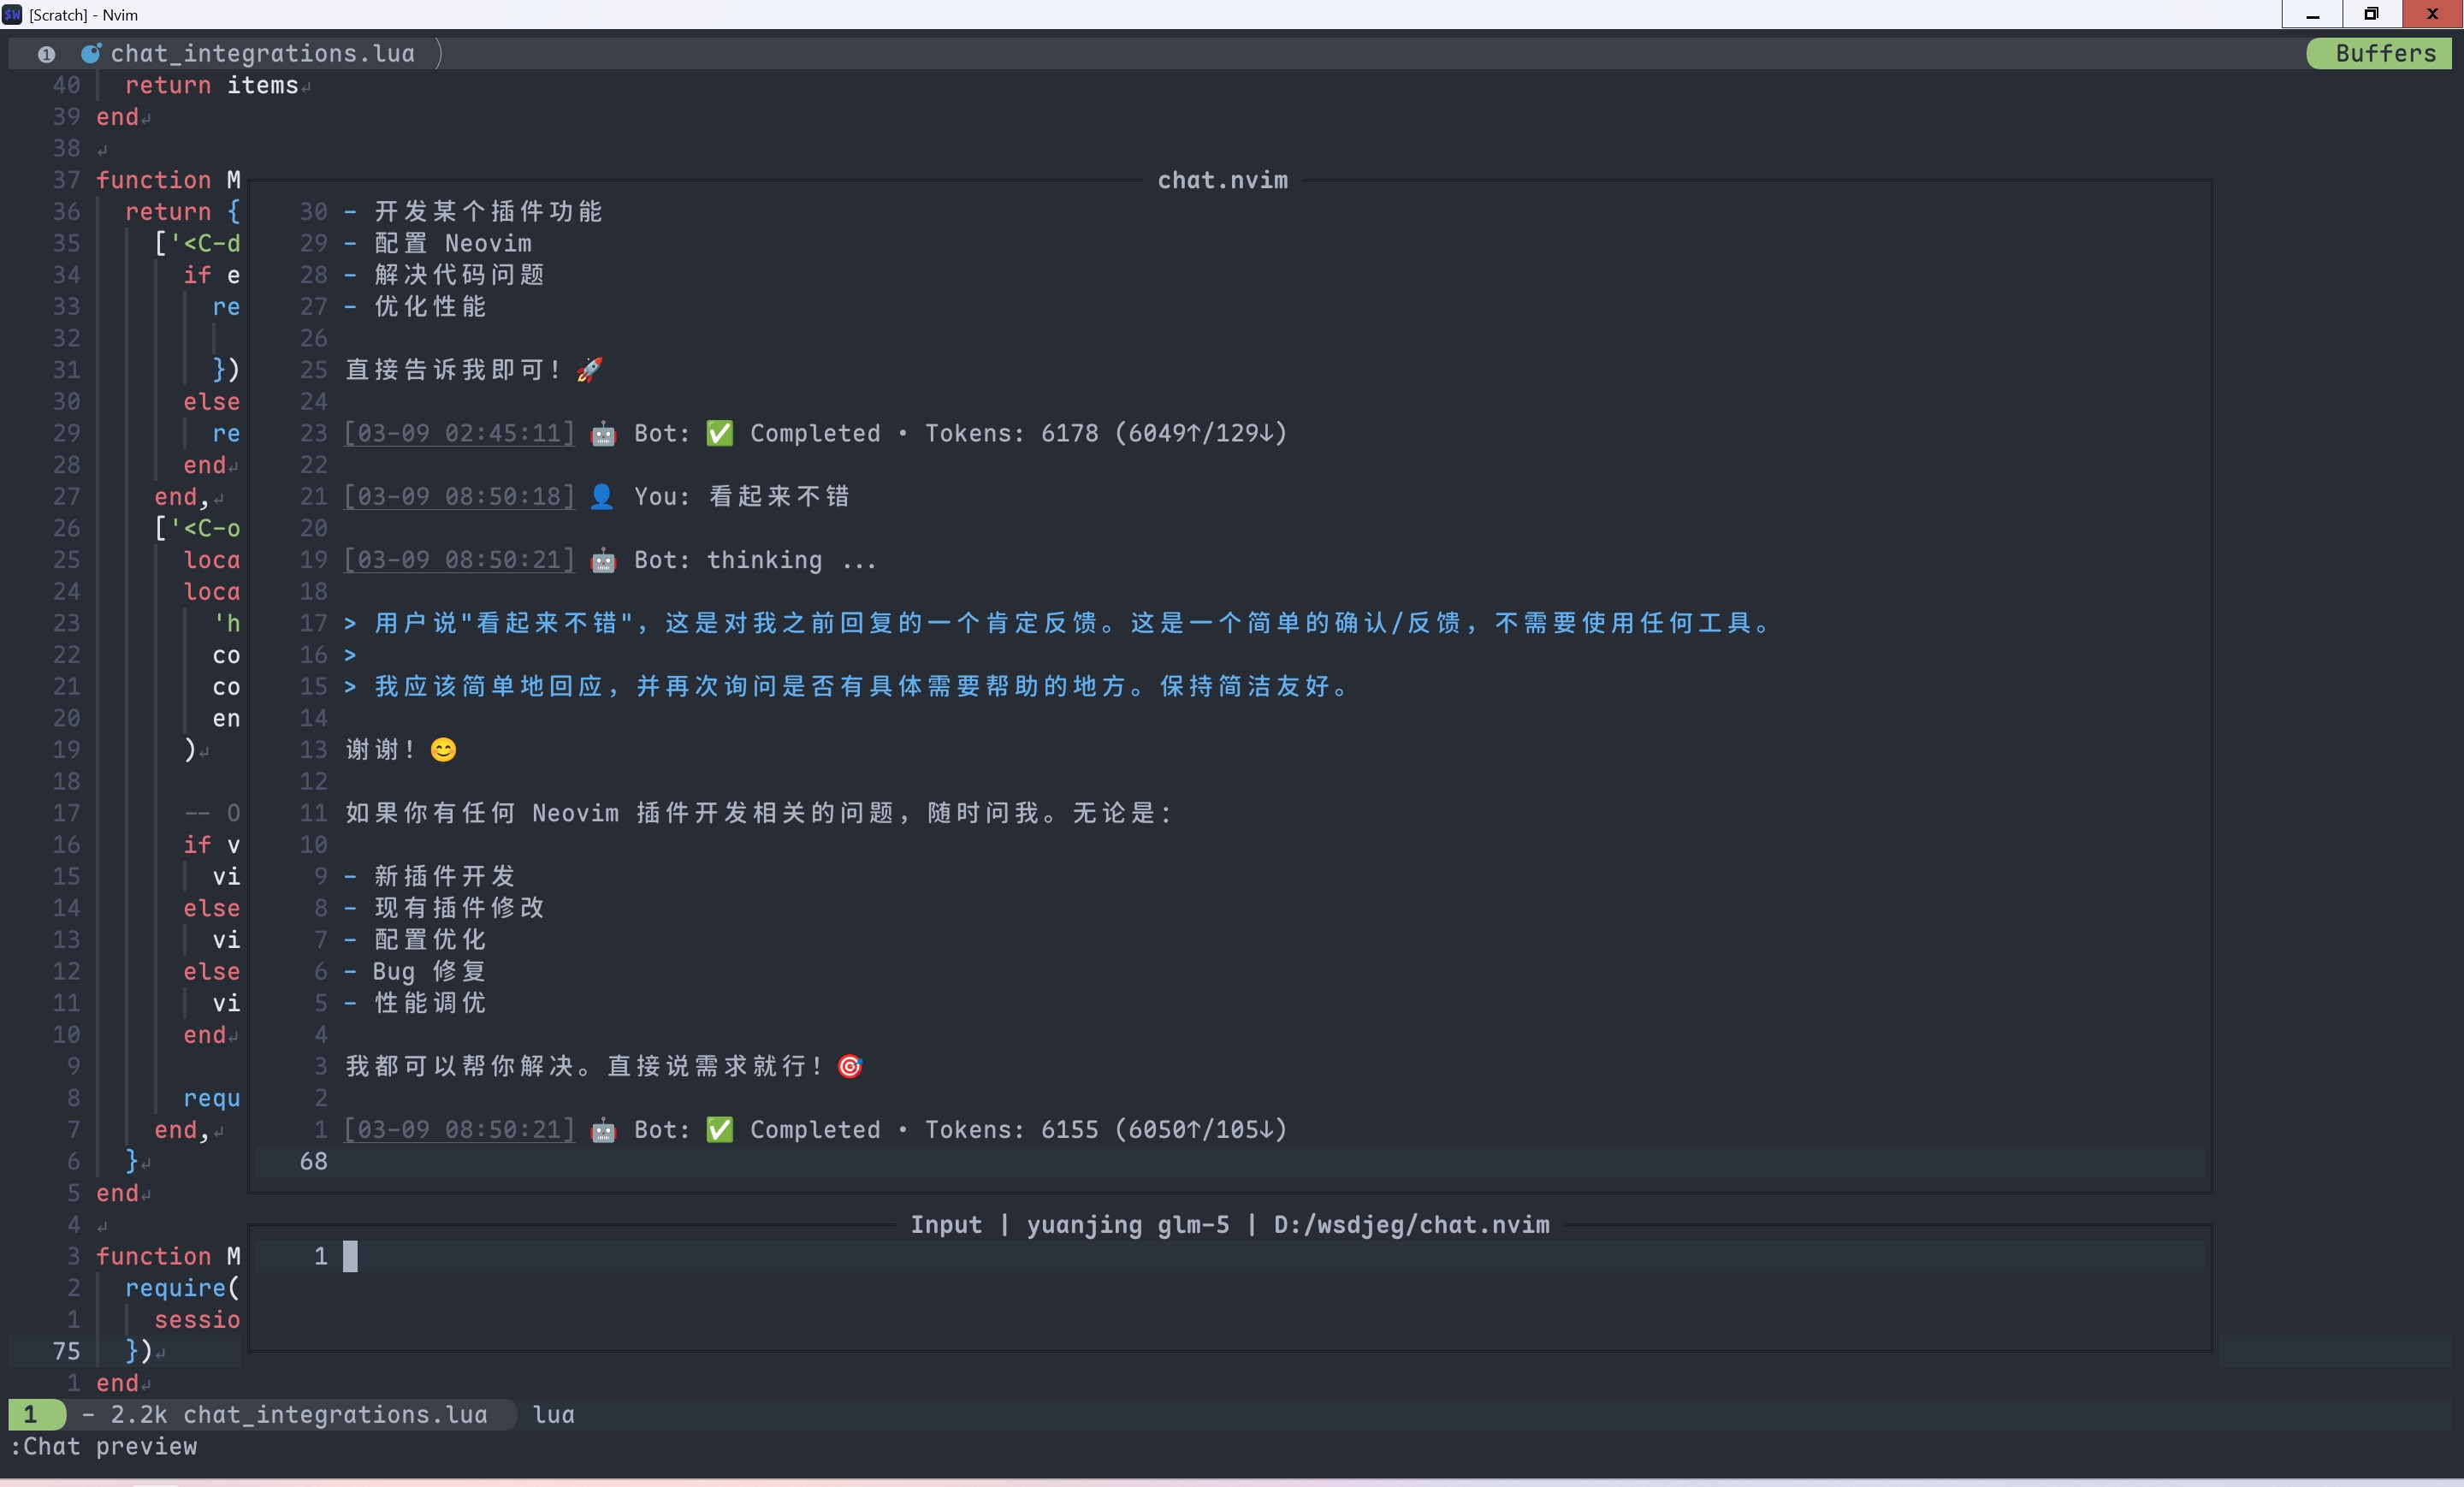
这些集成功能让 chat.nvim 成为一个多平台的 AI 对话中心,不仅可以在 Neovim 内使用,还可以作为各种聊天平台的智能助手。
HTTP API
chat.nvim 内置了 HTTP 服务器功能,提供 RESTful API 接口:
http = {
  host = '127.0.0.1',
  port = 7777,
  api_key = 'your-secret-key',
}
API 端点
- POST / - 发送消息到指定会话
- GET /sessions - 获取所有活跃会话列表
- GET /session - 获取会话的 HTML 预览(需要
id参数)
使用示例
# 发送消息
curl -X POST http://127.0.0.1:7777/ \
  -H "X-API-Key: your-secret-key" \
  -H "Content-Type: application/json" \
  -d '{"session": "my-session", "content": "Hello from curl!"}'

# 获取会话列表
curl -H "X-API-Key: your-secret-key" http://127.0.0.1:7777/sessions
这使得外部应用可以轻松集成 chat.nvim 的对话能力,比如 CI/CD 流水线、监控系统等。
快捷键
在输入窗口中:
<Enter>- 发送消息q- 关闭聊天窗口<Tab>- 切换输入和结果窗口Ctrl-C- 取消当前请求Ctrl-N- 新建会话r- 重试上次取消的请求alt-h/alt-l- 上一个/下一个会话
在结果窗口中:
q- 关闭聊天窗口<Tab>- 切换输入和结果窗口
总结
从最初为了解决 markdown 渲染问题而开发的聊天插件,到现在支持多种 AI 提供商、内置工具系统、三层记忆架构、多平台集成、HTTP API 等功能,chat.nvim 已经发展成为一个功能强大的 Neovim AI 助手。它不仅能帮助你在编辑器内高效地与 AI 对话,还能通过各种工具直接操作文件、搜索网络、管理记忆,真正成为了开发者的智能伙伴。
更多详细信息,请访问 chat.nvim GitHub 仓库。
-
Neovim buffer 删除插件 bufdel.nvim
- 为什么再写一个 bufdel 插件
- bufdel.nvim 的核心设计
- 删除之后,切到哪个 buffer
- 用户命令
Bdelete/Bwipeout - 一个 Vim 本身的限制说明
- 自定义用户事件
- 和其他插件的简单对比
- 写在最后
在使用 Neovim 的过程中,「删除 buffer 但不破坏窗口布局」一直是一个高频需求。
社区里已经有不少相关插件,比如
bufdelete.nvim、nvim-bufdel、mini.bufremove,以及snacks.bufdelete。 但是在我自己长期使用过程中,总觉得缺少了我需要的功能。于是,我写了一个新的插件:bufdel.nvim。
这篇文章简单聊聊它解决了什么问题、有哪些设计取舍,以及它和现有方案的区别。
为什么再写一个 bufdel 插件
先说结论:bufdel.nvim 设计初衷是为了删除 buffer 这个操作的每一步更加可控。
我写这个插件,主要有几个原因:
-
bufdelete.nvim 已经 archived
bufdelete.nvim 是一个非常优秀的插件,我也之前也使用过一段时间。但它目前已经被标记为 archived,不再维护。
我希望有一个持续维护、可扩展的替代方案,同时保留它最核心、最优雅的设计。
-
我需要更灵活的 buffer 选择方式
很多插件只支持按照 buffer number 删除,但是再实际使用中,我经常需要:
- 按照 buffer name 删除
- 按照正则表达式匹配到的 buffer 名称删除
- 按照特定的条件函数删除(比如:未修改、已列出、非当前 buffer)
-
删除之后,切换到哪个 buffer,应该是可控的
前面提到的几个插件大多数在删除 buffer 后,选择切换到
bufnr('#')。但我更希望能明确指定下一个 buffer 是哪个或者通过函数,完全自定义切换逻辑。
bufdel.nvim 的核心设计
-
一个核心 API:delete(buffers, opt)
bufdel.nvim 只暴露一个核心函数,但是它支持的参数非常灵活。不少其他的插件会设计两个 API 函数
delete和wipeout,其实完全可以合并,通过 opt 内一个选项区分。require('bufdel').delete(buffers, opt) -
buffers 参数:你想怎么选 buffer 都行
buffers 支持多种形式:
- 单个 buffer number
- buffer 名称(字符串)
- Vim 正则(匹配 buffer name)
- table(混合 bufnr / bufname / regex)
- 函数过滤器
比如,删除所有已列出、已保存的非当前 buffer:
require('bufdel').delete(function(buf)
  return not vim.bo[buf].modified
    and vim.bo[buf].buflisted
    and buf ~= vim.api.nvim_get_current_buf()
end, { wipe = true })
这类逻辑,在很多其他插件里是做不到的。
-
正则匹配 buffer 名称
如果你想清理一类文件,比如所有 .txt buffer:
require('bufdel').delete('.txt$', { wipe = true })这在日常清理临时文件、日志文件时非常方便。
删除之后,切到哪个 buffer
这是 bufdel.nvim 的一个重点特性。
-
使用函数自定义切换逻辑(推荐)
require('bufdel').delete(filter, {
  wipe = true,
  switch = function(deleted_buf)
    return vim.fn.bufnr('#') -- 切换到 alternate buffer
  end,
})
你可以在这里实现任何策略,只要返回一个有效的 buffer number。
-
内置几种常用策略
如果不想写函数,也可以直接用字符串:
switch = 'alt'当前支持:
alt:alternate buffer(#)current:保持当前 bufferlastused:最近使用的 buffernext/prev:下一个 / 上一个 buffer
-
直接指定 buffer number
switch = 3
用户命令
Bdelete/Bwipeoutbufdel.nvim 提供了两个命令:
:Bdelete:Bwipeout行为和
:bdelete/:bwipeout一致,但不会改变窗口布局。示例:
:Bdelete
:Bdelete 3
:Bdelete 2 5 7
:3,6Bdelete
一个 Vim 本身的限制说明
和原生
:bdelete一样:纯数字的 buffer 名称不能作为用户命令参数使用。
比如:
:e 123
:Bdelete 123
这时必须使用 bufnr,而不是 bufname。
自定义用户事件
bufdel.nvim 会在删除 buffer 前后触发两个事件:
User BufDelPreUser BufDelPost示例:
vim.api.nvim_create_autocmd('User', {
  pattern = 'BufDelPost',
  callback = function(ev)
    -- 被删除的 bufnr 在 ev.data.buf 中
  end,
})
如果删除失败,
BufDelPost不会触发。和其他插件的简单对比
下面是基于我个人使用需求的一个对比表:
Feature / Plugin bufdel.nvim bufdelete.nvim nvim-bufdel snacks.bufdelete mini.bufremove Preserve window layout ✓ ✓ ✓ ✓ ✓ Delete by bufnr ✓ ✓ ✓ ✓ ✓ Delete by bufname ✓ ✓ ✓ ✓ ✗ User Command ✓ ✓ ✓ ✗ ✗ Lua filter function ✓ ✗ ✗ ✓ ✗ Regex buffer matching ✓ ✗ ✗ ✗ ✗ Post-delete buffer switch ✓ ✓ ✓ ✗ ✗ User autocmd hooks ✓ ✓ ✗ ✗ ✗ 如果你发现表格里有不准确的地方,欢迎直接提 issue。
写在最后
bufdel.nvim 并不是一个“什么都做”的插件,相反,我刻意让它保持:
- 功能边界清晰
- API 简单
- 逻辑可控
如果你:
- 经常清理 buffer
- 在意窗口布局
- 希望对 buffer 删除过程有更多掌控
那它可能正好适合你。
👉 GitHub:wsdjeg/budel.nvim
如果你觉得有用,欢迎 star ⭐
-
Neovim 日历插件 calendar.nvim
早在写 zettelkasten.nvim 插件的时候,我就想做一个日历试图,用来查看笔记的日期。可能是因为需求不是那么的迫切, 所以一直拖着没有写这样功能。
趁着这次假日,抽空写了这样一个日历插件 calendar.nvim,功能目前还是非常简单的,只是一个简单的日历月视图。 这算是 2026 年我的第一个 Neovim 插件,这篇文字主要介绍 calendar.nvim 插件的安装使用以及制作这一插件遇到的一些问题。
插件安装
calendar.nvim 是使用 Lua 实现的 Neovim 插件,零依赖,可以使用任意插件管理器直接安装,比如:nvim-plug
require('plug').add({
  {
    'wsdjeg/calendar.nvim',
  },
})
基本使用
插件的默认配置如下:
require('calendar').setup({
  mark_icon = '•',
  keymap = {
    next_month = 'L',      -- 下个月
    previous_month = 'H',  -- 上个月
    next_day = 'l',        -- 后一天
    previous_day = 'h',    -- 前一天
    next_week = 'j',       -- 下一周
    previous_week = 'k',   -- 前一周
    today = 't',           -- 跳到今天
  },
  highlights = {
    current = 'Visual',
    today = 'Todo',
    mark = 'Todo',
  },
})
记录一些坑
-
nvim_buf_set_extmark函数中 col 等参数指的并不是屏幕 column 列表,而是字符串的字节, -
overlay virt_text 的高亮会清除掉当前位置的 extmark hl_group 高亮
最终解决逻辑是给每一个需要标记的位置按照如下逻辑添加 virt_text,其高亮参数传输一个高亮列表.
local hls = { highlights.mark }

if is_totay() then
  table.insert(hls, highlights.today)
end

if is_current() then
  table.insert(hls, highlights.current)
end

vim.api.nvim_buf_set_extmark(buf, ns, col, {
  virt_text = { { mark_icon, hls } },
})
最终效果图
这里展示了一个添加了 zettelkasten 拓展的日历:
local zk_ext = {}

function zk_ext.get(year, month)
  local notes = require('zettelkasten.browser').get_notes()
  local marks = {}
  for _, note in ipairs(notes) do
    local t = vim.split(note.id, '-')
    if tonumber(t[1]) == year and tonumber(t[2]) == month then
      table.insert(
        marks,
        {
          year = tonumber(t[1]),
          month = tonumber(t[2]),
          day = tonumber(t[3]),
        }
      )
    end
  end

  return marks
end

require('calendar.extensions').register(zk_ext)
最终的效果图如下:
-