-
文件路径大小写敏感导致 Lua 模块重载
事情起因
时隔十年,再次被 Windows 系统的路劲大小写问题坑了一把。记得上一次被坑是因为写 Vim Script 的 autoload 脚本时出现的问题。 最近使用 Lua 重新写了 ChineseLinter.vim 这个插件,最开始的文件结构:
文件:
plugins/chineselinter.luareturn { 'wsdjeg/ChineseLinter.nvim', dev = true, opts = { ignored_errors = { 'E015', 'E013', 'E020', 'E021' }, }, cmds = { 'CheckChinese' }, desc = 'Chinese Document Language Standards Checking Tool', }按照以上配置,无论如何 ignored_errors 配置都无法起效。
寻找原因
上述插件在载入时没有报错,说明被成功载入并且执行了 setup 函数。我试着用单独的脚本来测试,并且打入一些日志:
vim.opt.runtimepath:append("D:/wsdjeg/job.nvim")
vim.opt.runtimepath:append("D:/wsdjeg/logger.nvim")
vim.opt.runtimepath:append("D:/wsdjeg/nvim-plug")

require('plug').setup({

    bundle_dir = 'D:/bundle_dir',
    raw_plugin_dir = 'D:/bundle_dir/raw_plugin',
    -- ui = 'notify',
    http_proxy = 'http://127.0.0.1:7890',
    https_proxy = 'http://127.0.0.1:7890',
    enable_priority = false,
    enable_luarocks = true,
    max_processes = 16,
    dev_path = 'D:/wsdjeg',
})

require("plug").add({
	{
		"wsdjeg/ChineseLinter.nvim",
		dev = true,
		opts = {
			ignored_errors = { "E015", "E013", "E020", "E021" },
		},
		cmds = { "CheckChinese" },
		desc = "Chinese Document Language Standards Checking Tool",
	},
})
日志结果如下:
[ 23:35:32:449 ] [ Info  ] [ cnlint ] module is loaded
[ 23:35:32:450 ] [ Info  ] [ cnlint ] setup function is called
[ 23:35:32:450 ] [ Info  ] [   plug ] load plug: ChineseLinter.nvim in 4.3624ms
[ 23:35:32:451 ] [ Info  ] [ cnlint ] module is loaded
[ 23:35:32:451 ] [ Info  ] [ cnlint ] check function is called
不难看出 ChineseLinter 模块被载入了两次,第一次载入及setup函数是 nvim-plug 在执行,执行后计算的载入时间,第二次是执行 CheckChinese 命令时, 而这一命令是在
plugin/ChineseLinter.lua内定义的:vim.api.nvim_create_user_command("CheckChinese", function(opt) require("ChineseLinter").check() end, { nargs = "*" })问题就在这里,这个命令内
require('ChineseLinter')不应该再次载入模块文件,因为前面 nvim-plug 已经执行过一次了,正常情况下 package.loaded 内会缓存模块。看一下 nvim-plug 载入 Lua 插件的逻辑,它会给 plugSpec 自动设置一个模块名称, 以便于自动执行
require(plugSpec.module).setup(plugSpec.opts)。问题就在于这个 module 名称生成函数原先是:
local function get_default_module(name)
  return name
    :lower()
    :gsub('[%.%-]lua$', '')
    :gsub('^n?vim-', '')
    :gsub('[%.%-]n?vim', '')
end
也就是说,按照上述载入插件方式,nvim-plug 执行的是
require('chineselinter'),这在 Windows 系统下, 因为文件lua/ChineseLinter/init.lua已存在,那么上述 require 函数就会读取这个模块。而
:CheckChinese命令实际上调用的模块是require('ChineseLinter')。 因为 Lua 的模块名称实际上是大小写敏感的,就会再次去寻找模块文件以载入。如何修复?
我查阅了几个插件管理器,他们的获取模块名称的函数基本上逻辑类似,都使用了
lower()函数:---@param name string ---@return string function M.normname(name) local ret = name:lower():gsub("^n?vim%-", ""):gsub("%.n?vim$", ""):gsub("[%.%-]lua", ""):gsub("[^a-z]+", "") return ret end实际上,最好是不要自动去将模块的名字全部小写,按照仓库的名称来最合适,去除掉前后缀,修改 nvim-plug 如下:
diff --git a/lua/plug/loader.lua b/lua/plug/loader.lua
index d0fc7b6..957fcb7 100644
--- a/lua/plug/loader.lua
+++ b/lua/plug/loader.lua
@@ -68,8 +68,7 @@ end
 --- @param name string
 --- @return string
 local function get_default_module(name)
-    return name:lower()
-        :gsub('[%.%-]lua$', '')
+    return name:gsub('[%.%-]lua$', '')
         :gsub('^n?vim-', '')
         :gsub('[%.%-]n?vim', '')
 end
@@ -94,6 +93,13 @@ function M.parser(plugSpec)
     plugSpec.name = check_name(plugSpec)
     if not plugSpec.module then
         plugSpec.module = get_default_module(plugSpec.name)
+        log.info(
+            string.format(
+                'set %s default module name to %s',
+                plugSpec.name,
+                plugSpec.module
+            )
+        )
     end
     if #plugSpec.name == 0 then
         plugSpec.enabled = false
考虑到 Windows 系统的大小写敏感,以及
Shift键这么难按,我将插件的名称以及其内模块的名称都改成了小写,修改后插件的安装方式:return { 'wsdjeg/chineselinter.nvim', dev = true, opts = { ignored_errors = { 'E015', 'E013', 'E020', 'E021' }, }, cmds = { 'CheckChinese' }, desc = 'Chinese Document Language Standards Checking Tool', }总结
上述核心问题在于 Lua 的 require() 函数读取模块缓存时判断的是
package.load[key],这里的key是大小写敏感的。 而发现缓存不存在时,依照key去载入文件时,在 Windows 系统下路劲又是不敏感的, 会导致同一个模块被不同的大小写模块名称多次载入。
-
Neovim 悬浮滚动条 scrollbar.nvim
scrollbar.nvim 简介
好几年前,我使用 Vim Script 实现过一个悬浮侧栏插件 scrollbar.vim, 前段时间该插件使用 Lua 进行了重写并改名称为 scrollbar.nvim, 重写后的插件只支持 Neovim。
scrollbar.nvim 会在当前窗口的右侧使用浮窗绘制一个滚动条,其位置依据当前窗口显示的内容在整个文件中所在的行数, 并且随着鼠标移动、滚屏等操作上下移动。
安装 scrollbar.nvim
使用 nvim-plug 进行安装:
require('plug').add({
    {
        'wsdjeg/scrollbar.nvim'
    }
})
或者使用 luarocks 进行安装:
luarocks install scrollbar.nvim插件的配置
require('scrollbar').setup({
  max_size = 10,
  min_size = 5,
  width = 1,
  right_offset = 1,
  excluded_filetypes = {
    'startify',
    'git-commit',
    'leaderf',
    'NvimTree',
    'tagbar',
    'defx',
    'neo-tree',
    'qf',
  },
  shape = {
    head = '▲',
    body = '█',
    tail = '▼',
  },
  highlight = {
    head = 'Normal',
    body = 'Normal',
    tail = 'Normal',
  },
  debug = false,
})
-
如何正确地使用 ftplugin 目录
前面再阅读一些插件源码时,发现一个问题,很多插件的使用了 ftplugin 这个目录,其内的脚本文件中直接使用了
setlocal xx=xx这样的语法。 在早期的 Neovim 或者 Vim 版本中这样确实没有问题,但是随着 Neovim 功能特性增加。这样写就会容易出错。 实际上,直到目前为止 Neovim 和 Vim 的官方文档:h ftplugin内的示例还是:" Only do this when not done yet for this buffer if exists("b:did_ftplugin") finish endif let b:did_ftplugin = 1 setlocal textwidth=70Neovim 插件的 ftplugin 目录是一个特殊的文件夹,其内的文件会在 FileType 事件触发是被载入。
看一下 Neovim 的源码,ftplugin 目录下的文件是如何被载入的。
augroup filetypeplugin
  au FileType * call s:LoadFTPlugin()

  func! s:LoadFTPlugin()
    if exists("b:undo_ftplugin")
      exe b:undo_ftplugin
      unlet! b:undo_ftplugin b:did_ftplugin
    endif

    let s = expand("<amatch>")
    if s != ""
      if &cpo =~# "S" && exists("b:did_ftplugin")
	" In compatible mode options are reset to the global values, need to
	" set the local values also when a plugin was already used.
	unlet b:did_ftplugin
      endif

      " When there is a dot it is used to separate filetype names.  Thus for
      " "aaa.bbb" load "aaa" and then "bbb".
      for name in split(s, '\.')
        " Load Lua ftplugins after Vim ftplugins _per directory_
        " TODO(clason): use nvim__get_runtime when supports globs and modeline
        " XXX: "[.]" in the first pattern makes it a wildcard on Windows
        exe $'runtime! ftplugin/{name}[.] ftplugin/{name}_*. ftplugin/{name}/*.'
      endfor
    endif
  endfunc
augroup END
以上内容不难看出,Neovim 实际上是监听了
FileType这个事件,然后根据expand('<amatch>')的值来执行:runtime命令。但是,随着 Neovim 和 Vim 增加了设置非当前 buffer 的 option 这一功能后。就会出现这样问题,当 FileType 事件触发时,触发的 buffer 并非是当前 buffer。 那么在 ftplugin 内如果使用了
setlocal这样的命令,有可能会设置错了缓冲区。test_ft.lua
local log = require("logger").derive("ft")
log.info("nvim_get_current_buf() is " .. vim.api.nvim_get_current_buf())
log.info("nvim_get_current_win() is " .. vim.api.nvim_get_current_win())
log.info("-----------------------------------------------------")
local real_current_win = vim.api.nvim_get_current_win()
local newbuf = vim.api.nvim_create_buf(true, false)

local events = {}

for _, v in ipairs(vim.fn.getcompletion("", "event")) do
	if not vim.endswith(v, "Cmd") then
		table.insert(events, v)
	end
end

local id = vim.api.nvim_create_autocmd(events, {
	group = vim.api.nvim_create_augroup("test_ft", { clear = true }),
	pattern = { "*" },
	callback = function(ev)
		log.info("-----------------------------------------------------")
		log.info("event is " .. ev.event)
		log.info("ev.buf is " .. ev.buf)
		log.info("nvim_get_current_buf() is " .. vim.api.nvim_get_current_buf())
		log.info("nvim_get_current_win() is " .. vim.api.nvim_get_current_win())
		log.info("real_current_win's buf is" .. vim.api.nvim_win_get_buf(real_current_win))
	end,
})

vim.api.nvim_open_win(newbuf, false, { split = "above" })
vim.api.nvim_set_option_value("filetype", "test123", { buf = newbuf })
vim.api.nvim_del_autocmd(id)
log.info("-----------------------------------------------------")
log.info("nvim_get_current_buf() is " .. vim.api.nvim_get_current_buf())
log.info("nvim_get_current_win() is " .. vim.api.nvim_get_current_win())
[ 23:50:19:932 ] [ Info ] [ ft ] nvim_get_current_buf() is 7 [ 23:50:19:932 ] [ Info ] [ ft ] nvim_get_current_win() is 1000 [ 23:50:19:932 ] [ Info ] [ ft ] ----------------------------------------------------- [ 23:50:19:933 ] [ Info ] [ ft ] ----------------------------------------------------- [ 23:50:19:933 ] [ Info ] [ ft ] event is WinNew [ 23:50:19:933 ] [ Info ] [ ft ] ev.buf is 7 [ 23:50:19:933 ] [ Info ] [ ft ] nvim_get_current_buf() is 7 [ 23:50:19:933 ] [ Info ] [ ft ] nvim_get_current_win() is 1008 [ 23:50:19:933 ] [ Info ] [ ft ] real_current_win's buf is7 [ 23:50:19:934 ] [ Info ] [ ft ] ----------------------------------------------------- [ 23:50:19:934 ] [ Info ] [ ft ] event is BufWinEnter [ 23:50:19:934 ] [ Info ] [ ft ] ev.buf is 9 [ 23:50:19:934 ] [ Info ] [ ft ] nvim_get_current_buf() is 9 [ 23:50:19:934 ] [ Info ] [ ft ] nvim_get_current_win() is 1008 [ 23:50:19:934 ] [ Info ] [ ft ] real_current_win's buf is7 [ 23:50:19:953 ] [ Info ] [ ft ] ----------------------------------------------------- [ 23:50:19:953 ] [ Info ] [ ft ] event is Syntax [ 23:50:19:953 ] [ Info ] [ ft ] ev.buf is 9 [ 23:50:19:953 ] [ Info ] [ ft ] nvim_get_current_buf() is 9 [ 23:50:19:953 ] [ Info ] [ ft ] nvim_get_current_win() is 1008 [ 23:50:19:953 ] [ Info ] [ ft ] real_current_win's buf is7 [ 23:50:19:954 ] [ Info ] [ ft ] ----------------------------------------------------- [ 23:50:19:954 ] [ Info ] [ ft ] event is FileType [ 23:50:19:954 ] [ Info ] [ ft ] ev.buf is 9 [ 23:50:19:954 ] [ Info ] [ ft ] nvim_get_current_buf() is 9 [ 23:50:19:954 ] [ Info ] [ ft ] nvim_get_current_win() is 1008 [ 23:50:19:954 ] [ Info ] [ ft ] real_current_win's buf is7 [ 23:50:19:954 ] [ Info ] [ ft ] ----------------------------------------------------- [ 23:50:19:954 ] [ Info ] [ ft ] event is OptionSet [ 23:50:19:954 ] [ Info ] [ ft ] ev.buf is 0 [ 23:50:19:954 ] [ Info ] [ ft ] nvim_get_current_buf() is 9 [ 23:50:19:954 ] [ Info ] [ ft ] nvim_get_current_win() is 1008 [ 23:50:19:954 ] [ Info ] [ ft ] real_current_win's buf is7 [ 23:50:19:954 ] [ Info ] [ ft ] ----------------------------------------------------- [ 23:50:19:954 ] [ Info ] [ ft ] nvim_get_current_buf() is 7 [ 23:50:19:954 ] [ Info ] [ ft ] nvim_get_current_win() is 1000可以看到,在 event 触发 callback 函数内 nvim_get_current_win 和 nvim_get_current_buf 都临时被修改了。
测试一下,不开窗口效果呢?
local log = require("logger").derive("ft")
log.info("nvim_get_current_buf() is " .. vim.api.nvim_get_current_buf())
log.info("nvim_get_current_win() is " .. vim.api.nvim_get_current_win())
log.info("-----------------------------------------------------")
local real_current_win = vim.api.nvim_get_current_win()
local newbuf = vim.api.nvim_create_buf(true, false)

local events = {}

for _, v in ipairs(vim.fn.getcompletion("", "event")) do
	if not vim.endswith(v, "Cmd") then
		table.insert(events, v)
	end
end

local id = vim.api.nvim_create_autocmd(events, {
	group = vim.api.nvim_create_augroup("test_ft", { clear = true }),
	pattern = { "*" },
	callback = function(ev)
		log.info("-----------------------------------------------------")
		log.info("event is " .. ev.event)
		log.info("ev.buf is " .. ev.buf)
		log.info("nvim_get_current_buf() is " .. vim.api.nvim_get_current_buf())
		log.info("nvim_get_current_win() is " .. vim.api.nvim_get_current_win())
		log.info("real_current_win's buf is" .. vim.api.nvim_win_get_buf(real_current_win))
	end,
})

-- vim.api.nvim_open_win(newbuf, false, { split = "above" })
vim.api.nvim_set_option_value("filetype", "test123", { buf = newbuf })
vim.api.nvim_del_autocmd(id)
log.info("-----------------------------------------------------")
log.info("nvim_get_current_buf() is " .. vim.api.nvim_get_current_buf())
log.info("nvim_get_current_win() is " .. vim.api.nvim_get_current_win())
[ 23:53:49:058 ] [ Info ] [ ft ] nvim_get_current_buf() is 10 [ 23:53:49:058 ] [ Info ] [ ft ] nvim_get_current_win() is 1000 [ 23:53:49:058 ] [ Info ] [ ft ] ----------------------------------------------------- [ 23:53:49:078 ] [ Info ] [ ft ] ----------------------------------------------------- [ 23:53:49:078 ] [ Info ] [ ft ] event is Syntax [ 23:53:49:078 ] [ Info ] [ ft ] ev.buf is 12 [ 23:53:49:078 ] [ Info ] [ ft ] nvim_get_current_buf() is 12 [ 23:53:49:078 ] [ Info ] [ ft ] nvim_get_current_win() is 1001 [ 23:53:49:078 ] [ Info ] [ ft ] real_current_win's buf is10 [ 23:53:49:079 ] [ Info ] [ ft ] ----------------------------------------------------- [ 23:53:49:079 ] [ Info ] [ ft ] event is FileType [ 23:53:49:079 ] [ Info ] [ ft ] ev.buf is 12 [ 23:53:49:079 ] [ Info ] [ ft ] nvim_get_current_buf() is 12 [ 23:53:49:079 ] [ Info ] [ ft ] nvim_get_current_win() is 1001 [ 23:53:49:079 ] [ Info ] [ ft ] real_current_win's buf is10 [ 23:53:49:079 ] [ Info ] [ ft ] ----------------------------------------------------- [ 23:53:49:079 ] [ Info ] [ ft ] event is OptionSet [ 23:53:49:079 ] [ Info ] [ ft ] ev.buf is 0 [ 23:53:49:079 ] [ Info ] [ ft ] nvim_get_current_buf() is 12 [ 23:53:49:079 ] [ Info ] [ ft ] nvim_get_current_win() is 1001 [ 23:53:49:079 ] [ Info ] [ ft ] real_current_win's buf is10 [ 23:53:49:079 ] [ Info ] [ ft ] ----------------------------------------------------- [ 23:53:49:079 ] [ Info ] [ ft ] nvim_get_current_buf() is 10 [ 23:53:49:079 ] [ Info ] [ ft ] nvim_get_current_win() is 1000这窗口 1001 是什么鬼?临时隐藏窗口?
local log = require("logger").derive("ft")
log.info("nvim_get_current_buf() is " .. vim.api.nvim_get_current_buf())
log.info("nvim_get_current_win() is " .. vim.api.nvim_get_current_win())
log.info("-----------------------------------------------------")
local real_current_win = vim.api.nvim_get_current_win()
local newbuf = vim.api.nvim_create_buf(true, false)

local events = {}

for _, v in ipairs(vim.fn.getcompletion("", "event")) do
	if not vim.endswith(v, "Cmd") then
		table.insert(events, v)
	end
end

local id = vim.api.nvim_create_autocmd(events, {
	group = vim.api.nvim_create_augroup("test_ft", { clear = true }),
	pattern = { "*" },
	callback = function(ev)
		log.info("-----------------------------------------------------")
		log.info("event is " .. ev.event)
		log.info("ev.buf is " .. ev.buf)
		log.info("nvim_get_current_buf() is " .. vim.api.nvim_get_current_buf())
		log.info("nvim_get_current_win() is " .. vim.api.nvim_get_current_win())
        log.info('win count is ' .. vim.fn.winnr('$'))
        log.info('winconfig is ' .. vim.inspect(vim.api.nvim_win_get_config(vim.api.nvim_get_current_win())))
		log.info("real_current_win's buf is" .. vim.api.nvim_win_get_buf(real_current_win))
	end,
})

-- vim.api.nvim_open_win(newbuf, false, { split = "above" })
vim.api.nvim_set_option_value("filetype", "test123", { buf = newbuf })
vim.api.nvim_del_autocmd(id)
log.info("-----------------------------------------------------")
log.info("nvim_get_current_buf() is " .. vim.api.nvim_get_current_buf())
log.info("nvim_get_current_win() is " .. vim.api.nvim_get_current_win())
[ 23:57:49:249 ] [ Info ] [ ft ] nvim_get_current_buf() is 9 [ 23:57:49:249 ] [ Info ] [ ft ] nvim_get_current_win() is 1000 [ 23:57:49:249 ] [ Info ] [ ft ] ----------------------------------------------------- [ 23:57:49:268 ] [ Info ] [ ft ] ----------------------------------------------------- [ 23:57:49:268 ] [ Info ] [ ft ] event is Syntax [ 23:57:49:268 ] [ Info ] [ ft ] ev.buf is 13 [ 23:57:49:268 ] [ Info ] [ ft ] nvim_get_current_buf() is 13 [ 23:57:49:268 ] [ Info ] [ ft ] nvim_get_current_win() is 1001 [ 23:57:49:268 ] [ Info ] [ ft ] win count is 2 [ 23:57:49:268 ] [ Info ] [ ft ] winconfig is { anchor = "NW", col = 0, external = false, focusable = false, height = 5, hide = false, mouse = false, relative = "editor", row = 0, width = 168, zindex = 50 } [ 23:57:49:268 ] [ Info ] [ ft ] real_current_win's buf is9 [ 23:57:49:269 ] [ Info ] [ ft ] ----------------------------------------------------- [ 23:57:49:269 ] [ Info ] [ ft ] event is FileType [ 23:57:49:269 ] [ Info ] [ ft ] ev.buf is 13 [ 23:57:49:269 ] [ Info ] [ ft ] nvim_get_current_buf() is 13 [ 23:57:49:269 ] [ Info ] [ ft ] nvim_get_current_win() is 1001 [ 23:57:49:269 ] [ Info ] [ ft ] win count is 2 [ 23:57:49:270 ] [ Info ] [ ft ] winconfig is { anchor = "NW", col = 0, external = false, focusable = false, height = 5, hide = false, mouse = false, relative = "editor", row = 0, width = 168, zindex = 50 } [ 23:57:49:270 ] [ Info ] [ ft ] real_current_win's buf is9 [ 23:57:49:270 ] [ Info ] [ ft ] ----------------------------------------------------- [ 23:57:49:270 ] [ Info ] [ ft ] event is OptionSet [ 23:57:49:270 ] [ Info ] [ ft ] ev.buf is 0 [ 23:57:49:270 ] [ Info ] [ ft ] nvim_get_current_buf() is 13 [ 23:57:49:270 ] [ Info ] [ ft ] nvim_get_current_win() is 1001 [ 23:57:49:270 ] [ Info ] [ ft ] win count is 2 [ 23:57:49:270 ] [ Info ] [ ft ] winconfig is { anchor = "NW", col = 0, external = false, focusable = false, height = 5, hide = false, mouse = false, relative = "editor", row = 0, width = 168, zindex = 50 } [ 23:57:49:270 ] [ Info ] [ ft ] real_current_win's buf is9 [ 23:57:49:270 ] [ Info ] [ ft ] ----------------------------------------------------- [ 23:57:49:270 ] [ Info ] [ ft ] nvim_get_current_buf() is 9 [ 23:57:49:270 ] [ Info ] [ ft ] nvim_get_current_win() is 1000这里说明一下,即便是 nvim_open_win 没有执行,Neovim 也会新建一个 autocmd windows,使用 win_gettype() 函数可以获取值为 “autocmd”。
-
本地化管理 Github secrets
有这样一个需求,要给自己多个 Github 仓库增加多个仓库 secrets,以便于 Action 中使用。 起初我是手动在每个仓库的设置页面逐一复制粘贴来添加的。但是这样效率明显太低,而且容易出错,此外后期若需要修改, 还得要重新操作。
于是我就想着是否可以使用脚本访问 Github API 来更改,查阅了 GitHub secrets API 文档,也找到了相关信息。 这篇文章就是我使用 Neovim 编辑并批量更新 Github 仓库 secrets 的完整方案。
安装 github.nvim
github.nvim 是一个 GitHub REST API 的 Lua 实现,用于在 Neovim 中访问 Github API。 早些年,我使用 Vim Script 写过类似的 Vim 插件 GitHub.vim, 而 github.nvim 算是 github.vim 的 Lua 重新实现版本,目前也仅仅实现了部分 API,会更具个人使用需要,陆续再实现其他的 API。
可以使用任意 Neovim 插件管理器安装,比如 nvim-plug,
require('plug').add({
  'wsdjeg/github.nvim',
})
当然了,你也可以使用 luarocks 安装:
luarocks install github.nvim使用 github.nvim 访问仓库 secrts
由于 Github 的 secrts API 访问时,传输的数据都是要使用 libsodium 加密,因此需要安装 libsodium,以及对应的 Lua 模块。 这里记录一下 Windows 下安装这两个工具遇到的坑:
从官网下载 libsodium-1.0.20-stable-msvc.zip,解压后, 需要将
libsodium\x64\Release\v143\dynamic目录加入到环境变量PATH内。vim.env.PATH = vim.env.PATH .. ';' .. [[D:\Downloads\libsodium-1.0.20-stable-msvc\libsodium\x64\Release\v143\dynamic]]此时再使用 luarocks 安装 luasodium,需要指定 libsodium 的安装目录:
luarocks install luasodium SODIUM_INCDIR=D:\Downloads\libsodium-1.0.20-stable-msvc\libsodium\include SODIUM_DIR=D:\Downloads\libsodium-1.0.20-stable-msvc\libsodium\x64\Release\v143\dynamic如果提示安装成功后,在 Neovim 内如果使用以下 Lua 脚本,只有最后一个会报错。
local luasodium_ffi = require'luasodium' -- ok
local luasodium_ffi = require'luasodium.ffi' -- uses the FFI API (in a C module) ok
local luasodium_c = require'luasodium.core' -- uses the C API ok
local luasodium_pureffi = require'luasodium.pureffi' -- 失败,因为他使用 `require('ffi').load('sodium')`, 应该是 libsodium
最后一个失败的原因时因为 luasodium 源码文件 lib_loader.lua 中使用了 require(‘ffi’).load(‘sodium’)
– 在luasodium 修复之前,可以临时如下操作 – 将 dynamic 目录里面的 libsodium.dll 改名为 sodium.dll
我也给 luasodium 提交了一个 PR 来解决这个问题。
确保上述 libsodium、luasodium、github.nvim 都安装好了之后,就可以使用以下脚本了:
local secrts = {
  {
    name = 'DOCKER_API_KEY',
    value = '12jdksjdiiwkdjsskkdj',
  },
  {
    name = 'LUAROCKS_API_KEY',
    value = 'ijnuhbygvtfcrdxesz',
  },
}
local repos = {
  'picker.nvim',
  'format.nvim',
  'tasks.nvim',
}
for _, repo in ipairs(repos) do
  for _, secrt in ipairs(secrts) do
    require('github.secrets').update_repository_secret('wsdjeg', repo, secrt)
  end
end
通过上述脚本,就给批量给自己的 Github 仓库设定 secrets,后期如果 API_KEY 修改了, 只需要修改脚本后再执行一次即可。
-
发现 Git 仓库中幽灵文件
在使用 Git 过程中,有时候会遇到这样的情况:某个以前删除的文件,不记得当时删除的 commit message 内容了, 也不记得完整的文件路径,只记得文件部分名称,想要找到是哪一个 commit 删除的,发现比较难。
实际上可以通过下方的命令来时间这一功能,首先使用下面的命令搜索删掉的文件路径包含
src的文件列表:git log --diff-filter=D --summary | rg delete | rg src如果要使用 code-runner.nvim,执行并输出,需要设定 ps 的 runner:
require('code-runner').setup({
    runners = {
        lua = { exe = 'nvim', opt = { '-l', '-' }, usestdin = true },
        ps = { exe = 'powershell.exe', opt = { '-Command', '-' }, usestdin = true },
    },
})
快捷键调用 code-runner 输出:
[Running] powershell.exe -Command - STDIN

--------------------
 delete mode 100644 src/test/hello.c
 delete mode 100644 src/example/delete.c

[Done] exited with code=0, single=0 in 0.916431 seconds
获取到上述文件列表后,通过 git.nvim 执行以下命令,就可以打开 log 列表,列表内回车会分屏展示 commit diff。
:Git log -1 -- src/test/hello.c使用 git-ghosts 拓展
最近,给 git.nvim 增加了一个 git-ghosts 的 picker.nvim 拓展。其实现的原理就是参考上述的命令执行顺序。 先获取已删除文件的列表,回车获取改文件的最后一次 commit 的哈希值,然后执行:
:Git show <commit_hash>参考链接
- https://www.linux88.com/restore-a-deleted-document-in-git/
-
Neovim 中使用 luarocks
- 安装 luarocks
- 在 Neovim 内使用 luarocks
- 使用 nvim-plug 下载 rocks
- luarocks 的限制
- 将插件发布到 LuaRocks
- 模块载入问题
- 排除问题
- Neovim 终端中使用
luarocks 是 lua 常用的包管理器,类似于 python 的 pip。前面使用 Lua 实现了一个 Neovim 的插件管理器,而目前我自己正在维护的插件也都是使用 Lua 来实现的。 因此使用 luarocks 来管理插件,同时又让插件管理器 nvim-plug 支持 luarocks 就显得很有必要了。看了下目前主流的插件管理器 lazy.nvim、rocks.nvim 也是支持 luarcoks 的。
安装 luarocks
在 Windows 下可以使用 scoop 命令进行安装:
scoop install luarocks这里需要注意一下,上述命令会自动安装 lua 5.4,但是 Neovim 内默认使用的是 luajit 兼容的 lua 5.1。因此为了避免下载的 rocks 不兼容。可以再执行以下命令:
scoop uninstall lua
scoop install lua51
安装完成后检查一下:
luarocks config | rg deploy输出内容:
deploy_bin_dir = "D:\\Scoop\\apps\\luarocks\\current\\rocks\\bin"
deploy_lib_dir = "D:\\Scoop\\apps\\luarocks\\current\\rocks\\lib\\lua\\5.1"
deploy_lua_dir = "D:\\Scoop\\apps\\luarocks\\current\\rocks\\share\\lua\\5.1"
在 Neovim 内使用 luarocks
在 Neovim 内使用
:lua命令或者使用 lua 开发 Neovim 插件时, 若想要使用 luarocks 安装的包,其原理就是将 luarocks 所安装的包位置加入到package.path和package.cpath:nvim-plug 中实现这一步骤的逻辑如下:
function M.enable()
    if enabled then
        return
    end
    local ok, _ = pcall(function()
        local luarocks_config = vim.json.decode(
            vim.system({ 'luarocks', 'config', '--json' }):wait().stdout
        )
        package.path = package.path
            .. ';'
            .. luarocks_config.deploy_lua_dir
            .. [[\?.lua]]
            .. ';'
            .. luarocks_config.deploy_lua_dir
            .. [[\?\init.lua]]
            .. ';'
        package.cpath = package.cpath
            .. ';'
            .. luarocks_config.deploy_lib_dir
            .. '\\?.'
            .. luarocks_config.external_lib_extension
        -- 此处,还可以将 luarcoks bin 目录加入到 PATH
        vim.env.PATH = vim.env.PATH .. ';' .. luarocks_config.deploy_bin_dir
    end)
    if ok then
        enabled = true
    end
end
使用 nvim-plug 下载 rocks
可以在添加插件时,指定
type = 'rocks',比如:return { 'wsdjeg/mru.nvim', events = { 'UIEnter' }, opts = { enable_cache = true, ignore_path_regexs = { '/.git/', '/nvim/runtime/doc/', '.mp3$', '.mp4$', '.png$', '.jpg$', '.exe$', 'nvim-mru.json$', 'tags$', }, enable_logger = true, sort_by = 'lastenter', }, type = 'rocks', desc = 'mru(most recently used) files', }参考以上方式添加插件后,nvim-plug 在安装插件时会自动调用
luarocks install plugin_name这一命令。luarocks 的限制
在实现完上述功能后,才发现 luarocks 这个包管理器似乎还有一些限制。比如:
-
不支持同时安装多个插件。
因为 nvim-plug 是使用异步 job 调用外部命令的,因此支持多线程。 但是起初实现后发现,当同时执行多个 luarocks install 命令时, 只有第一个是成功的,后续的命令都有会报这一错误:Error: command ‘install’ requires exclusive write access。
解决的办法是为 luarocks 实现单独的 tasks 序列,逐一执行,这样的话插件的安装会非常慢。一个是单线程,一个是 16 线程 (max_processes = 16)。
-
无法根据 plugSpec 获取的 rtp 目录位置
一个最简单 plugSpec 比如
{ 'wsdjeg/mru.nvim' }, 默认 type 是 git,我是可以获取到该插件默认的 runtimepath 值为plug.config.bundle_dir .. '/' .. 'wsdjeg/mru.nvim', 此时就可以根据这个目录是否存在来判断插件是否已安装。但是,这样一个 plugSpec:
return {
  'wsdjeg/mru.nvim',
  type = 'rocks',
}
将无法获取到默认的 runtimepath 目录位置,因为他的格式是
D:/Scoop/apps/luarocks/current/rocks/lib/luarocks/rocks-5.1/mru.nvim/1.4.0-1最后面这个版本号,除非是 plugSpec 内指定,否则是无法判断到默认的值的。
最终的解决方案是分析 luarocks list 命令的输出内容,返回一个类似与这样的 lua table:
return {
  ['mru.nvim'] = {
    rtp = 'D:/Scoop/apps/luarocks/current/rocks/lib/luarocks/rocks-5.1/mru.nvim/1.4.0-1',
  },
  ['rooter.nvim'] = {
    rtp = 'D:/Scoop/apps/luarocks/current/rocks/lib/luarocks/rocks-5.1/rooter.nvim/1.3.0-1',
  },
}
将插件发布到 LuaRocks
这里主要使用到两个 Github actions:
- googleapis/release-please-action
- nvim-neorocks/luarocks-tag-release
使用
googleapis/release-please-action来自动打 tag 并且新建 GitHub release,可以参考之前的文章《Github 仓库自动 release》。使用
nvim-neorocks/luarocks-tag-releaseGitHub action 自动将 tag 上传到 luarocks.org。在仓库根目录新建文件
.github/workflows/luarocks.yml:name: Push to Luarocks on: push: tags: # Will upload to luarocks.org when a tag is pushed - "*" pull_request: # Will test a local install without uploading to luarocks.org workflow_dispatch: jobs: luarocks-upload: runs-on: ubuntu-22.04 steps: - uses: actions/checkout@v4 - name: LuaRocks Upload uses: nvim-neorocks/luarocks-tag-release@v7 env: LUAROCKS_API_KEY: $存在一个问题,luarocks-tag-release 使用 copy_directories 来复制打包插件的其他文件, 但是 luarocks 一旦使用了 copy_directories 这一设置,就不会复制默认的 doc 文件了。
相关 issue : luarocks/issues/1266
代码逻辑 src/luarocks/build.lua#L344-L363
模块载入问题
neovim 中直接使用 rocks 似乎还有问题,dll 文件载入时会报错,估计跟 luarocks 的包编译方式有关
D:\wsdjeg\my-blog>luarocks list | rg file -A 2
luafilesystem
   1.8.0-1 (installed) - D:\Scoop\apps\luarocks\current\rocks\lib\luarocks\rocks-5.1
然后在 Neovim 内执行
:lua require('lfs')时,报错:E5108: Error executing lua error loading module 'lfs' from file 'D:\Scoop\apps\luarocks\current\rocks\lib\lua\5.1\lfs.dll': 找不到指定的模块。 stack traceback: [C]: at 0x7ff83ac1bdb0 [C]: in function 'require' [string ":lua"]:1: in main chunk实际上这个 dll 文件是存在的:
D:\Scoop\apps\luarocks\current\rocks\lib\lua\5.1>ls
lfs.dll
排除问题
使用 scoop 安装 dependencies,
scoop install dependencies打开 lfs.dll 文件,发现确实是依赖问题:
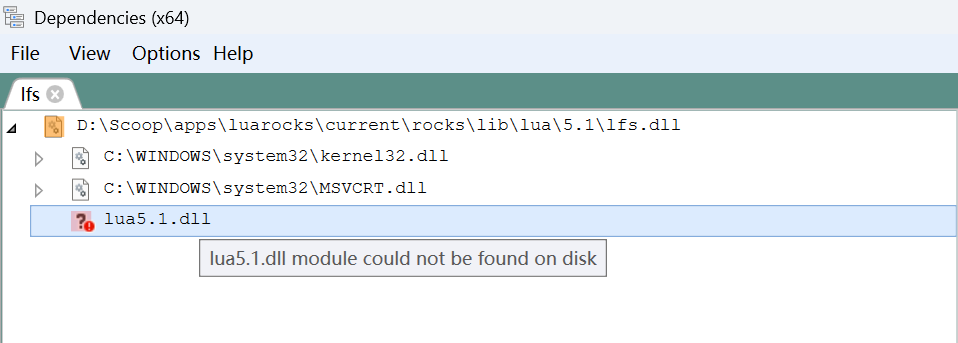
在 lua51 的安装目录里:
D:\Scoop\apps\lua51\current>ls
Microsoft.VC80.CRT  install.json  lua5.1.dll.manifest  lua51.dll           manifest.json
bin2c5.1.exe        liblua5.1.a   lua5.1.exe           lua51.dll.manifest  wlua5.1.exe
include             lua5.1.dll    lua5.1.exe.manifest  luac5.1.exe         wlua5.1.exe.manifest
而 Neovim 中
:lua调用的是:D:\Scoop\apps\neovim\current\bin>ls dbghelp.dll lua51.dll nvim.exe platforms win32yank.exe xxd.exe使用 scoop 安装 luajit:
scoop install luajit看下 luajit 的目录结构
D:\Scoop\apps\luajit/.. 2.1.1762795099-1 current ➛ 2.1.1762795099-1 bin lua51.dll luajit luajit-2.1.1762795099.exe luajit.exe include/luajit-2.1 lauxlib.h lua.h lua.hpp luaconf.h luajit.h lualib.h lib share install.json manifest.json修改
D:\Scoop\apps\luarocks\current\config.lua为:lua_interpreter = "D:/Scoop/apps/luajit/current/bin/luajit.exe" lua_version = "5.1" rocks_trees = { "D:/Scoop/apps/luarocks/current/rocks" } variables = { LUA = "D:/Scoop/apps/luajit/current/bin/luajit.exe", LUA_BINDIR = "D:/Scoop/apps/luajit/current/bin", LUA_INCDIR = "D:/Scoop/apps/luajit/current/include/luajit-2.1", LUA_DIR = "D:/Scoop/apps/luajit/current/bin" }重新安装 luafilesystem:
luarocks install luafilesystem --force此时再使用 Dependencies 查看 lfs.dll:
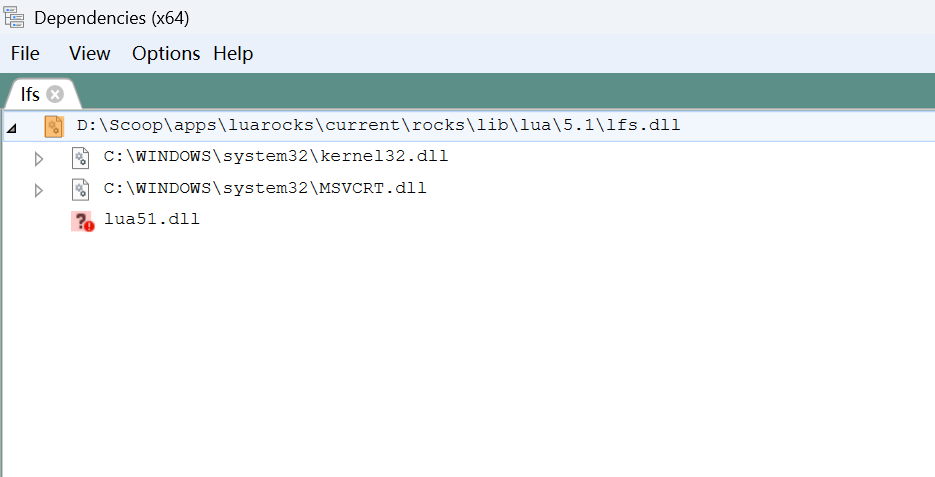
此时在 Neovim 中执行
:=require('lfs')就会看到:{ _COPYRIGHT = "Copyright (C) 2003-2017 Kepler Project", _DESCRIPTION = "LuaFileSystem is a Lua library developed to complement the set of functions related to file systems offered by the standard Lua distribution", _VERSION = "LuaFileSystem 1.8.0", attributes = <function 1>, chdir = <function 2>, currentdir = <function 3>, dir = <function 4>, link = <function 5>, lock = <function 6>, lock_dir = <function 7>, mkdir = <function 8>, rmdir = <function 9>, setmode = <function 10>, symlinkattributes = <function 11>, touch = <function 12>, unlock = <function 13> }Neovim 终端中使用
为了能在 Neovim 内置终端中使用 lua,luajit,luarocks 等,给 nvim-plug 增加这样一个 patch:
diff --git a/lua/plug/rocks/init.lua b/lua/plug/rocks/init.lua
index e336791..58f391d 100644
--- a/lua/plug/rocks/init.lua
+++ b/lua/plug/rocks/init.lua
@@ -71,6 +71,8 @@ function M.enable()
             .. luarocks_config.deploy_lib_dir
             .. '\\?.'
             .. luarocks_config.external_lib_extension
+        vim.env.LUA_PATH = package.path
+        vim.env.LUA_CPATH = package.cpath
     end)
     if ok then
         enabled = true
这样在 Neovim 内置终端内使用 lua 命令,或者 luajit 命令,就会自动读取这两个变量值。
D:\wsdjeg\my-blog>lua
Lua 5.1.5  Copyright (C) 1994-2012 Lua.org, PUC-Rio
> print(require('lfs'))
table: 00000000004DCAC0
>

D:\wsdjeg\my-blog>luajit
LuaJIT 2.1.1762795099 -- Copyright (C) 2005-2025 Mike Pall. https://luajit.org/
JIT: ON SSE3 SSE4.1 BMI2 fold cse dce fwd dse narrow loop abc sink fuse
> print(require('lfs'))
table: 0x01f72937bc70
>
D:\wsdjeg\my-blog>echo print(require("lfs")) | nvim -l -
table: 0x01dcba84a148